None can deny the wandering minstrel's inimitable way with words, nor the manner in which his penchant for embellishment and exaggeration has rendered your triumph over the primal Alexander all the more triumphant─and the insurmountable odds over which you did prevail all the more insurmountable. Reach back into your memory and relive your adventure inside the steel giant as it will live on in the hearts and minds of all who hear the tale!
— In-game description
Alexander - The Heart of the Creator (Savage) is a level 60 raid introduced in patch 3.4 with Heavensward. The raid is also known as A11S.
This is another fight that requires players to pay attention to what the boss is doing in order to dodge mechanics or stand in the correct place to make sure mechanics resolve properly.
Prior to the Fight:
Clock spots should be assigned for the Optical SightSpread Pattern in Phase 1.
Positioning should be decided for Limit Cut (Attack) in Phase 2.
Positioning for Tanks, Healers, and DPS should be assigned for spread circles in Phase 4.
Positioning and strategy should be decided for Limit Cut (Attack) in Phase 4.
Phase 1: 100 - 73%
Phase 1 Abilities
Name
Description
Left / Right Laser Sword
An unmarked 210 degree Static cone AoE on the side of the boss matching the attack name. Deals high damage and inflicts Vulnerability Up.
Whirlwind
High unavoidable party-wide damage.
Spin Crusher
An unmarked 90 degree Static cone AoE from Cruise Chaser's front. Deals high damage and knockback.
E.D.D
An enemy that occasionally appears throughout the fight. Uses two attacks:
Overboost: Summons an Armored Pauldron and begins charging Overboost. If the Armored Pauldron is not destroyed before the cast finishes, E.D.D gains a powerful Damage Up.
Self-Detonate: If not defeated after 20 seconds, E.D.D will self-destruct, wiping the party.
Two Giant Orbs:Spread Pattern - A massive unmarked Static circle AoE that hits everything except the very edge of the arena. Later combined with spread circles.
Ring of Eight Orbs:Stack Pattern - A small unmarked Static circle AoE is dropped on the location each player was standing when Optical Sight finished casting.
Scattered Ring of Orbs:Rotation Pattern - Two explosions will rotate clockwise around the edges of the arena, firing four times before lastly hitting the center. Later combined with spread circles.
Players will primarily need to look out for Laser Sword and Optical Sight, as failure to properly dodge will inflict Vulnerability Up if not outright kill the player. While Laser Sword can be dodged simply by moving to the opposite side of the cast, Optical Sight will require keen eyes and quick feet.
Players should rotate clockwise slightly off-center while those targeted by spread circles move to the far edges.The Spread Pattern (two giant orbs) must be dodged by all players immediately running to the edge of the platform. Players are not given much time to escape, so Sprint or any mobility skills are extremely helpful.
The Stack Pattern (balanced ring of orbs) is simply avoided by having all players stack together prior to the cast, then moving away a short distance afterwards.
The Rotation Pattern (scattered ring of orbs) requires players to stack in the center prior, then move to the location of one of the first explosions and chase the AoEs clockwise. Once the center explodes, it is safe to move back to the center again.
After 87%, one random DPS and one random healer will be marked with spread circles. These players should move all the way to the edge to leave the center safe for the rest of the party.
Once Cruise Chase hits 93% HP, it will summon E.D.D. DPS must kill this enemy as quickly as possible, as well as breaking its Armored Pauldron when it attempts to cast Overboost. Cruise Chaser will also cast Laser Sword at this time, so DPS must pay attention at which side to dodge while simultaneously attacking E.D.D.
Once Cruise Chase is pushed below 73% or it reaches the end of its rotation, it will become Invincible and begin Phase 2.
Phase 1 Rotation
HP Percent
Attack
Strategy
100% - 93%
Left / Right Laser Sword
Dodge to the opposite side of whichever the name of the cast indicates.
Optical Sight
Will be a random pattern. Observe the visual and dodge the explosions.
Whirlwind
Heal check.
93% - 87%
Spin Crusher
The main tank must move behind Cruise Chaser to dodge this. If the Boss's HP is pushed below 93% early, this attack will happen after Laser Sword.
E.D.D
DPS must focus and kill this enemy ASAP. When Overboost begins casting, the Armored Pauldron must be destroyed before the cast finishes.
Left / Right Laser Sword
While attacking E.D.D, keep an eye towards Cruise Chaser to know which side to dodge the Laser Sword.
Whirlwind
Left / Right Laser Sword
Dodge as usual.
GA-100
The off-tank should run to the opposite side of the arena as the rest of the party.
87% - 73%
Optical Sight x3
Cruise Chaser casts each pattern once, but in a random order. The Spread and Rotation patterns will now mark players with spread circles. The party should stack in the center prior to each cast.
Whirlwind
Left / Right Laser Sword
Phase 2 Start
Phase 2 - 73% - 61%
Cruise Chaser disappears and prepares a deadly attack against the group.
If brought to 61% prior to casting Limit Cut, Cruise Chaser will immediately skip to Blastoff and into Phase 3.
Phase 2 Abilities
Name
Description
Limit Cut (Attack)
All eight players are given unique number markers 1 to 8. Cruise Chaser will attack each player in the order of the numbers. If number markers are missing (due to players being dead at the time), Cruise Chaser will attack random players.
Cruise Chaser will teleport behind odd-numbered players (marked with blue), sending a large cleave in the direction the player is facing. Deals minor knockback and inflicts Magic Vulnerability Up.
Cruise Chaser then charges at the next even-numbered player (marked with red) in the order. This charge inflicts Magic Vulnerability Up and deals heavy knockback unless the player is facing Cruise Chaser.
Photon
Sets the HP of specific players to 1. The players are chosen based on job role and phase.
Blastoff
Four Open Ducts appear. Players that don't use these Open Ducts to jump onto Cruise Chaser will be knocked off the platform to their death. Is then followed by an Active Time Maneuver.
Aetheroplasm
A giant green orb that attaches a chase tether to a player. If it collides with a player, it explodes for AoE damage and leaves behind a puddle.
The Aetheroplasm shrinks over time, reducing the damage it deals once it bursts. The Aetheroplasm shrinks a total of three times, after which it will automatically explode.
If two puddles created by Aetheroplasms overlap, they will explode and wipe the party.
Small drones that aim several Static line AoEs at random players.
Eternal Darkness
Unavoidable party-wide damage. If any Lapis Lazuli remain, the party will wipe.
Two examples of positioning for Limit Cut.
Limit Cut positioning can be handled in many ways based on group preference, however there are three consistent goals with each strategy:
Odd numbered players must face towards a wall to prevent cleaving the party.
Even numbered players must face towards the player directly before them in the attack order.
No other players can be in a line with the odd and even numbered pair.
Due to the Magic Vulnerability Up, no player can survive two hits. This debuff can be cleansed with Esuna, but should only be done in the case that a number marker is missing.
After surviving Limit Cut, the other notable attack is Photon.
In this phase, Photon will set the off-tank, one random healer, and two random DPS's HP to 1. If the off-tank is dead at the time, the main-tank's HP will instead be set to 1, likely resulting in instant-death. Healers will need to refill the party's health quickly as this is always followed by a Whirlwind.
The phase will end with a Blastoff which functions exactly as it does in the normal version of the fight.
If Cruise Chaser is above 61% health, they will cast Limit Cut and become Invincible once again. Instead of attacking players, Cruise Chaser summons four Lapis Lazuli which must be destroyed as quickly as possible.
During this time, players will get tethered by Aetheroplasms. Players must pull these orbs to the edges of the arena, but also letting enough time pass for the Aetheroplasms to shrink to a more surviveable size. A total of five Aetheroplasms may be spawned in this phase, and each must be burst in different spots to prevent the resulting puddles from overlapping and thus exploding.
Destroy all the Lapis Lazuli while dealing with the onslaught of attacks and AoEs until Cruise Chaser begins casting Eternal Darkness, indicating the start of Phase 3.
Phase 2 Rotation
Attack
Strategy
Limit Cut (Attack)
Spread out in whatever desired positioning the party has decided, being careful not to hit other players with attacks.
Photon
The off-tank, one healer, and two DPS will have their HP set to 1. Healers must simply heal them back up before the next cast.
Whirlwind
Keep healing the party.
Left / Right Laser Sword
Dodge as usual.
Blastoff
Use the Open Duct, then succeed the Active Time Maneuver.
Limit Cut (Lapis Lazuli)
Four Lapis Lazuli are spawned. Players must start dealing damage to these and destroy them as quickly as possible.
Aetheroplasm
Always tethers to the off-tank. Should be placed between two of the Lapis Lazuli opposite to where the Aetheroplasm spawns.
Whirlwind
Aetheroplasm x2
The two tethered players should split to different areas of the arena. Be careful about running near the boss at it will begin casting Laser X Sword.
Laser X Sword
Both tanks should mitigate and stand next to each other, aiming this attack towards a wall.
Aetheroplasm x2
Try to find a spot away from other puddles to prevent wiping the party.
Left / Right Laser Sword
Whirlwind
Eternal Darkness
If any Lapis Lazuli remain during this cast, the party will wipe.
All players will be debuffed with Pyretic for the entirety of the phase. Unlike other versions, this only deals ~500 damage per action which healers must handle.
Limit Cut (Shield)
Cruise Chaser becomes Invincible and creates a destructible directional shield. This shield is invulnerable to damage unless the player is standing directly in front of it.
Blassty Charge
Cruise Chaser charges at a random player, dealing damage and Bleeding to players in a line. Will deal heavy knockback unless players are facing Cruise Chaser.
E.D.D
Now after Overboost finishes casting or is interrupted, follows up with Beam Saber: A tankbuster then followed by two dodgeable line AoEs in the same direction.
While all players will be debuffed with Pyretic, damage is not lethal and must be pushed through to resolve the phase. Healers will need to be active to keep the party alive.
However, Cruise Chaser will cast Photon three times, which will result in instant death to Pyretic if the player targeted is actively moving or attacking at the time. Healers will need to be quick after each cast of Photon as Cruise Chaser will always target players needed to handle the next ability.
The first Photon targets the off-tank, then follows up with Laser X Sword
The second Photon targets all DPS, and at same time spawns an E.D.D.
The final Photon targets one random healer, then follows up with a Whirlwind.
The E.D.D in this phase will use a Beam Saber immediately after Overboost which must be mitigated and side-stepped, as the following two-hits are extremely lethal.
Once brought to 45% health, Cruise Chaser will use Blastoff once again and begin the final phase.
Phase 3 Rotation
HP Percent
Attack
Strategy
61% - 53%
Left / Right Laser Sword
Whirlwind
Extra healing will be necessary to keep up against the Pyretic damage.
Spin Crusher
Optical Sight
Limit Cut (Shield)
Move to the front of the shield and destroy it quickly.
Blassty Charge
Spread out in a circle around Cruise Chaser and face it to limit the damage between players.
53% - 45%
Photon
Always targets the off-tank. Healers must refill the off-tanks health in preparation for the next attack.
Laser X Sword
Both tanks should stand together and mitigate.
Photon + E.D.D
All DPS should sheathe their weapons, waiting for healers to restore their health before attacking the E.D.D. The off-tank should mitigate when Overboost is cast and prepare to sidestep Beam Saber.
Whirlwind
Healers must keep all the DPS alive.
Left / Right Laser Sword
Photon
Always targets one healer. Both healers should sheathe temporarily and let the untargeted healer handle the missing health.
Whirlwind
Blastoff
Don't miss the Open Ducts!
Phase 4 Start
Phase 4: 45% - 0%
Multifield Pillar health is shown in the Duty Info.
Three Multifield pillars appear: one in the Northeast, Northwest, and South. The walls of the arena will also be destroyed, creating a fall hazard for the party.
Phase 4 Abilities
Name
Description
Multifield Damage
Multifield Pillar
Three pillars around the edges of the arena that must be protected. If all three pillars are destroyed, the floor will collapse and the party will wipe.
NA
Optical Sight
While the patterns are the similar, the spread circles change and will deal heavy damage to the Multifield Pillars if hit.
Spread Pattern now targets six players with spread circles— two tanks, two healers, and two random DPS.
Rotation Pattern functions identically. Always targets one healer and one DPS with spread circles.
Stack Pattern now targets four players with spread circles— both tanks and two random DPS.
Will destroy any pillar too close to the flare marker. All pillars take 15 damage regardless of distance.
15 damage to all pillars— 100 damage if within ~5y.
Laser X Sword
Will instantly destroy any pillars hit.
100 damage to pillars in range.
Limit Cut (Attack)
Instantly destroys any pillars hit by a cleave or charge.
100 damage to pillars hit.
E.D.D
Beam Saber will instantly destroy pillars if pointed in their direction.
100 damage to pillars hit.
Blassty Charge
Instantly destroys any pillars hit by the charge.
100 damage to pillars hit.
How to position for Optical Sight'sSpread Pattern without damaging other players or pillars.
The top priority of this final phase will be to keep the Multifield Pillars intact as long as possible to give time for the group to destroy Cruise Chaser. The boss should be tanked to the north between the players to avoid risking hitting pillars with dangerous attacks such as Laser X Sword.
The first attack, GA-100 should be moved to the edge between pillars to avoid destroying one completely. Losing a pillar early results in other pillars taking greater damage from Whirlwind.
The following two Optical Sights will always be Spread Pattern and Rotation Pattern in a random order. Tanks, healers, and DPS should have predetermined areas between pillars to move spread circles to in order to prevent overlap between other players or pillars.
After Laser X Sword, the next Optical Sight will always be Stack Pattern. Players should stack together away from pillars prior, then move away from the explosion area towards designated spread circle spots at the edge.
The first Photon in this phase serves as a body check, as it will hit all players except the main tank. If a single player is dead during this time, the Main Tank will be hit in their stead and likely die instantly. Several Static line AoEs will be going out repeatedly from the Clasters, forcing players to stay on their toes to survive.
After Whirlwind, players should start making their way over to the pillars in preparation for Propeller Wind. Failure to hide behind a pillar in time will cause a long-lasting Confused debuff that will severely cut into the time needed to position for Limit Cut (Attack).
Two options for Limit Cut positioning while keeping all pillars up. The left is safer but requires faster repositioning; the right gives more time at a higher risk to player and pillars.
Limit Cut (Attack) will be the most dangerous attack of the entire phase, requiring players to aim Cruise Chaser away from both the pillars and other players while at the same time avoiding the knockback as it may push players off the platform.
Odd-numbered players should stand a short distance away from the edge to compensate for the knockback. Alternatively, Arm's Length or Surecast can be used with precise timing.
As there are only three spaces between pillars and four pairs of players, a common strategy is to have the 7-8 numbered pair to swap positions with the 1-2 pair after that pair has taken their hits.
Alternatively, two swaps can be done— with 1-2 swapping with 5-6 and 3-4 swapping with 7-8, with all even-numbered players aiming Cruise Chaser's charge to the same gap between pillars.
If the party survives Limit Cut (Attack), the rest of the phase is mostly smooth sailing.
A Laser X Sword is followed by an E.D.D + Photon that targets all 4 DPS, but without Pyretic, there is no need to slow damage output. The off-tank must remember to not only mitigate Beam Saber but aim and side-step away from any pillars.
Afterwards, a Limit Cut (Shield) and a Blassty Charge will require players to once again aim Cruise Chaser away from any pillars.
Players have one last chance to defeat Cruise Chaser through its normal abilities before it casts a GA-100 that will destroy all remaining pillars regardless of health.
Phase 4 Rotation
Attack
Strategy
GA-100
The off-tank should run to the edge between two pillars while the rest of the party moves to the opposite side.
Optical Sight x2
Will always be Spread Pattern and Rotation Pattern but not in that order. Tanks, Healers, and DPS should place spread circles in their designated areas between pillars.
Whirlwind x2
Healers must keep the group alive. If one of the pillars was destroyed, these Whirlwinds will do a lot more damage to the remaining pillars.
Laser X Sword
Ensure the boss is facing away from pillars. Tanks must stack together and mitigate.
Optical Sight
Always a Stack pattern. Spread circles will target both tanks and two DPS, who can position in the same spots as the Spread Pattern.
Photon + Clasters
All players except the main tank will have their HP set to 1. If any player is dead, the main tank will get targeted and likely die.
Whirlwind + Clasters
Healers must keep all player's health topped up while dodging the Static line AoEs. Begin moving towards the pillars to dodge the next attack.
Propeller Wind
Hide behind the pillars to avoid line of sight from Cruise Chaser.
Limit Cut (Attack)
Aim all attacks away from the pillars using whichever method the party prefers.
Laser X Sword
Ensure this attack is aimed away from the pillars.
Photon + E.D.D
Photon targets all four DPS, but can simply be healed as normal. Point E.D.D away from any pillars to prevent destruction through Beam Saber.
Whirlwind
Limit Cut (Shield)
Move to and destroy the shield.
Blassty Charge
Spread around Cruise Chaser, but avoid being in line with any pillars. Face the boss to avoid knockback.
Spin Crusher
Face the boss away from any pillars and move behind the boss to dodge.
.png)
 2
2  4
4 
 30
30  The Echo
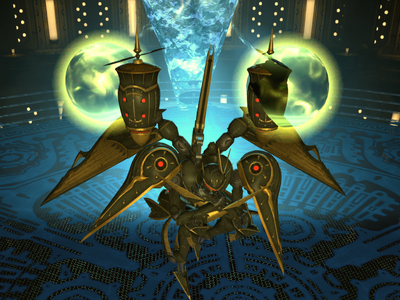 The Spread pattern visual. (Two Giant Orbs)
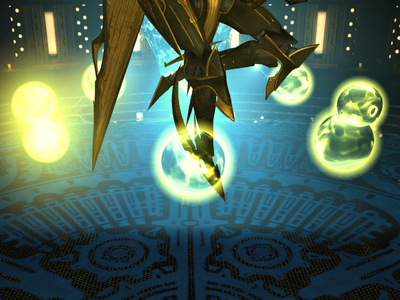 The Stack pattern visual. (Balanced Ring)
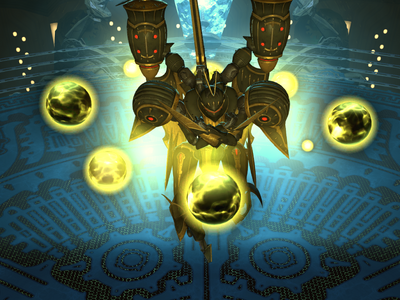 The Rotation pattern visual. (Scattered ring)


 Treasure Coffer 1