| Mechanic | Description |
|---|---|
| Pyromagicks | Spawns three "exaflare" markers on one wall, leaving gaps, followed by two markers in the previous safe zones. Another two sets of exaflares will spawn in the same pattern. An easy way to avoid these is at the wall where they spawn. |
| Lamp Lighting | Immediately before the third set of exaflares start resolving, the boss will face a random player and used a telegraphed frontal line AoE. |
The Merchant's Tale
Jump to navigation
Jump to search
See also: The Merchant's Tale (Advanced) and Another Merchant's Tale
The Merchant's Tale

- Level
- 90 (Sync: 100)
- Item Level
- 0 (Sync: 765)
- Difficulty
- Normal
- Party size
- Flexible
1-4 man • 1-4
- Unsyncing
- Not Allowed
- Time limit
- 90 minutes
- Phoenix Down
- Available
- Duty Finder
- V&C Dungeon Finder
- Tomestones
 40
40  25
25 - Req. quest
- A Spellbinding Read
- Entrance
- The Maiden's Home (X:6.0, Y:5.9)
- Region
- ???
- Patch
- 7.45
- Links
- GT TC
Your latest odd job commission brings you together with one Y'nazqha, a gleaner who finds herself in possession of an unusual book inherited from her father and mentor. It contains a rendition of The Merchant's Tale, a fable passed down through generations in Corvos. While the beautifully illuminated pages of the manuscript set it apart from common storybooks, its most singular feature is the enchantment which can pull the very mind of its readers into the story.
And so it is you are thrust into the role of bodyguard for Y'nazqha, who becomes the eponymous merchant while journeying within the tale. Together you must travel through a world steeped in folklore and find a treasure of immeasurable worth─treasure grand enough to stir even the most hardened heart.
— In-game description
The Merchant's Tale is a level 90 variant dungeon introduced in patch 7.45 with Dawntrail.
Level Sync
Unlike the three previous variant dungeons, The Merchant's Tale allows players to level to up to 100.
The level of all participants will be adjusted upwards to 100, and item level will be adjusted upwards or downwards to 765. Gear is not item level synced; instead, players are given fixed stats (per equipment slot) appropriate to their job. This also means materia bonuses will be ignored, regardless of the item level of gear affixed with materia. Please ensure that a full set of gear is equipped, as empty equipment slots will provide no stats.
Experience will be gained based on a player's unsynced level and rewarded to the class or job equipped upon defeating the boss and completing the duty. Players with an unsynced level of 100 or above will receive Allagan tomestones as a reward.
Objectives
The party may unlock up to one entry in the Corvosi Folklore Record per instance.
The left path is the first answer option (residential area), the middle path is the second (great gate), and the right path is the third (marketplace).
| # | Icon | Name | Path | Solution |
|---|---|---|---|---|
| 1 | A Land of Abundance | Left | After the first boss, interact with the damaged fence next to the personal spoils coffer. Wait by the bird nest for the Willful Wind to spawn and attack it before it finishes casting Flee. | |
| 2 | A Carpet Soars | Left | After the first boss, interact with the damaged fence next to the personal spoils coffer. Ignore the Willful Wind and allow it to steal the apple. Continue normally. | |
| 3 | A Foe of Flame | Left | After the first boss, take the main path through the gate and allow the Wisp to hit you with its AoE while standing next to the damaged stone railing on the left side. Take the path through the now broken railing. | |
| 4 | Fragrant Fruits | Left | After the first boss, take the main path through the gate and continue forward without any interactions. | |
| 5 | The Sunlit Expanse | Right | After the first boss, tell Y'nazqha "The seaweed won't steer us wrong." Allow the goobbue to cast Inhale and swallow the 4 clusters of colorful rocks around the island. | |
| 6 | Treasure at the Ocean's Floor | Right | After the first boss, tell Y'nazqha "The seaweed won't steer us wrong." Kill the goobbue without it swallowing all the rocks. | |
| 7 | Ruler of the Radiant Sea | Right | After the first boss, tell Y'nazqha "I'd fancy a stroll on the beach." After killing the first pack, interact with the Giant Conch Shell. | |
| 8 | The Ocean's Bounty | Right | After the first boss, tell Y'nazqha "I'd fancy a stroll on the beach." Do not interact with the Giant Conch Shell and continue to the boss. | |
| 9 | Valley of Extremes | Middle | After the first boss, tell Y'nazqha "Let the mushrooms guide us true!". The Stone Puppet (golem) will cast Magentic Rock, a small AoE around the main threat. Have this AoE hit the three large rock clusters around the cave. | |
| 10 | A Blade Engraven | Middle | After the first boss, tell Y'nazqha "Let the mushrooms guide us true!". Kill the Stone Puppet normally without lighting the rock clusters. | |
| 11 | Master of the Unyielding Blade | Middle | After the first boss, tell Y'nazqha "Floating rocks warrant a closer look." Stand near the three large rocks protruding from platforms until they start to glow. Note: There is a path to the west side of the room to get to the upper rock. | |
| 12 | In a Harsh Nature | Middle | After the first boss, tell Y'nazqha "Floating rocks warrant a closer look." Do not stand near the large rocks. | |
| 13 | The Eye of the Beholder | Right | After the first boss, tell Y'nazqha "The seaweed won't steer us wrong." Once you reach the Shimmering Stage altar prior to the seaweed barrier, perform Bow (/bow) to make five colored panels appear. Then, type: /say I am returned!. The panels will light up and shapes will appear - stand on four of them, each in order: Coral (green) - Conch (purple) - Starfish (magenta) - Pearl (blue). Image of solution.
|
Enemies
Left Path
- Hungry Jackal
- Tree Spirit
- Furball
- Red Bomb
- Sweet-rat
- Bandari Weed
- Great Unweaver
- Shrouded Lady
- Grapevine Vagabond
- Well-fed Wolf
- Airy Wisp
- Will of the Wind
Middle Path
- Thief
- Hungry Jackal
- Sunken Spirit
- Unsettled Spirit
- Shamshir-arm
- Stone Puppet
- Seeing Stone
- Ferocious Ferrobeast
Right Path
Bosses
Failing any boss mechanic will result in a ![]() Vulnerability Up debuff.
Vulnerability Up debuff.
First boss, found on the left and right paths. The right path is guaranteed to lead to the Genie, while the left path will lead to this boss if the party did not go down the path with apples. On the right path, the boss's mechanics will change depending on whether the Self-destruct AoE from the Blue Bombs (used upon death) hit the large blue rock formation directly to the right of where the bombs spawn.
| Mechanic | Description |
|---|---|
| Fabulous Firecrackers | The boss will brandish cannons on both arms. The glowing side will be hit with a late-telegraphed half-room cleave, while the non-glowing side will be hit with a smaller, 60 degree cleave originating from the boss. |
| Parade of Wonders | Party-wide magical damage. |
| Spectacular Sparks | A set of cannons will appear on the east or west wall, followed by a second set on the opposite wall. These will do late-telegraphed line AoEs in the order they spawned, leaving alternating gaps in between to dodge. |
| A Sailor's Tale | Spawns three lanes on the arena and three Airships at the start of each lane. Parts of each lane will glow purple, and the lanes will also be joined. The glowing regions will denote where the airships will late travel through as a line AoE (wider than the size of the lane). Initially, there will be two safe spots. |
| Chart Course | The boss will tether one of the levers near each lane connector, causing the airship on that lane to travel straight instead of switching lanes. This leaves only one safe spot for the Voyage line AoEs. |
| Explosive Ending | Party-wide magical damage. |
The battle then diverges depending on which path this boss is fought or previous interactions.
| Mechanic | Description |
|---|---|
| Aetherial Blizzard | Several Dousing Spirits will spawn on adjacent walls, then each begin casting a late-telegraphed line AoE in front of them. Each wall will have two gaps, creating four small square safe spots. |
| Lamp Oil | The Dousing Spirits will respawn in a different pattern and use the same attack, which is combine with five circle AoE telegraphs (one middle and on each corner), which limits the number of safe squares down to two. |
| Mechanic | Description |
|---|---|
| Rainbow Road | Spawns two large adjacent circle AoE telegraphs. After these resolve, a rainbow will originate from them and end on the location where a follow-up late-telegraphed AoEs of the same size will resolve. The follow-up AoEs will always be adjacent to each other. |
| Fanning Flame | The Rainbow Road sequence repeats again but is combined with this attack, which are four alternating conal AoE telegraphs, followed by another four telegraphed AoEs in the previous safe spots. This require the party to dodge the second set of cones after the final circle AoEs resolve. |
The rest of the encounter is shared between the paths.
| Mechanic | Description |
|---|---|
| Fanning Flame | Four alternating conal AoE telegraphs, followed by another four telegraphed AoEs in the previous safe spots. Used immediately after the second Chart Course. |
| Spectacular Sparks + Fabulous Firecrackers | A fast combination of both previous attacks. Fabulous Firecrackers resolves immediately after the second set of cannon AoEs. |
| Supernatural Surprise | Party-wide magical damage. |
| Rub Burn | Telegraphed physical tankbuster. |
First boss, found on the left and middle paths. The middle path is guaranteed to lead to the Rukhkh, while the left path will lead to this boss if the party went down the path with apples. On the middle path, the boss's mechanics will change depending on whether the Water III AoE from the Unsettled Spirit hit the bombs in the left room, immediately before the boss.
| Mechanic | Description |
|---|---|
| Sphere of Sand | Party-wide magical damage and spawns three untargetable sand balls in an equilateral triangle around the center. |
| Sandplume | Two sets of telegraphed conal AoEs with gaps in between. Two of the sand balls will be hit and enlarge, indicatred with The spheres of sand grow massive in size... |
| Sand Burst | Each sand ball will release a late-telegraphed point-blank AoE (Sphere Shatter) around itself. The ones from the larger balls will be much larger. Melee range is not safe. |
| Sphere of Sand + Banishing Mist + Sandplume + Sand Burst | Spawns another triangle of sand balls, but one will disappear after a few seconds (The spheres of sand fade out of sight...). The rest of the mechanic resolves as before, but players will need to remember where the invisible sand ball is and whether it is hit by a cone find the safe spots from Sand Burst. |
| Banishing Mist | The boss will disappear, begome untargetable, and leave behind moving white particle effects, denoting where it will emerge a few seconds later and use a massive, late-telegraphed point-blank AoE. |
The battle then diverges depending on which path this boss is fought or previous interactions.
| Mechanic | Description |
|---|---|
| Windborne Seeds | Summons 8 seeds in a 3x3 grid, leaving one cardinal empty. The boss will use Banishing Mist to make the seeds disappear. Players must remember the area without a seed for later. |
| Dry Typhoon | Spawns several conal AoE telegraphs in a rotating pattern around the arena. Dodge into the first telegraph after it disappears, then run around the middle back to the starting spot, because another set of telegraphs will spawn in the same order and location. |
| Seedsprout | The seeds will become visible again and each use a late-telegraphed point-blank AoE, then withdraw. Dodge in the area without a seed. |
| Mechanic | Description |
|---|---|
| Beaksbane | The thieves from earlier will reappear and spawn three circle AoE telegraphs, followed by another three circles in the previous safe spots. Being hit by these will inflict a 15-second cleansable |
| Biting Scratch | Another two sets of circle AoEs will spawn. The boss will also face a random player and use a late-telegraphed wide frontal conal AoE. Get behind while avoiding the poison bombs. |
| Mechanic | Description |
|---|---|
| Big Burst | The thieves from earlier will reappear and spawn three bombs, each of which do telegraphed proximity AoE magical damage. |
| A deep rumbling sound comes from the cliffs... | Arrows will spawn from the slope in the background, indicating that half of the arena will be hit by rolling boulders. |
| Biting Scratch | Another 3 lanes of arrows will spawn, leaving safe gaps in between. The boss will also face a random player and use a late-telegraphed wide frontal conal AoE. Get behind while being in a safe lane. |
The rest of the encounter is shared between the paths.
| Mechanic | Description |
|---|---|
| Sphere of Sand + Banishing Mist + Sandplume + Sand Burst | Similar as before, but all three sand spheres will disappear. Two will still be hit by cones and emit much larger AoEs later. |
| Streaming Sands | Party-wide magical damage. |
| Banishing Mist + Biting Scratch | Similar to before with the boss disappearing, but will immediately follow the large point-blank AoE with Biting Scratch. |
 Bewitching Flame: The Pari of Plenty
Second boss of the left path. Shortly after pulling the boss, the arena will be surrounded with a dangerous AoE that inflicts ![]() bleeding.
bleeding.
| Mechanic | Description |
|---|---|
| Heat Burst | Party-wide magical damage. |
| Flying Carpet | Spawns an untargetable Flying Carpet that is used for mechanics throughout the fight. |
| Fireflight | Briefly shows three lines with magic carpet symbols, indicating the trajectory of the boss as three sequential late-telegraphed line AoEs (Carpet Ride). |
| Sun Circlet | After the boss finishes charging, it will use a very fast cast of a donut AoE. Determine the boss's ending position when it shows the line trajectories and get close to it at the end. |
| Left/Right Fireflight: Two Nights | The boss shows a narrow line AoE telegraph, followed sequentially by two rotation indicators (blue for counterclockwise, orange for clockwise), which indicates how the initial AoE will sweep to make a half-room cleave. To solve:
The name of the cast indicates the location of the initial AoE telegraph: "Left" for west and "Right" for east. |
| Charming Baubles | Spawns a red gem on a tile that will use a telegraphed plus-shaped AoE. This is combined with Fireflight, during which two more gems will spawn and resolve in order. The third gem's AoE will bisect the safe spot of the Sun Circlet donut. |
The fight then diverges based on the route.
| Mechanic | Description |
|---|---|
| Gale Force | Five untargetable Capricious Chambermaid adds will spawn and travel to the corners and centers of the arena, each using a large telegraphed point-blank AoE. The telegraphs will initially cover all of the arena. |
| A massive bird seems to be fighting on your behalf! | The Legendary Bird from before will use a line AoE through one diagonal that will defeat three of the adds and leave two opposite corners safe from their AoEs. The remaining two adds will reposition and cast Gale Force again, but the bird will defeat them before they go off. |
| Mechanic | Description |
|---|---|
| Transcendent Flight | An untargetable Capricious Chambermaid adds will spawn and then be targeted with a large circle AoE telegraph, also spawning the Legendary Bird from before. The bird will tether the chambermaid and pounce on it four more times as large, late-telegraphed circle AoEs. The chambermaid will reposition each time it is pounced on, so take note of where it is. |
| Mechanic | Description |
|---|---|
| Strong Wind | An untargetable Summoned Spirit add will spawn and use a massive telegraphed circle AoE on one area, with arrow indicators denoting where it will move later. The AoE will spawn a tornado that will move there. This attack is then repeated but combined with two plus-shaped AoEs from Charming Baubles. |
| Mechanic | Description |
|---|---|
| Four Magic Carpets | Spawns four untargetable Flying Carpets. |
| Charming Baubles | Spawns three red gems on different lanes, leaving one lane safe. |
| Thieves' Weave | The magic carpets will cover each gem, with one magic carpet covering nothing. The magic carpets will then exchange places three times. Players will need to keep track of which carpet does not have a gem within, as they will use Unravel and the gems will immediately resolve as late-telegraphed plus AoEs. |
Afterwards, the following mechanics are shared regardless of the route.
| Mechanic | Description |
|---|---|
| Left/Right Fireflight: Three/Four Nights | Similar to before, but now has three or four half-room cleaves instead of two (based on the cast name). Stay or swap sides after each one as necessary. |
| Spurning Flames | Party-wide magical damage and gives the boss a |
| Impassioned Sparks | Spawns four sets of expanding circle AoE telegraphs, each centered on random tiles. The AoEs will resolve once they become slightly larger than the size of the tile. |
| Scouring Scorn | Party-wide magical damage and removes the Fury buff. |
Fang of the Lion: The Lone Swordmaster
Second boss of the middle path. Shortly after pulling the boss, the arena will be surrounded with a dangerous AoE that inflicts ![]() bleeding.
bleeding.
| Mechanic | Description |
|---|---|
| Malefic Quartering | Gives each player a 33-second |
| Vanishing Horizon | Two opposite telegraphed 90 degree cleaves, then two more telegraphed cleaves hitting the initial safe spots. |
| Will of the Underworld | The arena will be split in half, one half being hit with an eastward-directed AoE, and the other westward-directed. Players must go to the half that prevents their vulnerable sector from facing the AoE origin, or they will take much greater damage. |
| Crusher of Lions | The arena will be split into four quadrants, each being hit with a directional AoE from the center. Players must go to a quadrant that prevents their vulnerable sector from facing the AoE origin. |
| Earth-rending Eight | Two telegraphed circle AoEs near opposite corners, immediately followed with telegraphed 8-way "starburst" line AoEs in the same locations. |
| Waiting Wounds | Spawns three vertical sets of three circle AoEs, each covering a little over a third of the arena. Start in the third set that spawns and dodge into the first. |
| Heavens' Confluence | Marks a player for a spread AoE, which is combined with a telegraphed point-blank into donut AoE (or vice versa). |
| Malefic Quartering | Now gives each player a 48-second |
| Unyielding Will | Each player is targeted with an L-shaped AoE. If the AoE will hit a vulnerable sector, they should move through the AoE telegraph (flipping the L) so it hits the opposite (safe) side. Prior to the AoE resolving, each player will be |
| Steelsbreath Release | Party-wide physical damage. Combined with several additional effects based on the route (see following). |
The fight then diverges based on the route.
| Mechanic | Description |
|---|---|
| Negative / Positive Charge | Each player will be inflicted with a 34-second |
| Concentrativity | Physical damage and a telegraphed knockback from the boss. If the player is standing on a quadrant opposite their debuff, the knockback will be very weak. However, if standing on a quadrant matching their debuff, they will be knocked into the wall. This knockback can also be prevented with knockback immunities, but since this attack is used twice in proximity, it will only work for one. |
| Mechanic | Description |
|---|---|
| Plummet | Multiple sets of smaller and larger circle AoE telegraphs will spawn at random locations. This is combined with Heavens' Confluence and ends with a proximity AoE centered on one corner. |
| Mechanic | Description |
|---|---|
| Negative / Positive Charge | Each player will be inflicted with a 15-second |
| Magnetic Rock | Magnetic Rock adds will spawn on each corner. Two will be positively charged, while the others will be negative. Each player will be tethered to one random add, and then either be pulled towards it (if the player's and rock's charges are opposite) or pushed away (if the charges are the same). Players will be |
| Concentrativity | A telegraphed radial knockback from the boss, which cannot be prevented with knockback immunities. Players should position so they end up near the center of the arena when being pushed/pulled from the magnet tethers and positioned to be knocked back towards a corner. |
| Mechanic | Description |
|---|---|
| Malefic Quartering (on boulders) | Four circle AoE telegraphs will appear, each spawning a rock. Each one will have a weak sector on either its east or west. In addition, players will be given a 20-second |
| Vanishing Horizon | Opposite conal cleaves that spawn two directional AoEs. Due to their Malefic debuff, players will be unsafe from these AoEs if by themselves, so they will need to stand behind a rock to block them. Only rocks that do not have a red sector facing a line AoE origin will be safe; the others will be destroyed. |
Afterwards, the following mechanics are shared regardless of the route.
| Mechanic | Description |
|---|---|
| Maw of the Wolf | Telegraphed 180 degree frontal cleave aimed at one corner. |
| Will of the Underworld x2 | The arena will be divided into quadrants, each with two directional AoEs 90 degrees apart. Players must stand on the safe quadrant that prevents both of their vulnerable regions from being hit. |
| Sting of the Scorpion | Telegraphed physical tankbuster. |
| Crusher of Lions + Unyielding Will | Players will be given a single-direction Malefic debuff and must position for both of the these attacks in sequence. There are a few seconds to adjust if needed after Crusher of Lions resolves. |
Shattering Siren: Darya the Sea-maid
Second boss of the right path. Shortly after pulling the boss, the arena will be surrounded with a dangerous AoE that inflicts ![]() dropsy.
dropsy.
| Mechanic | Description |
|---|---|
| Piercing Plunge | Party-wide magical damage. |
| Familiar Call | Summons 5 untargetable adds at a wall: 2-3 Seaborn Stalwarts (clionids), and the rest Seaborn Steeds (seahorses). |
| Echoed Serenade | The boss spawns a music score above itself, and images of the adds will travel from right to left, denoting the order in which they resolve. For the first two iterations, each add type will be invoked exactly once. However, each add will be invoked twice during later iterations. |
| Watersong | Each add group will use a late-telegraphed line AoE hitting the column in front of it, the order given by Echoed Serenade. |
| Surging Current | Two adjacent 90 degree cleaves indicated by gathering water, forming a frontal half-room cleave. |
| Swimming in the Air | Summons (one at a time) seven floating blue crystals, leaving two corners empty. These will explode as large, late-telegraphed circle AoEs all at once. |
| Sunken Treasure | Sunnons four floating blue spheres, one at each corner. Three of the spheres will crack twice and turn yellow, denoting massive late-telegraphed circle AoEs. When these are resolving, the remaining sphere will start cracking and explode later. |
| Aqua Ball | Two sets of baited circle AoE telegraphs on players. Used in conjunction with the secondSunken Treasure. |
| Receding/Encroaching Twin Tides |
|
The fight then diverges based on the route.
| Mechanic | Description |
|---|---|
| Familiar Call | Summons the 5 clionids/seahorses as in before, in addition to 4 Seaborn Songstresses (goobbues) near each corner. The goobbues will spawn Siren Spheres (water orbs) that aim at players during Echoed Serenade (4 add commands), so players must dodge the line AoEs and orbs at the same time. |
| Mechanic | Description |
|---|---|
| Aqua Spear | Spawns a persistent AoE on 5 tiles. Standing in these will inflict |
| Alluring Order | Give each player a 13-second |
| Aqua Ball | Two sets of baited circle AoE telegraphs on players. Used shortly before the direction debuff timer expires. While dodging these AoEs, each player should position to be marched across a safe region of the arena. They will travel approximately the length of two tiles. |
| Mechanic | Description |
|---|---|
| Big Wave | A large geyser will erupt on one wall of the arena, while three circle AoE telegraphs will spawn opposite the geyser. Players should move close to the wall with geyser and not be in line with a circle AoE telegraph, as they will be knocked back nearly the length of the arena. Knockback immunities also work, but since this attack is used twice in a row, it can only be used on one knockback. |
| Mechanic | Description |
|---|---|
| Ceaseless Current | A moving line AoE will spawn on one outer row or column of the arena, cascading forwards one row/column at a time. When the first cascading line AoE starts moving, a second moving line AoE will spawn on an adjacent wall. |
Afterwards, the following mechanics are shared regardless of the route.
| Mechanic | Description |
|---|---|
| Hydrocannon | Telegraphed line AoE tankbuster, dealing magical damage. |
| Familiar Call + Echoed Seranade + Receding/Encroaching Twin Tides | A combination of the previous attacks, where players must dodge both the line AoEs and in/out sequence at once. The add commands will always be in this format: ABAB or ABBA. |
| Sunken Treasure + Surging Current | Summons four orbs on corners again, but only two opposite orbs will begin cracking. However, the boss will also face a cardinal and cleave that half with Surging Current, leaving only one safe orb initially. Shortly after dodging these, the remaining two orbs will explode. |
Midnight Maw: The Deadly Dandan
Secret second boss of the right path. This battle takes place on a transparent circular platform over open water, with the boss at the edge.
| Mechanic | Description |
|---|---|
| Murky Waters | Party-wide magical damage. |
| Devour | The boss will begin rotating around the arena, and two red line AoE charge telegraphs will appear, denoting the boss's trajectory for later. These telegraphs move with the boss, but the relative position stays constant. The first AoE will always be a dash across the arena, while the second AoE will be a dash back, but offset left or right. The telegraphs will disappear after several seconds.
Players should take note of the relative safe area (i.e. back and to the left if the dash is offset left; back and to the right if offset right). When the boss finishes moving, it will cast Devour and execute the dashes. Anyone hit will be sucked in and instantly killed later. |
| Spit | A telegraphed wide frontal conal AoE that will also spit back and kill any devoured players. In addition, each player will be targeted with a spread AoE telegraph (Dropsea) that resolves later. |
| Stinging Tentacle | The boss summons two tentacles to either side of it, each of which will spawn a line AoE telegraph that will swivel back and forth. When the timer on each tentacle expires, the AoEs will stop moving and resolve, leaving either the middle or sides safe. |
| Tidal Guillotine | The Dandan moves to attack from beneath the water's surface... The boss will become untargetable and reappear in a location beneath the arena floor, indicating the epicenter of a massive, late-telegraphed circle AoE. |
| Swallowed Sea | An identical attack to Spit but not preceded by Devour. |
| Unfathomable Horror | Spawns two water orbs opposite each other. These will do telegraphed point-blank AoEs, followed by telegraphed concentric donut AoEs. |
| Strewn Bubbles | Spawns pairs of moving bubbles on opposite sides of the arena. Anyone hit will be inflicted with a |
| Maw of the Deep | Spawns three sets of circle AoE telegraphs that cover the entire arena. Dodge into the first set when they resolve. |
| Combinations |
|
Loot
This duty uses personal loot, so players must interact with and loot each coffer by themselves. If the party chooses the same starting path that the NPC recommends, they will receive a bonus personal spoils coffer immediately prior to the final boss.
| Name | Type | Item Level | Rarity | Quantity |
|---|---|---|---|---|
| Corvosi Potsherd | Other | 1 | Basic | 1 |
| Corvosi Parasol | Other | 1 | Basic | 1 |
| Imitation Corvosi Shisha | Other | 1 | Basic | 1 |
| Magic Lamp | Minion | N/A | Basic | 1 |
| Name | Type | Item Level | Rarity | Quantity |
|---|---|---|---|---|
| Corvosi Potsherd | Other | 1 | Basic | 1 |
| Corvosi Sofa | Other | 1 | Basic | 1 |
| Little Mermaid | Minion | N/A | Basic | 1 |
| Name | Type | Item Level | Rarity | Quantity |
|---|---|---|---|---|
| Corvosi Potsherd | Other | 1 | Basic | 2 |
| Pari of Plenty Card | Triple Triad Card | N/A | 1 |
| Name | Type | Item Level | Rarity | Quantity |
|---|---|---|---|---|
| Corvosi Potsherd | Other | 1 | Basic | 2 |
| Lone Swordmaster Card | Triple Triad Card | N/A | 1 |
| Name | Type | Item Level | Rarity | Quantity |
|---|---|---|---|---|
| Corvosi Potsherd | Other | 1 | Basic | 2 |
| Darya the Sea-maid Card | Triple Triad Card | N/A | 1 | |
| Little Mermaid | Minion | N/A | Basic | 1 |
| Name | Type | Item Level | Rarity | Quantity |
|---|---|---|---|---|
| Corvosi Potsherd | Other | 1 | Basic | 2 |
| Deadly Dandan Card | Triple Triad Card | N/A | 1 |
 Personal Spoils Coffers
| Name | Type | Item Level | Rarity | Quantity |
|---|---|---|---|---|
| Magicked Prism (Ribbons) | Other | 1 | Basic | 1 |
| Corvosi Parasol | Other | 1 | Basic | 1 |
| Corvosi Crystal | Other | 1 | Basic | 1 |
| Corvosi Fan | Other | 1 | Basic | 1 |
| Corvosi Sofa | Other | 1 | Basic | 1 |
| Green Corvosi Carpet | Other | 1 | Basic | 1 |
| Imitation Corvosi Shisha | Other | 1 | Basic | 1 |
| Purple Corvosi Carpet | Other | 1 | Basic | 1 |
| Little Mermaid | Minion | N/A | Basic | 1 |
| Magic Lamp | Minion | N/A | Basic | 1 |
Achievements
This duty is associated with the following achievements:
| Name | Points | Task | Reward | Patch |
|---|---|---|---|---|
| Through the Carpets and Flames | 5 | Defeat the Pari of Plenty in The Merchant's Tale variant dungeon. | - | 7.45 |
| Singing with the Fishes | 5 | Defeat Darya the Sea-maid in The Merchant's Tale variant dungeon. | - | 7.45 |
| Master of Masters | 5 | Defeat the Lone Swordmaster in The Merchant's Tale variant dungeon. | - | 7.45 |
| The Strife Aquatic | 5 | Defeat the Deadly Dandan in The Merchant's Tale variant dungeon. | - | 7.45 |
| A Storied Collection | 10 | Unlock all folklore records in The Merchant's Tale. | The Faces We Wear - Comfortable Eye Mask | 7.45 |
| Mapping the Realm: The Merchant's Tale | 10 | Discover every location within The Merchant's Tale variant dungeon. | - | 7.45 |
Music
| Section | Theme |
|---|---|
| Main | Worthy Pursuits |
| Mid-Boss | On Blade's Edge |
| Final Bosses | Finality |
| Secret Final Boss | Inexorable |
Gallery
Reward Images


Dungeon Images


Map
-
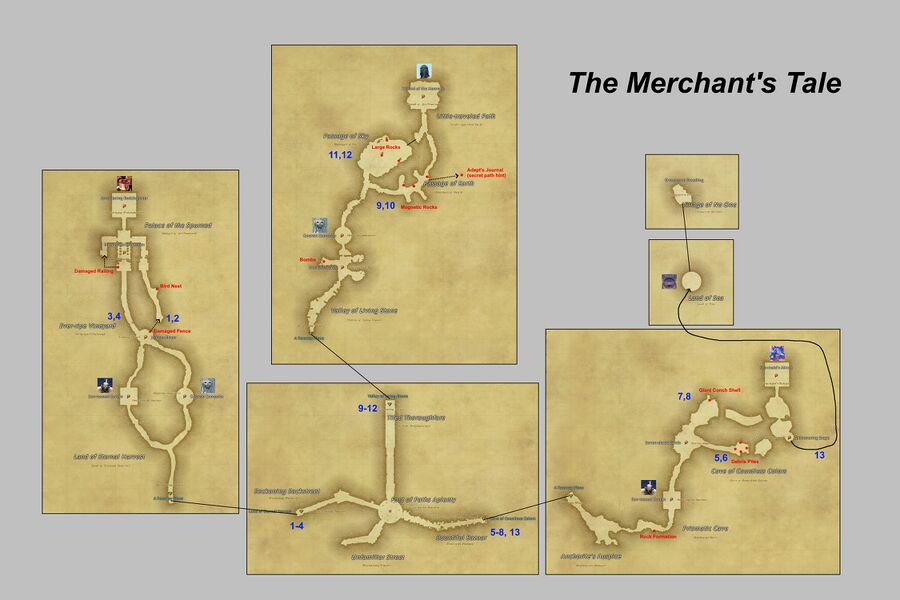 Click to enlarge

Other Images


Dialogue
Now, let our adventure begin!
With the foremost bodyguard of Corvos by his side, the young merchant set out on his journey.
The colors are breathtaking!
A beautiful place, to be sure, but sprawling. Perhaps the locals can help us catch the scent of treasure, eh?
This must be the heart of the city. We've many roads to choose from. Do any pique your interest?
Our first fork in the road. Where should we go?
Surprise me!
You're fine with me making the choice? Well, my gleaner's intuition is pointing me...this way!
Let's go left, into the residential area.
Let's to straight, toward the great gate.
Let's go right, into the marketplace.
The party has 30 seconds to vote on a response.
The route [route] has received the most votes.
If the party chooses the same path as the NPC
Ah, I see we think alike! Let us proceed.
If the party chooses a different path
Oh? That way? Well, I'm not one to gainsay an adventurer's intuition, so lead the way!
Among the many paths before him, the merchant chose the backstreet, lined with homes.
What awaits at road's end?
What are those!?
Beasts, here!? It looks like they're attacking someone─we must help, Forename!
Are you hurt?
I'm...I'm unharmed, thanks to you. Just who are you, anyways?
I'm but a humble merchant, and this is my trusty bodyguard. We are searching for treasure said to be of value immeasurable.
Hmm... Perhaps you'll find what you seek in the plains to the west. There lies an old abandoned palace, said to house a veritable mountain of treasure.
An abandoned palace? Why, that sounds perfect! Thank you, kind sir.
It's the least I could offer. Safe travels.
And the story unfurls further!
What could be in an abandoned palace but abandoned treasure? Let our search begin in earnest!
Unnamed Man A
I could go for a cup of tea...
Unnamed Man B
Phew... I think a quick break is in order.
The young merchant and his bodyguard reached a green expanse, the gentle breeze carrying sweet scents through the air.
There's nothing like the gentle caress of the wind! And that smell...something sweet is in the air!
That tree...
If you don't mind!
So that was the scent of apples! I thought so. The orchard keeps going in that direction, it seems.
These apples were grown by a caretaker's hand. Beyond the orchard we might find a settlement!
Which way should we go?
Let's follow the fruit.
If there's a settlement nearby, someone might be able to point us towards the nearest treasure.
This is no time to be staring at apples trees, Nazqha!
Even the beasts have a sweet scent about them!
This tale has no shortage of danger!
Standing in their path was a monstrous bird with an appetite for flesh.
Yet the sight did not perturb the bodyguard, who stood steadfast and dauntless.
Get your weapon ready!
Where have I seen this before...? Careful─it appears to be in a foul mood!
The spheres of sand grow massive in size...
The spheres of sand fade out of sight...
What? It disappeared? There was a ball of dirt over there, right?
Wait, the balls are still here, we just can't see them! Remember their position before they turn invisible!
It must still be here somewhere! Look carefully for traces of its passage!
It can turn the seeds invisible too!? Remember where they are!
Exactly the outcome I expected! Even an invisible enemy is no match for your cunning, Forename!
Though the bird was laid low, the path ahead was treacherous still.
Are those...grapes!?
Mmm... They are! Slightly bitter, but delightfully sweet!
You know, we have selectively bred grapes in Labyrinthos.
Oh, and here I was hoping for a feast!
Eyaaah! Apologies, but combat is not my specialty!
What wondrous sights await us, I wonder?
I have a good feeling about the other way.
I see your thinking: where there's fewer people, there's more hidden treasure to be found!
I leave the combat to you!
Those appeared to be naught but seedlings... I shudder to think what they might grow into.
I didn't expect to see bombs here...
We should get to a safe distance before they explode.
From the lamp before them emerged a grinning genie.
Do you see that, Forename!? It's almost as if...it's beckoning us forward.
The bodyguard readied his weapon, eager to prove the truth of his fierce reputation.
Is that a magic lamp I see!? Just how long was it waiting for us?
Welcome, welcome! The guests of honor are here at last!
The curtain rises on the big show! Dare not look away, or else!
Now we turn up the heat! Do make sure not to get burned!
Splendid! Look how they dart about! Be aware that I take no responsibility in case of grievous injury!
Let us end on a high note! An explosive note!
That was only the opening act! Keep your eyes peeled─you won't want to miss this next part!
Keep your wits about you and your eyes sharp! An opening will present itself!
Now for the part no one expects─the encore! Can you keep up the energy for just a little longer?
Oh ho, you really know how to put on a show! But I can't let my own guests upstage me!
Bang! Boom! And a blast for good measure!
I must say, that was a grand display! If that genie wasn't trying to kill us, I would certainly watch it again!
Although their foe lay defeated, their journey was far from over.
Ah, look! Could those be...
I knew it! This singular blend of bitter and sweet...
You know, we grow these in Labyrinthos as well─ Forename, watch out!
Those grapes almost took a bite out of me!
The horizon stretches as far as the eye can see! Oh, is that...? Why, I think it's the palace!
Now how do we get down there...
Interacting with the damaged fence
Forename!? Are you... Oh, can I get down from over there!?
Here I go!
I made it! And I didn't even trip! ...Hm?
What have we here...?
Is that a bird's nest? Those look like chicks.
Legendary Bird Chick A
<chirp>
Hehehe! I'll be taking this!
Legendary Bird Chick A
<squeak> <chirp>
Legendary Bird Chick B
<chirp> <chirp>
Legendary Bird Chick C
<chirp>!
Hahaha!
Attacking the Willful Wind
Ouch!
How dare you!
Grrr! Now you've made me mad!
That...doesn't look good!
Ungh... You'll regret this!
<screech> <screech>
Legendary Bird Chick A
<squeak>! <squeak>!
It sounds grateful that we protected its chicks!
Not attacking the Willful Wind
See you never!
It stole their food!
Although our goal is in sight, we mustn't let our guard down!
There's treasure here, I can feel it!
At last, the merchant and his bodyguard set foot inside the palace, its ornate entrance hinting at bygone resplendence.
Friends of the spirit we encountered before?
Ignoring the damaged fence and going left on the path
Here we are! I expect we'll be accosted soon enough, so be careful!
Ah, I saw these flowers in a field guide! I believe they're used to make honey.
Oh my, they taste sweet as the summer sun! And that smell─absolutely heavenly!
I think I've seen those in a picture book somewhere...
Destroying the damaged railing with the wisp AoE
Not destroying the damaged stone fence, going through the main entrance
<gasp>
In the bowels of the ancient palace, they encountered a foe unlike any other.
It would take a lifetime to count all this!
Hm? I thought I saw flames...
<sigh> What a chore. Must you soil the floor of my paradise?
Sigh...
Why, she hasn't even bothered to get up! Does she consider us beneath her, or is she just lazy?
Time to wake up, you dusty things.
Put those tattered threads to use!
It seems the carpets do her bidding... Heavens forfend she lift a finger herself!
Ah, I see we're going this way now.
This is taking too long...
Route 1 (destroy the fence, hit the Willful Wind)
A spirit draws near, eager to work mischief...
You got in the way of our fun, and now it's time to pay the price!
Another nuisance... Well, go on. Kill each other.
A massive bird seems to be fighting on your behalf!
Is that the bird from before!?
Ouch!
That hurts!
How dare you!
You will rue this day!
Play with us again sometime!
It helped us! Perhaps as a show of thanks for before?
Route 2 (destroy the fence, do not hit the Willful Wind)
A spirit draws near, eager to work mischief...
Get away, you blubbering bird! Stop nipping at my heels!
Ugh. Their voices grate on the ears.
Eeek!
Greedy bird! I only stole a few snacks!
Big dumb bird! And slow, oh so slow!
Grrr... Grraaah!
Hahaha, too slow! That food was delicious, by the way! Until next time!
Gyah! Gyaaah!
Route 3 (main path, destroy the stone fence with the wisp AoE)
Drawn by the scent of chaos, a spirit wanders into the bedchamber...
A spirit come to join the fray? Good, good. The lighter my burden, the better.
Even they tire of your company...
Route 4 (main path, use main entrance)
Now make yourselves useful, you old rags. You do know what I mean, yes?
Oh? You're still here?
I've had quite enough of you! I shall like you better set aflame!
Your prancing and capering sickens me! Begone from my sight!
I tire of this. Go on, you frayed mats─smother the life out of them.
Do try and make the ride less bumpy this time.
What persistent pests... Come now, you worthless rugs, shake off that dirt and do something!
That was quite the fight! Despite appearances, her strength was terrifying to behold.
It's one of the carpets...she just left it here. Now that I see it up close, 'tis plain it was woven by a master.
I, for one, could not put a price on a treasure such as this! Let us bring it to the maiden!
I could not have asked for a more dependable bodyguard!
Among the many paths before him, the merchant approached the grand gates.
The brilliant blue, the dazzling white... It's like something out of a picture book!
What awaits at road's end?
Unnamed NPC A
Why not stop by for a visit? The new tea I bought is simply divine.
Have you ever seen such a gate!?
Unnamed NPC B
I don't recall there being so many stairs when I was a lad...
Nooo!
Hehe, dressed up like a noble, are ya?
Suppose that means you've got riches like a noble. Why not share the wealth?
You listenin' to a word we're sayin'!?
Hand it over!
Forename, look! That woman is under attack!
Unnamed NPC C
Curses... They're in the city!?
We-We've seen the error of our ways!
Are you all right!? To think they would be so bold as to attack on a well-traveled avenue...
Just spare our lives!
You saved my life, truly. Those thieves but recently began to infest the valley to the north.
Thieves, eh? The classic antagonists!
Shall we travel to the northern valley, Forename? As insufferable as thieves are, they often hoard treasure!
Be well, friends.
May priceless riches await!
The young merchant and his bodyguard set forth into the deep valley, which may hold even deeper secrets.
What a strange feeling...
Whenever I draw near the rocks, the fur on my tail stands on end! What could be causing that?
Thieves!?
Excellent work!
The sprites are effervescent! This place must be suffuse with aether.
If Water III from the Unsettled Spirit hits the bombs in the left room
The explosives are drenched in water...
That looks slippery...
Optional dialogue
Bandit Missive
We nabbed some geezer from the town and made him spill his guts. It's just like you said, Boss. Deep in this canyon, there's some hidden place that hardly a soul knows about.
I reckon we'll find treasure the likes we've never dreamed of! Me and a few of the lads went to get eyes on it, but we stepped right into the nest of some monstrous bird. Barely made it out with our lives.
We've scrounged together every weapon and bomb we could, and we're standing by until you say the word. After we've cut and blasted our way through, we'll be richer than kings!
Standing in their path was a monstrous bird with an appetite for flesh.
It's trampling the flowers!
Yet the sight did not perturb the bodyguard, who stood steadfast and dauntless.
Where have I seen this before...? Careful─it appears to be in a foul mood!
The spheres of sand grow massive in size...
The spheres of sand fade out of sight...
What? It disappeared? There was a ball of dirt over there, right?
Wait, the balls are still here, we just can't see them! Remember their position before they turn invisible!
It must still be here somewhere! Look carefully for traces of its passage!
<cough> <wheeze> ...There you are! Reckoned we'd sit back lickin' our wounds, eh?
If bombs in camp hit with Water III
We slaved for days to make those bombs! Good thing we've got other ways to make you suffer!
Take this!
Have a taste!
Godsdammit, why didn't you bring more!? Get the hells out of here!
Otherwise (bombs left intact)
They've run out of eyeshot. I suppose every story needs its petty villains...
Though the bird was laid low, the path ahead was treacherous still.
A lot of good invisibility did that beast! Watch for shaking flowers─we don't want another surprise!
Watch your step!
What could those adorable creatures be?
Eyaaah! Apologies, but combat is not my specialty!
Oh my, the stones are floating! I wonder what keeps them aloft...
What have we here? Mushrooms?
What divine flavor! I scarcely need to chew, and the aroma overwhelms the senses!
On one side, tantalizing mushrooms. On the other...floating rocks?
Which way should we go?
Let the mushrooms guide us true!
I can tell you're curious too. My intuition agrees─follow the mushrooms!
Ungh... I can barely move!
Tread carefully...very carefully.
It seems no path is without obstacles!
If the player activates the rocks with the golem's electric AoE
Forename, listen. Did you hear a sound just now?
A new path! It seems the rocks moved... Hmm. Were they imbued with some unseen power?
Optional dialogue
Adept's Journal
How many seasons have come and gone since I set foot in this land, where the rules of gravity are mere suggestions? How many times have I swung my sword—each flourish bringing me one step closer to mastering the Unyielding Blade, honing the aether within my weapon to a fine edge?
Yet even as my body is consumed by training, my mind turns only to my dear friend, bound still to the sea. To destroy the vile thing which threatens her and hers, my bladework must be without equal.
When I have reached the heights I must, I shall come for you. I will stand upon those shores of our home once more and cry out: “I am returned!”
If the rocks were not activated
Are golems affected by this strange magnetism too?
Not the easiest place to fight through, was it?
Floating rocks warrant a closer look.
I haven't seen anything quite like this... I believe we have no choice but to get a closer look!
Forename, Forename! Am I...floating!?
I must wonder as to the nature of the rocks... Perhaps their magnetic fields have been disrupted?
Unfortunately, I hardly think floating rocks could be considered treasure...
I don't know where to step, nor where to hide!
Eyaaah! Apologies, but combat is not my specialty!
If the three large rocks are activated
The magnetism of the atmosphere shifts...
Even without solid ground under your feet, you made quick work of them. Of course, I never doubted you!
Ah hah, do you feel that? Gravity! I can step surely now.
Some sort of rock beast, I presume?
Its surface was hard as rock, but it moved nimbly enough...
In the valley's most remote reaches they faced their deadliest challenge yet.
This is the last place I expected to run into a person...
Take up your weapon. I pray you can provide some measure of entertainment before you die.
From where shall death take you? I shall grant you the mercy of foresight.
Whence shall my blade strike? Look well!
Blades of aether! Don't let them pierce you!
Do you truly believe you can run from me?
This fighting style...sword strikes imbued with aether. Could this be one of the swordmasters that were snuffed out by the Empire!?
Death comes from all directions!
The blades of aether changed trajectory!? I see now why the Unyielding Blade was so feared...
Route 9 (mushroom path, rocks activated by golem)
Only a true master can call the earth itself her ally!
The magnetic fields are wildly unstable... Perhaps our foe uses them against us.
Route 10 (mushroom path, rocks not activated by golem)
Do not dare perish before witnessing my full strength!
Falling stones! Watch your head!
Route 11 (floating rock path, Seeing Stones fought near large rocks)
Let us see how attuned you are to the flow of battle!
The magnetic fields are wildly unstable... Perhaps our foe uses them against us.
Route 12 (floating rock path, Seeing Stones fought away from large rocks)
Hah hah, good, good! Perhaps you shall not disappoint after all!
Falling stones! Watch your head!
Run if you dare! Doom shall find you all the same!
Come now, you can do better than that!
Not so fast!
That was like seeing two artists at work! My jaw was clenched the whole time...but in the end, you proved the mightier!
My heart is still pounding! Wait, is this...?
Why, it's the swordmaster's blade. The edge is flawless, and the decorations are exquisite!
I must say, I certainly couldn't measure the value of this. Could you? No? I believe that means we should deliver it to the maiden!
Since we both have all of our limbs, I would say that was a job well done. Thank you, Forename!
Among the many paths before him, the merchant felt drawn to the lively shouts of the bazaar.
I've never seen such elaborate weaving!
Unnamed Customer
Oh my! This is quite the lovely color!
What awaits at road's end?
Unnamed Vendor A
Welcome, welcome! If it's a bargain you're after, look no further!
Unnamed Vendor B
There we go. Everything should be sorted now.
Look, over there. Someone's in trouble.
This isn't good...
What's the matter?
The damned wheels came right off... Suppose I'll be carrying my haul the rest of the way.
Well, we can help with that. If we split the load, we should be able to make it in one go!
This may help us progress the story─let's give this merchant a hand!
Lift with the knees...
My thanks. The shop is just over this way.
Say, if I asked you to imagine an object of immeasurable worth, what would come to mind?
Unnamed Vendor C
We're well stocked for now. Hmm... When's the next delivery?
Looking to make some coin, eh? Hmm. Silk, gemstones, spices. All those would fetch a high price.
I see. Just how much would we need for immeasurable profit...?
Unnamed Vendor D
Come peruse my porcelain wares! You'll not see anything like them elsewhere!
Unnamed Customer B
What will the next delivery bring, I wonder?
Your wares are all here!
That got the blood flowing...
Many thanks for the help!
Come to think of it, I heard sea-folk live in the cove to the east. If anyone had a treasure of singular worth, it would be them.
Thank you for that precious morsel of information, my good man! I believe we have our next destination, Forename!
Sea-folk...could it truly be?
The young merchant and his bodyguard set forth towards the clear blue sea.
Ah, could that be? The Anchorite at Corvos? I read that the rocky formations on both sides of the strait are actually the ankles of a massive statue!
Those claws...they're so big!
Into the cave!
That's a lot of bombs!
Stay away!
If Self-destruct hits the rock formation to the right
Look! The blast knocked the wall loose!
Ugh... Rubble flew into my eyes.
There's something there!
From the lamp before them emerged a grinning genie.
The bodyguard readied his weapon, eager to prove the truth of his fierce reputation.
Is that a magic lamp I see!? Just how long was it waiting for us?
Welcome, welcome! The guests of honor are here at last!
The curtain rises on the big show! Dare not look away, or else!
Splendid! Look how they dart about! Be aware that I take no responsibility in case of grievous injury!
Now we turn up the heat! Do make sure not to get burned!
Let us end on a high note! An explosive note!
If Self-destruct from the Blue Bombs hit the rock formation
What do we have here? Surprise guests! This will be one for the ages!
Otherwise
Now for the fun part! Be dazzled! Be amazed! Be hypnotized!
How breathtaking! And...dangerous! Yes, dangerous! Stay focused!
Now for the part no one expects─the encore! Can you keep up the energy for just a little longer?
Oh ho, you really know how to put on a show! But I can't let my own guests upstage me!
Bang! Boom! And a blast for good measure!
Although their foe lay defeated, their journey was far from over.
That was─how should I put it?─quite the cheerful adversary. Perhaps it was welcoming us, in its own way...
It appears we can get out from over there!
Oh my! This beach is gorgeous!
They emerged from the dark cave and were greeted by the glittering sea.
Even the shells sparkle!
I imagine they would prove quite popular if used for pearl inlay.
Ah, but this is no time for such musings!
I've never seen such coloring before...
Indeed, it is edible! This unique flavor would make for a perfect spice in certain dishes.
The seaweed seems much denser on the right side. Rich waters might hold even richer treasures...
Which way should we go?
The seaweed won't steer us wrong.
Indeed, these waters may hold treasures all their own! I look forward to the sights which await us.
Don't slip, Forename.
The coral shines like nothing else...
<slurp>
...'Tis a bitter taste.
Even the goobbues have fantastic colors!
I'm glad we weren't pulled into that goobbue's gullet.
Look at those rocks. Something's strange about them...
Now I must look twice at every rock I see...
A bottle, here?
Optional dialogue
Letter in a Bottle
I pray this letter finds its way into the hands of a kind-hearted soul, who shall bear word of the ruin encroaching upon my home to a warrior of courage.
The Dandan terrorizes our village, raising waves to topple our houses and lashing its tail to sink our ships. We are now cut off from our neighbors, and our reserves have dwindled to naught. Before long, none shall remain.
If only we could join hands with the beautiful maidens who dwell in the sea...yet now even they are beyond our reach.
The marks of civilization are plain to see. Was this once a place of worship?
True ending
The player uses /bow on the Shimmering Stage.
They lit up!
The player says "I am returned!"
By the Twelve, it's beautiful!
The player presses the panels in the correct order.
Hmm? What's that sound?
Oh, most joyful of days! At last, voices from the land call out to me again!
Does that voice belong to one of the sea-folk?
Pretty creatures, allow me to guide you. What you seek lies at the end of this path.
What!? It appeared from nowhere!
Yet you must tread carefully. It passes through the territory of a dreadful beast...where my voice will not reach you.
I can't hear her anymore...
At the end of the path weaved by the sea-maid was a sight most astounding.
Well, we've no choice but to move forward, right?
The Dandan moves to attack from beneath the water's surface...
Though it called ruin upon its foes, the monstrous fish was felled.
I think I'll stay well away from the open sea for some time... Well, let's get to land, yes?
Are those...flowers?
Soon after, they came upon a village, long forgotten.
Not a single soul to be found...but plainly, this place once thrived.
Wait... That carpet. Is it not the selfsame design we saw in the maiden's room?
It is...
Could this have been her home...?
There's a plate with a matching pattern, too. It's quite dirty, but I think we should take it back with us.
Let us return. I can only hope this will offer her some comfort.
[Duty Complete]
I think we can go this way!
Some sort of stage...?
I fancy a stroll along the beach.
Indeed, I see shells and pearls glittering among the sands... All right, lead the way!
What gave rise to this color, do you think?
That pearl is larger than me! One moment, please...
<gulp>
Very bitter.
What causes such growth in these waters?
Impressive as always, Forename!
Interacting with the Giant Conch Shell
Huh!? Did that sound come from that massive shell?
Did it answer the shell's call? What an adorable thing─and it's colored just like the cove!
May we meet again.
Urgh... The pleasant scent of ocean and rot...
Perhaps the sea-folk are nearby.
The figures were carven by a skilled hand, indeed...
In the bowels of the cove, the end of their journey was marked by an unexpected encounter.
Is that a sea-maid?
Come, join us. Lend your voice to our chorus!
Let our song ring ever louder!
They're being guided by her singing. Watch your back!
Dance with me. Let the beat of our hearts guide our steps.
Now we offer ourselves to the sea. Hope overflowing coalesces into a wish come true...
The orbs are changing─keep an eye on them!
Route 5 (seaweed path, letting the goobbue inhale all the rocks)
These creatures are different than before... Be wary of their attacks!
Grooo... Grooh ♪
Route 6 (seaweed path, not letting the goobbue inhale all the rocks)
Let us shout our prayers to the heavens, and they may be answered.
Watch your step! Dense aether yet lingers!
You can but walk the path fate sets before you.
Route 7 (beach path, interacting with the giant conch shell)
Surrender yourself to the ocean's embrace.
Here comes the wave again! Watch the water carefully!
Route 8 (beach path, not interacting with the giant conch shell)
Be buried under the weight of countless unanswered wishes...
Waves are coming from everywhere at once! Don't let them knock you over!
More minions! Listen to her voice carefully, Forename!
She's swimming around again. Don't get caught in her wake!
We made it! Although the sea-maid tried to kill us, something about her seemed...mournful.
Look, she dropped this gem. Its glow is entrancing...'tis probably best not to stare too long.
This has to be of great value─value immeasurable, one might say! Let us deliver this to the maiden!
You played your part as bodyguard perfectly. Thank you, Forename!
After completing a route and leaving the instance, the player will receive a cutscene with the Fair Maiden each time they bring back a new treasure.
Trivia
- The dungeon name is italicized because it is the name of the book in which the dungeon takes place.
| Endwalker (Lv. 90) | |||||
|---|---|---|---|---|---|
| Dawntrail (Lv. 90-100) | |||||