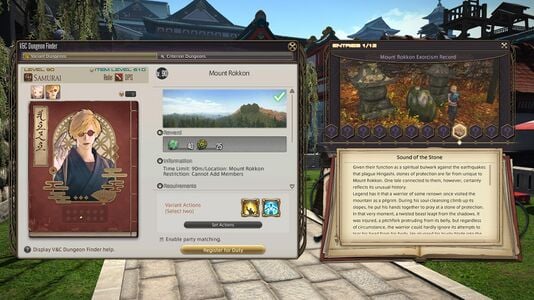
Mount Rokkon
Mount Rokkon

- Level
- 90 (Sync: 90)
- Item Level
- 605 (Sync: 665)
- Difficulty
- Normal
- Party size
- Flexible
1-4 man • 1-4
- Unsyncing
- Allowed
- Time limit
- 90 minutes
- Phoenix Down
- Available
- Duty Finder
- V&C Dungeon Finder
- Tomestones
 15
15 - Req. quest
- Mononoke Aware
- Entrance
- Kugane (X:8.9, Y:8.8)
- Region
- Hingashi
- Patch
- 6.45
- Links
- GT TC
On Hingashi's westernmost isle of Shishu lies the long-venerated Mount Rokkon. Once refuge for humble monks and weary pilgrims, the holy site lately fell to a host of malevolent mononoke, spurring the local liege lord to take the unprecedented step of inviting ijin to assist in reclaiming its slopes. As in his wont, Hancock has secured the promise of valuable rewards in exchange for his—and your—assistance, but each of these treasures has a life of its own...
— In-game description
Mount Rokkon is a level 90 variant dungeon introduced in patch 6.45 with Endwalker.
The dungeon's rewards are cosmetic in nature: the Shishu Glamour Set, as well as other glamour items, can be acquired for the currency obtained in the dungeon, while the Burabura Chochin mount is obtained for completing all 12 Mount Rokkon Exorcism Records (i.e., different endings depending on the dungeon mechanisms activated and paths taken).
Objectives
The party may unlock up to one entry in the Mount Rokkon Exorcism Record per instance.
| # | Icon | Name | Path | Solution |
|---|---|---|---|---|
| 1 | Gift of the Onmyoji | Left | In the room with the crystal ball, interact with the orb without touching the statues. In the next room, close the case after Hancock inspects it. | |
| 2 | The Crimson Sword | Left | In the room with the crystal ball, interact with the orb without touching the statues. In the next room, ignore the case after Hancock inspects it. | |
| 3 | A Tale of Dead Men | Left | In the room with the crystal ball, rotate the Seiryu statue so it faces east (facing Suzaku) and the Suzaku statue so it faces south (the large double doors). Then interact with the orb. In the last set of enemies in the Upper Pagoda area, allow the Apa to cast Water III before defeating it. | |
| 4 | Forging a Legacy | Left | In the room with the crystal ball, rotate the Seiryu statue so it faces east (facing Suzaku) and the Suzaku statue so it faces south (the large double doors). Then interact with the orb. In the last set of enemies in the Upper Pagoda area, defeat the Apa before it casts Water III, or interrupt the cast. | |
| 5 | The Luthier and the Songstress | Middle | Before the second boss, defeat the enemies and choose "Deal" during the dialogue choice whether to spare the baboon. | |
| 6 | Lost to Avarice | Middle | Before the second boss, defeat the enemies and choose "Think about it" during the dialogue choice whether to spare the baboon. | |
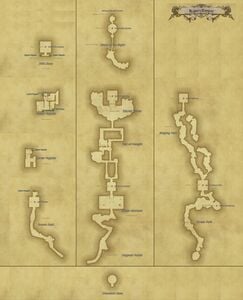
| 7 | Beyond the Lanterns' Light | Middle | After defeating the tiger, climb the "mountain of crates" and pull the rope. Wait for Hancock in the upper floor, then defeat the lantern enemies normally. | |
| 8 | The Common Man's Courage | Right | Ignore the Rokkon Sentinel then, after the first boss, interact with the 4 Stones of Protection along the path. | |
| 9 | Sound of the Stone | Right | Ignore the Rokkon Sentinel and the Stones of Protection. | |
| 10 | The Seal of Silence | Right | Interact with the Rokkon Sentinel to remove the dogu from the tree. Later on, use /easternbow in front of the unmarked shrine next to the fallen tree. Place the dogu in the shrine. Later, interact with the Iwakura. | |
| 11 | Seasons of the Fleeting | Right | Interact with the Rokkon Sentinel to remove the dogu from the tree. Later on, use /easternbow in front of the unmarked shrine next to the fallen tree. Place the dogu in the shrine. Later, interact with the Ancient Tree instead of the Iwakura. | |
| 12 | The Ogiseru's Fate | Middle | This is the path to fight Enenra. After defeating the tiger, climb the "mountain of crates" and pull the rope. Wait for Hancock in the upper floor, then pull the three enemies down the stairs. Defeat each enemy individually while they are facing each one of the three unlit lanterns in front of a wall with a yellow pattern. The lantern enemies will cast a conal aoe when they die. After lighting three lamps, the lamp against the blank wall will light. Interact with it to teleport to the boss area. |
Enemies
Left Path
- Shishu Hitodama
- Shishu Yamawaro
- Shishu Sharin
- Shishu Kosamebo
- Shishu Dorotabo
- Shishu Fuko
- Shishu Yamabiko
- Shishu Kiyofusa
- Shishu Kotengu
- Shishu Onmitsu
- Shishu Apa
- Shishu Izumo
Middle Path
- Shishu Hitodama
- Shishu Sharin
- Shishu Koja
- Shishu Mifune
- Shishu Kotengu
- Shishu Yoko
- Shishu White Baboon
- Shishu Yamawaro
- Shishu Chochin
Right Path
- Shishu Hoko
- Shishu Irakusa
- Shishu Wanyudo
- Shishu Tenaga
- Shishu Furutsubaki
- Red Shishu Penghou
- Shishu Jumokko
- Shishu Kuzuri
- Shishu Sai Taisui
- Shishu Raiko
- Shishu Daitengu
Bosses
Failing any boss mechanic will result in a ![]() Vulnerability Up debuff.
Vulnerability Up debuff.
First boss of all paths.
- Glory Neverlasting: Tankbuster using Dream Within a Dream's animation, but only hitting once.
- Art of the Windblossom: Donut AoE centered on Yozakura, leaving inside its hitbox safe.
- Art of the Fireblossom: Point-blank AoE centered on Yozakura.
- Oka Ranman: Unavoidable magic damage to the entire party, and spawns two piles of cherry blossom petals, later four piles.
- Seal of the Fleeting: Yozakura tethers to the petal piles, imbuing them with Water, Lightning, Fire, and Wind magic.
- Seal of Riotous Bloom: Two of the petal piles will converge on Yozakura, causing an AoE to go off based on the element imbued into them, with each pair having one of Lightning OR Water, and Fire OR Wind.
- Water: Four cone AoEs from Yozakura's hitbox in the intercardinal directions, leaving the cardinals safe.
- Lightning: Four cone AoEs from Yozakura's hitbox in the cardinal directions, leaving the intercardinals safe.
- Fire: Point-blank AoE centered on Yozakura.
- Wind: Donut AoE centered on Yozakura.
- Bunshin: Summons an untargetable clone of the boss (Mirrored Yozakura) per player in the party.
- Shadowflight: Each clone will teleport behind a player and use a briefly telegraphed line AoE.
- Seasons of the Fleeting: Yozakura will telegraph four sequential AoEs (cardinal conal AoEs, intercardinal AoEs, alternating line AoEs). The range of the line AoEs are indicated by the horizontal lines on the arena floor. Start in an area that is safe from the first two AoEs, then after those resolve, move to the second safe area (for example: intercardinal -> cardinal and past the horizontal line).
- Kuge Rantsui: Unavoidable magic damage to the entire party.
Left Path: Yozakura's abilities change depending on the random weather event immediately prior to it (either wind or rain).
- If the weather is windy, Yozakura will use:
- Windblossom Whirl / Levinblossom Strike: Donut AoE centered on Yozakura, along with four small circular AoEs that partially cover the initial safe spot. There are five sets of AoEs in total.
- Prior to the last set of AoEs, Yozakura will use Drifting Petals, a knockback from the center. This cannot be prevented with knockback immune actions. Players will need to quickly run back to the safe region after the knockback.
- If the weather is rainy, Yozakura will use:
- Mudrain: Summons several circular AoE telegraphs that will leave behind a puddle.
- Icebloom: Multiple targeted circular AoEs on players.
- Mud Pie: The mud puddles will transform into Mud Bubbles and each telegraph a line AoE in a a random direction.
Center Path: Yozakura's abilities change depending on whether or not the party pulls the Worn Rope before opening the door to the first shrine.
- If the rope was not pulled, Yozakura will use:
- Tatami Trap: The tatami tiles on two-thirds of the arena will vibrate for a few seconds, telegraphing a later attack.
- Levinblossom Lance: A line AoE through the boss that will rotate either clockwise or counterclockwise based on the arrows telegraph. Used twice in a row.
- Tatami-gaeshi: The tatami tiles that previously vibrated will flip over, damaging and knocking up any players on them.
- If the rope was pulled, Yozakura will use:
- Silent Whistle: Summons three untargetable dogs (Shiromaru, Kuromaru, Shibamaru), which will quickly vanish.
- Donden-gaeshi: Tethers the three platforms on one side (either east or west) of the arena, indicating where the dogs will reappear.
- Art of the Fluff: The dogs will cast a gaze attack that inflicts
 Seduce.
 - The boss will use Fireblossom Flare twice during the gaze cast, spawning baited circle AoEs on players.
Right Path: Yozakura's abilities change depending on whether or not the party removes the dogu in the tree.
- If the dogu was left in place Yozakura will use:
- Nubuki: Several Accursed Seedlings will spawn around the arena, surrounded by circles of bramble. Entering the bramble will
 Bind nearby players inside a Living Gaol, which must be destroyed to free them. If the Gaol isn't destroyed, it will Explode.
 - Root Arrangement: A chaser AoE of rocks erupting from the ground.
- Nubuki: Several Accursed Seedlings will spawn around the arena, surrounded by circles of bramble. Entering the bramble will
- If the dogu was removed Yozakura will use:
- Witherwind: Spawns several Autumnal Tempest tornados at one wall, which will begin slowly moving across the arena, leaving gaps for dodging. Four sets of tornados will spawn on adjacent walls.
- Mudrain: Summons several circular AoE telegraphs that will leave behind a puddle.
- Drifting Petals: A knockback from the center. This cannot be prevented with knockback immune actions. Players will need to position to avoid being knocked into the wall, a puddle, or a tornado.
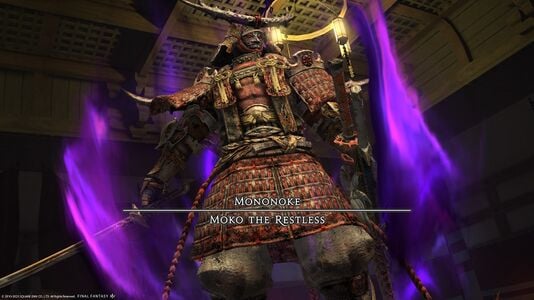
 Mononoke: Moko the Restless
Second boss of the left path. Shortly after engaging the boss, the arena will be surrounded with an AoE that will inflict damage-over-time to anyone who steps in it.
- Kenki Release: Partywide magic damage.
- Iai-kasumi-giri: The boss will telegraph a 270 degree cleave based on the symbol over it and relative to where it is currently facing. The arrow denotes the front of the boss and the empty part of the symbol indicates the safe spot. Note that the boss will always turn 180 degrees opposite the safe spot when it uses the cleave. For visual clarity, two short yellow lines will also appear to denote the boss's flanks because its hitbox is omnidirectional. Standing between these markings while facing the boss will display the safe location indicated above the boss's head based on the player's actual location.
- Soldiers of Death: Summons three untargetable Ashigaru Kyuhei archer adds at the north wall. They will mark a part of the arena with a curving red dashed line, indicating where they will use a large circular AoE (Iron Rain).
- Soldiers of Death: Summons a row of untargetable Ashigaru Sohei lancer adds at the north wall.
- Spearman's Orders: The lancer adds will begin charging through the arena at various speeds, creating some gaps where players can dodge through.
- Two sets of lancers will spawn in total.
- Soldiers of Death: Six untargetable Ashigaru Kyuhei archer adds will spawn on adjacent walls. They will each telegraph Iron Rain as before, leaving only three safe areas.
- Double Kasumi-giri: Similar to Iai-kasumi-giri but will telegraph two cleaves in succession. If the boss changes the direction it faces after the first cleave, players will need to dodge the second cleave relative to the new direction.
The boss will use an action that depended on the route:
(Route 1) If the katana case was closed:
- Untempered Sword: Five Ancient Katana adds will spawn on one wall, leaving some gaps between them. They will use Veil Sever, a briefly telegraphed line AoE that leaves the gaps safe. Three more sets of adds will sequentially spawn on the other walls.
(Route 2) If the katana case was left open:
- Moonless Night: Two large Oni's Claw adds will spawn opposite each other. Each will use a massive point-blank AoE (Clearout). Two sets of adds will spawn in total.
(Route 3) If the Apa was allowed to cast Water III:
- Tengu-yobi: Eight Ill-come Tengu adds will spawn opposite each other (four per wall), each telegraphing a line knockback (Yama-kagura) in alternating directions. Position to prevent being knocked into the wall, or use knockback immune.
- Ghastly Grasp: Similar to Tengu-yobi, but several red circle AoE telegraphs will also spawn, reducing the number of possible safe spots.
(Route 4) If the Apa was not allowed to cast Water III:
- Spiritspark: Summons four sequential sets of several overlapping circular AoEs along with multiple untargetable Spiritflame head adds that will move around. Dodge both the AoEs and the heads.
The following are common regardless of route.
- The boss will then use one of the following two attacks (Azure or Scarlet):
- Azure Auspice: A telegraphed donut AoE
- Boundless Azure: Three line AoEs in a pattern that resembles an inverted Z. The line AoEs will leave behind thin blue lines that will begin glowing sequentially. When these resolve, they will use another line AoE that will cascade outward in both directions.
- Scarlet Auspice: A telegraphed point-blank AoE
- Boundless Scarlet: Three line AoEs in a pattern that resembles an inverted Z. The line AoEs will leave behind thin red lines that will begin glowing sequentially. When these resolve, they will spawn a very wide line AoE.
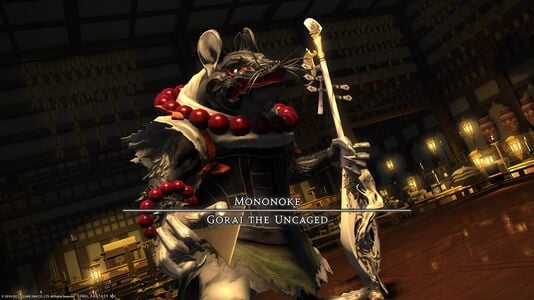
Mononoke: Gorai the Uncaged
Second boss of the middle path. Shortly after engaging the boss, the arena will be surrounded with an AoE that will inflict damage-over-time to anyone who steps in it.
- Unenlightenment: Partywide magic damage.
- Flickering Flame: Summons three blue fireballs on one wall that will each telegraph a line AoE.
- Plectrum of Power: The boss will glow red and cause the line AoE telegraphs to enlarge.
- Flickering Flame: Summons two blue fireballs on adjacent walls, each telegraphing a line AoE.
- Morphic Melody: The boss will glow blue and cause the line AoE telegraphs to double and move to the sides of the initial telegraphs.
- Sulphuric Stone: Summons three floating stones, each telegraphing a point-blank AoE.
- Plectrum of Power: The boss will glow red and cause the point-blank AoE telegraphs to enlarge.
- Sulphuric Stone: Summons three floating stones, each telegraphing a point-blank AoE.
- Morphic Melody: The boss will glow blue and cause the point-blank AoE telegraphs to expand and become donut AoEs.
The next set of attacks will depend on the route:
(Route 5) If the baboon was spared:
- The Shishu White Baboon will appear, tether to all players, and spawn an octagon around it.
- The boss will cast Pure Shock, dealing partywide damage and inflicting
 Stun.
Stun. - All players will be pulled inside the octagon. The baboon will finish casting Wily Wall, spawning a dangerous AoE around the octagon.
- The baboon will begin casting Self-destruct and needs to be killed to interrupt this cast, which will also remove the octagon wall.
- Meanwhile, the boss will use Impure Purgation, creating two sets of conal AoEs that should be dodged.
(Route 6) If the baboon was killed earlier:
- Thundercall: Spawns two Ball of Levin on opposite walls. These will use a massive point-blank AoE (Shock).
- Humble Hammer: Spawns several circle AoE telegraphs. Being hit will inflict
 Minimum.
 - Thundercall: Spawns four Ball of Levin. The boss will use Humble Hammer again. One of the orbs will be hit with an AoE and be shrunk, which will also be indicated with the hammers rotating around it. The party should dodge to the corner with the shrunken orb, as its Shock AoE will be smaller than the others.
(Route 7) If the party took the upper path using the crates:
- Fighting Spirits: The boss will take a drink and receive a buff, also inflicting partywide magic damage.
- Worldly Pursuit: Spawns two massive line AoEs in a plus formation. These will rotate either clockwise or counterclockwise depending on the arrows telegraph.
- Biwa Breaker: Five hits of physical partywide damage. Mitigate and heal through.
The next set of attacks are used regardless of route:
- Rousing Reincarnation: Partywide magic damage and applies three


 Rodential Rebirth debuffs to each player.
- Malformed Prayer: Sequentially summons three orange towers marked with a rodent symbol. Players will need to cleanse their debuffs by soaking a tower, which will both prevent it from exploding and from them being turned into a rodent, which will incapacitate them.
- During the towers, the boss will use Impure Purgation, creating two sets of conal AoEs that should be dodged.
- Spike of Flame: Baited circle AoEs on each player.
- Flame and Sulphur: Summons both blue flames telegraphing line AoEs and stones telegraphing circle AoEs.
- These AoEs will be transformed similarly as before.
- Plectrum of Power: Dodge in an area that initially far away from all AoEs because they will all expand.
- Morphic Melody: Dodge in an area that initially is overlapping with both a line and circle AoE.
- Torching Torment: Telegraphed AoE tankbuster.
- String Snap: Spawns a cascading earthquake AoE.
Mononoke: Shishio
Second boss of the right path.
- Enkyo: Partywide magical damage.
- Stormcloud Summons: Spawns a AoE that will inflict damage-over-time to anyone who steps in it and compresses the arena to a circle, along with several untargetable Raiun (small red clouds).
- Smokeater: The boss will inhale one set of clouds, removing them from the arena. In later usages, the boss may inhale two or three times, removing more clouds. The number of inhalations determines the number of line AoEs the boss will do and the resulting size of the cloud explosions in its next attack.
- Once on Rokujo: If the boss inhaled once, it will telegraph a dark red line AoE. Note that the arrangement of rocks on the floor denotes the range of the AoE if the telegraph is hard to see.
- Two clouds on opposite sides will be inside the AoE.
- After the AoE resolves, the clouds inside the AoE will explode as a medium-sized point-blank AoE (Leaping Levin) with a brief telegraph.
- Other clouds in range of the prior cloud explosions will explode themselves, leading to a chain reaction.
- Players should locate a cloud inside the line AoE telegraph, go across the line from it, and dodge into the first explosion.
- Twice on Rokujo: If the boss inhaled twice, it will telegraph two line AoEs in sequence. Each will contain two opposite cloud adds inside the AoE. Two remaining clouds will be outside the AoEs.
- When the clouds are hit, they will explode as a large point-blank AoE with a brief telegraph.
- Similar to Once on Rokujo, locate the first line AoE and a cloud inside the AoE, go across from it, and dodge into the first explosion.
- Thrice on Rokujo: If the boss inhaled thrice, it will telegraph three line AoEs in sequence. One line AoE will contain two opposite clouds.
- Locate a region that is safe from all line AoEs, or dodge into the first one and away from both clouds.
- The clouds will each explode in a massive point-blank AoE, so be at the wall as far away from them as possible.
- Splitting Cry: Conal AoE tankbuster.
The next set of attacks will depend on the route:
(Route 8) If all four Stones of Protection were cleaned:
- Haunting Cry: Summons several untargetable adds with the system message "Startled wildlife heed the cry!"
- Four Clever Thralls (baboons) will be at one wall. They will begin moving across at varying speeds and occasionally use a point-blank AoE (Unsagely Spin).
- Four Feral Thralls (tigers) will be on an adjacent wall. Each will telegraph a line AoE (Rush), leaving safe gaps in between.
- Four Venomous Thralls (snakes) will spawn, one per cardinal. Each will telegraph two sets of circular AoE (Vasoconstrictor) on or near players.
- At the end of this sequence, the boss will jump to the middle and use Thunder Vortex, a donut AoE.
(Route 9) If not all four Stones of Protection were cleaned:
- Haunting Cry: Minor partywide damage (Focused Tremor) and covers around 75% of the arena with quicksand. Displays the system message "Lacking divine protection, the ground buckles beneath you..."
- Any player who steps in the quicksand will receive a 12-second
 Six Fulms Under debuff. If the timer reaches 0, they will die. The debuff will be cleansed if the player leaves the quicksand.
 - Yoki: Spawns two sets of multiple circular AoEs. Dodge these on the solid ground.
- Yoki-uzu: The boss will jump to the edge with solid ground and telegraph a massive circular AoE. Players must avoid it by moving far into the quicksand region, then back to the solid ground to prevent the quicksand from killing them. Being hit with the AoE will inflict Hysteria. Using a gap closer is strongly recommended, if possible.
- The boss will cast Enkyo again, which also removes the quicksand.
(Route 10) If the party interacted with the Iwakura:
- Haunting Cry: Summons four untargetable Devilish Thrall (ghoul) adds, one per cardinal. Each add will have an orange ring indicating where it is facing. Displays the system message "Ghastly shadows heed the cry!"
- Two adds will use Left Swipe while the others will use Right Swipe, which are 180 degree cleaves based on which arm is being raised. This will leave a square region between two adjacent adds safe.
- The safe area will always be opposite the two adjacent adds that are facing the middle, or directly in between the two adjacent adds that are facing away from each other.
- After the first set of cleaves, each add will rotate to a different direction and use another cleave.
(Route 11) If the party interacted with the Ancient Tree:
- Haunting Cry: Summons four untargetable Haunting Thrall (ghost) adds. Displays the system message "Departed Spirits heed the cry!"
- Each ghost will tether to one player and follow them. If there are fewer than 4 players, the untethered ghosts will move around randomly.
- The ghosts will emit untelegraphed, point-blank AoEs (Reisho) that should be avoided.
- At the end of this sequence, the boss will jump to the middle and use Thunder Vortex, a donut AoE.
The next set of attacks are used regardless of route:
- Stormcloud Summons / Smokeater: Similar as before, but all clouds will spawn at the edge of the arena.
- Thunder Onefold / Twofold / Threefold: The clouds will begin aiming numerous telegraphed line AoEs (Cloud to Cloud) through the arena aimed at other random clouds, requiring tricky dodging. If the boss inhaled more than once, there will be fewer clouds and AoEs to deal with, but the AoEs will be wider.
- Noble Pursuit: The boss will jump to one wall and telegraph a line AoE dash through the middle. In addition, three sets of rings will spawn in the telegraph. These will use an untelegraphed line AoE perpendicular to them when the boss dashes through them. Once the boss reaches the other side, it will cast Thunder Vortex, a donut AoE.
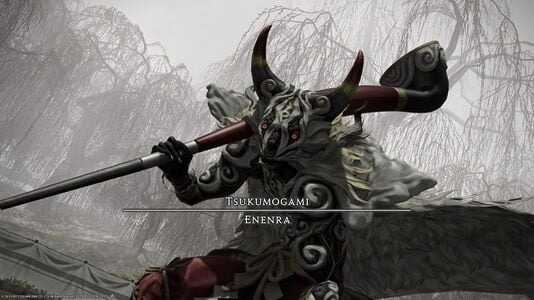
Tsukumogami: Enenra
Secret second boss of the middle path, path 12. Shortly after engaging the boss, the arena will be surrounded with an AoE that will inflict damage-over-time to anyone who steps in it.
- Flagrant Combustion: Partywide damage.
- Out of the Smoke: Gradually spawns a curving trail of purple smoke. At the end of the cast, the boss will teleport to the end of the trail, face the middle of the arena and use Into the Fire, a briefly telegraphed 180 degree frontal cleave.
- Kiseru Clamor: Spawns two sequential, opposite cascading earthquake AoEs.
- Smoke and Mirrors: Summons a targetable clone of the boss and splits its current health with it.
- The clones will use Kiseru Clamor twice in a row so dodge the AoEs.
- They will then both use Out of the Smoke and Into the Fire, leaving a small corner safe from both cleaves.
- Clearing Smoke / Smoke Rings: Both bosses will teleport to the wall, opposite from each other, and tether. A mechanic telegraph will appear in the middle, either a knockback that can be prevented with knockback immune actions, or a large point-blank AoE (blue circle) hitting the middle.
- Smoke Stack: The bosses will reform into one.
- Smoldering Damnation: Summons multiple purple AoEs, which will gradually expand in three sets. AoEs that are about to go off will turn red.
- Pipe Cleaner: Tethers one player and hits them with a line AoE.
- The boss will use Smoke and Mirrors again.
- Both bosses will use Flagrant Combustion.
- They will then use a combination of Smoldering Damnation and Clearing Smoke / Smoke Rings, so dodge the AoE sets, then resolve the knockback or point-blank AoE.
- They will then re-fuse with Smoke Stack.
- Snuff: Telegraphed AoE tankbuster that will leave behind a briefly telegraphed circular AoE that should be avoided.
Loot
Mount Rokkon uses personal loot, so players have to be sure to click and loot each chest themselves. If the party chooses the same portal that the NPC suggests at the start of the dungeon, an additional treasure coffer will spawn later on the path, immediately prior to the second boss.
| Name | Type | Item Level | Rarity | Quantity |
|---|---|---|---|---|
| Rokkon Potsherd | Other | 1 | Basic | 1 |
| Name | Type | Item Level | Rarity | Quantity |
|---|---|---|---|---|
| Moko the Restless Card | Triple Triad Card | N/A | 1 | |
| Rokkon Potsherd | Other | 1 | Basic | 2 |
| Name | Type | Item Level | Rarity | Quantity |
|---|---|---|---|---|
| Gorai the Uncaged Card | Triple Triad Card | N/A | 1 | |
| Rokkon Potsherd | Other | 1 | Basic | 2 |
| Name | Type | Item Level | Rarity | Quantity |
|---|---|---|---|---|
| Rokkon Potsherd | Other | 1 | Basic | 2 |
| Shishio Card | Triple Triad Card | N/A | 1 |
| Name | Type | Item Level | Rarity | Quantity |
|---|---|---|---|---|
| Enenra Card | Triple Triad Card | N/A | 1 | |
| Rokkon Potsherd | Other | 1 | Basic | 2 |
Treasure Coffers
 Treasure Coffer
| Name | Type | Item Level | Rarity | Quantity |
|---|---|---|---|---|
| Magicked Prism (Onibi) | Other | 1 | Basic | 1 |
| Shishu Reiseki | Material | 610 | Basic | 1 |
| Far Eastern Brazier | Other | 1 | Basic | 1 |
| Stone Toro Lantern | Other | 1 | Basic | 1 |
| Planted Toro Lantern | Other | 1 | Basic | 1 |
| Tsukumogami Parasol | Other | 1 | Basic | 1 |
| Komainu Statue | Other | 1 | Basic | 1 |
| Okuri Chochin | Minion | N/A | Basic | 1 |
| Shiromaru | Minion | N/A | Basic | 1 |
| Kuromaru | Minion | N/A | Basic | 1 |
Achievements
This duty is associated with the following achievements:
| Name | Points | Task | Reward | Patch |
|---|---|---|---|---|
| The Lion Kingslayer | 5 | Defeat Shishio in the Mount Rokkon variant dungeon. | - | 6.45 |
| Rattling The Uncaged | 5 | Defeat Gorai the Uncaged in the Mount Rokkon variant dungeon. | - | 6.45 |
| Cut Above The Restless | 5 | Defeat Moko the Restless in the Mount Rokkon variant dungeon. | - | 6.45 |
| Up In Smoke | 5 | Defeat Enenra in the Mount Rokkon variant dungeon. | - | 6.45 |
| Mononopeke | 10 | Unlock all exorcism records on Mount Rokkon. | Burabura Chochin Whistle | 6.45 |
| Mapping the Realm: Mount Rokkon | 10 | Discover every location within the Mount Rokkon variant dungeon. | - | 6.45 |
Music
| Section | Theme |
|---|---|
| Main | Crimson Sunset (Piano Collections) |
| Mid-Boss | Looping in the Deepest Fringes |
| Final Bosses | Stormblood |
| Secret Final Boss | Triumph |
Note: The final bosses theme is the first half of the Stormblood trailer music and is not present in the Orchestrion Roll version, which only contains the second half.
Gallery
Gear Images
-
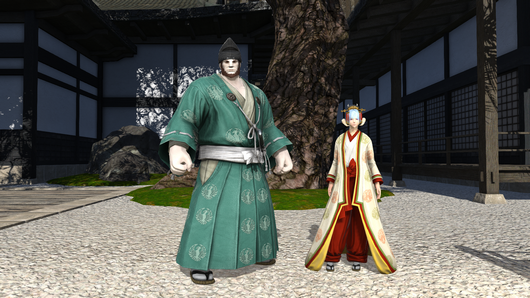 Shishu Glamour Set Front
 -
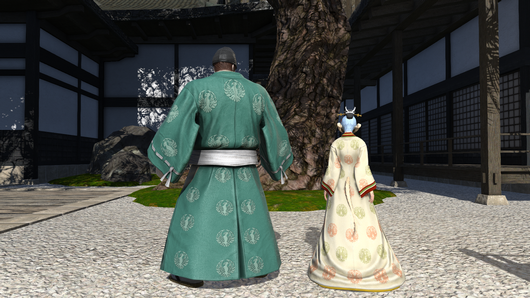 Shishu Glamour Set Back


Dungeon Images
-
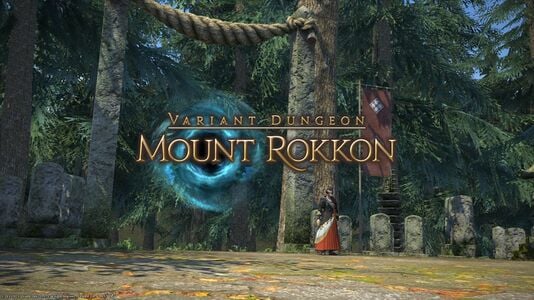
-

-
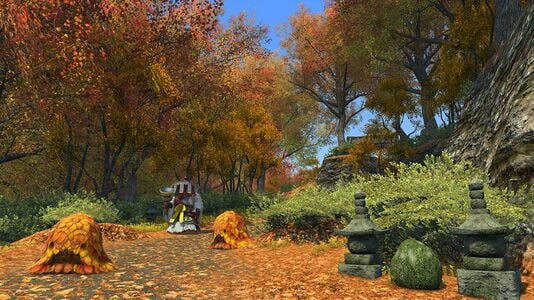
-
-

-
-
-

-
-
 Map
Map


.jpg)


External Links
| Endwalker (Lv. 90) | |||||
|---|---|---|---|---|---|
| Dawntrail (Lv. 90-100) | |||||