Cutter's Cry
Cutter's Cry

- Level
- 38 (Sync: 40)
- Difficulty
- Normal
- Party size
- Light Party
4 man • 1 1
1  2
2 
- Unsyncing
- Allowed
- Time limit
- 90 minutes
- Phoenix Down
- Available
- Duty Finder
- Dungeons (A Realm Reborn)
- Roulette
- Leveling
- Req. quest
- Dishonor Before Death
- Entrance
- Central Thanalan (X:15, Y:14)
- Region
- Thanalan
- Modes
 Explorer
 Duty Support
- Patch
- 2.0
- Links
- EDB GT TC
Near an old mountain path once used by Sixth Astral Era woodcutters as a detour through the more perilous stretches of northern Thanalan, lies a cave sought out only by the ignorant or the foolish. Upon first glance, the shade of its maw might appear inviting to one who seeks to escape the punishing rays of the midday sun. However, any good woodcutter knows to keep his distance, for it is said all who enter, never return - the cries of the damned echoing up from the depths the only testament to their folly. Heed this dire warning, and you may live. Ignore it, and soon it shall be your screams that add to the cacophony.
— In-game description
Cutter's Cry is a level 38 dungeon introduced in patch 2.0. This dungeon was carried forward from 1.x and revamped. In patch 7.3, additional changes were implemented with the addition of Duty Support for this dungeon.
Duty Support
| Scion Marauder | Scion Conjurer | Scion Thaumaturge | Scion Lancer | |
|---|---|---|---|---|

|

|

|

| |
| Class | ||||
| Role | Tank | Healer | DPS | DPS |
Objectives
- Slay all the enemies: 0/8
- Slay all the enemies: 0/8
- Clear the Feeding Pit: 0/1
- Clear the Sunken Antechamber: 0/1
- Defeat the chimera: 0/1
Walkthrough
The dungeon layout is relatively straightforward, with only a few branching paths.
In the first two rooms, the party must defeat all enemies and interact with the Shifting Sands to proceed to the next room.
In the third room, take the left path at the intersection to reach the first boss. The right path is a dead end containing only enemies and no bonus treasure coffer.
In the section between the first and second bosses, the party will again progress by interacting with Shifting Sands. These will spawn once a sufficient number of enemies in the room (around 2 packs) have been defeated.
The section before the last boss contains two branching paths with a treasure coffer in each one. Many parties will skip these.
Enemies
- Myrmidon Sentry
- Sand Bat (uses blue mage spell Blood Drain)
- Quicksand Basilisk
- Shrapnel (uses blue mage spell Self-destruct)
- Myrmidon Soldier
- Myrmidon Guard
- Myrmidon Marshal
- Sandstorm
- Sandshell
- Sabotender Desertor (uses blue mage spell 1000 Needles)
- Canyon Condor
- Slipsand
- Arkose Golem
- Schorl Doblyn
- Spriggan Crier
- Cacophony
Bosses
- Stone II is a telegraphed circle AoE on a player's location.
- Mandible Bite is a telegraphed frontal conal AoE.
- Silence is a spell used to
 Silence a party member for a short time. Can be interrupted to stop.
 - Trap Jaws is a multi-hit instant melee attack.
Periodically, the boss will summon three types of adds:
- Myrmidon Soldier is the least dangerous add type. It only has a basic attack.
- Myrmidon Guard is a slightly stronger add. It also has Mandible Bite, the frontal AoE cone ability.
- Myrmidon Marshal is the strongest add. It has an AoE frontal cone ability, Mandible Bite, that damages all targets caught within. The Marshal can also use an ability named Formic Pheromones, which puts a Vulnerability Down buff on Myrmidon Princess. Will be indicated by it tethering to the Princess.
The boss will summon 4 soldiers, then 1 guard, then 1 marshal. Repeat summonings will either be 2 soldiers or 1 guard; it will not summon the marshal again.
Throughout the fight, the Giant Tunnel Worm will submerge underneath the sandy grounds of the boss room. The worm is the most dangerous when it is submerged. The worm's main abilities include:
- Sandstorm is an instant frontal attack that deals a small amount of damage.
- Sand Cyclone is a spell that targets a random party member. It does a small amount of damage and inflicts a damage over time debuff.
- Sand Pillar is used when it is burrowed. Sand Pillar damages any player standing on top of the sand trap.
- Earthbreak is used when it is burrowed. Tunnel Worm explodes out of the ground and heavily damages anyone near it.
- Bottomless Desert is used by the Worm when it is burrowed. It appears as a whirlwind on the ground, does small amount of damage and pulls all party members towards its center.
- Sludge is a single-target ability used by the Worm. It inflicts a heavy
 Sludge DoT (~200 HP per tick) on a player which should be removed as soon as possible. Target priority does not seem to factor in who gets attacked.
Spreading out when the worm submerges reduces the chance that multiple party members will be hit when it emerges from the sand. It is important that after it does the Bottomless Desert that adventurers move out of the center to not get hit when the worm emerges.
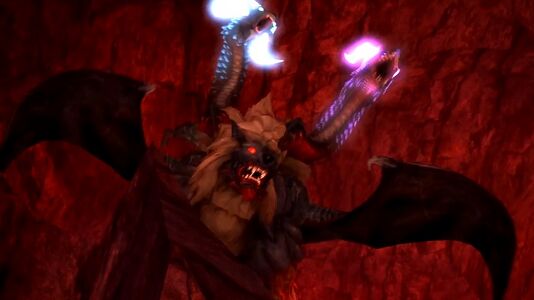
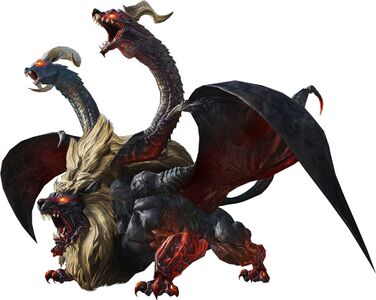
The final boss of Cutter's Cry, the Chimera requires players to pay attention to its cast bar for some attacks to avoid them, rather than relying entirely on orange ground AoE indicators. Being hit with avoidable AoEs may inflicts some cleansable status effects that the healer should remove with Esuna.
- Lion's Breath: An instant, untelegraphed frontal cleave. Tank should face boss away from party so others are not hit by this.
- The Ram's Breath / The Dragon's Breath. Both are telegraphed conal AoEs. Ram's Breath causes ice damage and
 Heavy on the right side of its body and Dragon's Breath causes thunder damage and
  Paralysis on the left side of its body. Non-tanks can stand directly behind the Chimera to avoid these cones, but the tank will have to move left or right to sidestep out of the way.
The Chimera's main mechanics are either The Dragon's Voice[1] and The Ram's Voice[1]. When players see one of the two messages below in the chat log, they need to either move closer to the boss or away from it. Neither of these attacks have orange ground AoE indicators.
- When the Chimera's eyes glow violet - The Dragon's Voice, a donut thunder AoE attack that damages and inflicts Paralysis on everyone outside of Chimera's melee range. All players should move toward the boss immediately.
- When the Chimera's eyes glow blue - The Ram's Voice, a point-blank ice AoE that damages and inflcits Heavy on everyone in Chimera's melee range. All players should move away from it to dodge.
The Chimera will randomly begin targeting adventurers with two new abilities as well:
- Cacophony: The Chimera will re-center itself and mark one player with an orange marker. It then sends out a purple ball of energy that travels to the target and explodes. That party member targeted by this ability should move away from the ball immediately. If the ball hits a player while it is traveling, it will explode immediately. The explosion not only damages players but also inflicts Paralysis on them.
- Lightning Storm: Telegraphed circle AoEs at two random players' locations.
[1] ![]() Blue Mages can learn these spells.
Blue Mages can learn these spells.
Loot
| Name | Type | Item Level | Rarity | Quantity |
|---|---|---|---|---|
| Conquistador Elmo | Head | 40 | Green | 1 |
| Poacher's Hat | Head | 40 | Green | 1 |
| Divining Hat | Head | 40 | Green | 1 |
| Seer's Cowl | Body | 40 | Green | 1 |
| Conquistador Vambraces | Hands | 40 | Green | 1 |
| Venerer's Bracers | Hands | 40 | Green | 1 |
| Divining Halfgloves | Hands | 40 | Green | 1 |
| Aetherial Heliodor Earrings | Earrings | 39 | Aetherial | 1 |
| Aetherial Garnet Earrings | Earrings | 39 | Aetherial | 1 |
| Aetherial Amethyst Earrings | Earrings | 39 | Aetherial | 1 |
| Aetherial Goshenite Earrings | Earrings | 39 | Aetherial | 1 |
| Aetherial Pearl Earrings | Earrings | 39 | Aetherial | 1 |
| Aetherial Peridot Earrings | Earrings | 39 | Aetherial | 1 |
| Aetherial Aquamarine Earrings | Earrings | 39 | Aetherial | 1 |
| Aetherial Heliodor Choker | Necklace | 38 | Aetherial | 1 |
| Aetherial Garnet Choker | Necklace | 38 | Aetherial | 1 |
| Aetherial Amethyst Choker | Necklace | 38 | Aetherial | 1 |
| Aetherial Goshenite Choker | Necklace | 38 | Aetherial | 1 |
| Aetherial Pearl Choker | Necklace | 38 | Aetherial | 1 |
| Aetherial Peridot Choker | Necklace | 38 | Aetherial | 1 |
| Aetherial Aquamarine Choker | Necklace | 38 | Aetherial | 1 |
| Aetherial Wolf Necklace | Necklace | 37 | Aetherial | 1 |
| Name | Type | Item Level | Rarity | Quantity |
|---|---|---|---|---|
| Kokoroon's Darkshell Mail | Body | 40 | Green | 1 |
| Poacher's Tunic | Body | 40 | Green | 1 |
| Loyalist's Bliaud | Body | 40 | Green | 1 |
| Paladin's Trousers | Legs | 40 | Green | 1 |
| Poacher's Kecks | Legs | 40 | Green | 1 |
| Divining Gaskins | Legs | 40 | Green | 1 |
| Aetherial Red Coral Armillae | Bracelets | 39 | Aetherial | 1 |
| Aetherial Heliodor Bracelet | Bracelets | 38 | Aetherial | 1 |
| Aetherial Garnet Bracelet | Bracelets | 38 | Aetherial | 1 |
| Aetherial Amethyst Bracelet | Bracelets | 38 | Aetherial | 1 |
| Aetherial Goshenite Bracelet | Bracelets | 38 | Aetherial | 1 |
| Aetherial Pearl Bracelet | Bracelets | 38 | Aetherial | 1 |
| Aetherial Peridot Bracelet | Bracelets | 38 | Aetherial | 1 |
| Aetherial Aquamarine Bracelet | Bracelets | 38 | Aetherial | 1 |
| Aetherial Boarskin Wristbands | Bracelets | 37 | Aetherial | 1 |
| Aetherial Heliodor Ring | Ring | 39 | Aetherial | 1 |
| Aetherial Garnet Ring | Ring | 39 | Aetherial | 1 |
| Aetherial Amethyst Ring | Ring | 39 | Aetherial | 1 |
| Aetherial Goshenite Ring | Ring | 39 | Aetherial | 1 |
| Aetherial Pearl Ring | Ring | 39 | Aetherial | 1 |
| Aetherial Peridot Ring | Ring | 39 | Aetherial | 1 |
| Aetherial Aquamarine Ring | Ring | 39 | Aetherial | 1 |
| Aetherial Mythril Ring | Ring | 37 | Aetherial | 1 |
- Chimera Card (Drops at a fixed rate)
| Name | Type | Item Level | Rarity | Quantity |
|---|---|---|---|---|
| Paladin's Crier Arms (Lv. 38) | Other | 1 | Green | 1 |
| Crier's Bhuj | Marauder's Arm | 40 | Green | 1 |
| Crier's Claymore | Dark Knight's Arm | 40 | Green | 1 |
| Crier's Halberd | Lancer's Arm | 40 | Green | 1 |
| Crier's Baghnakhs | Pugilist's Arm | 40 | Green | 1 |
| Crier's Knives | Rogue's Arm | 40 | Green | 1 |
| Crier's Composite Bow | Archer's Arm | 40 | Green | 1 |
| Crier's Carbine | Machinist's Arm | 40 | Green | 1 |
| Crier's Staff | Two-handed Thaumaturge's Arm | 40 | Green | 1 |
| Crier's Grimoire | Arcanist's Grimoire | 40 | Green | 1 |
| Crier's Radical | Two-handed Conjurer's Arm | 40 | Green | 1 |
| Crier's Star Globe | Astrologian's Arm | 40 | Green | 1 |
| Conquistador Thighboots | Feet | 40 | Green | 1 |
| Engineer's Leggings | Feet | 40 | Green | 1 |
| Divining Moccasins | Feet | 40 | Green | 1 |
| Abomination Orchestrion Roll | Other | 1 | Basic | 1 |
| The Ram's Voice | N/A | 1 | ||
| The Dragon's Voice | N/A | 1 |
Treasure Coffers
 Treasure Coffer 1 (The Wet Sands,(X:16.0, Y:9.9)
| Name | Type | Item Level | Rarity | Quantity |
|---|---|---|---|---|
| Seer's Cowl | Body | 40 | Green | 1 |
| Conquistador Thighboots | Feet | 40 | Green | 1 |
| Engineer's Leggings | Feet | 40 | Green | 1 |
| Divining Moccasins | Feet | 40 | Green | 1 |
| Aetherial Heliodor Earrings | Earrings | 39 | Aetherial | 1 |
| Aetherial Garnet Earrings | Earrings | 39 | Aetherial | 1 |
| Aetherial Amethyst Earrings | Earrings | 39 | Aetherial | 1 |
| Aetherial Goshenite Earrings | Earrings | 39 | Aetherial | 1 |
| Aetherial Pearl Earrings | Earrings | 39 | Aetherial | 1 |
| Aetherial Peridot Earrings | Earrings | 39 | Aetherial | 1 |
| Aetherial Aquamarine Earrings | Earrings | 39 | Aetherial | 1 |
| Aetherial Heliodor Choker | Necklace | 38 | Aetherial | 1 |
| Aetherial Garnet Choker | Necklace | 38 | Aetherial | 1 |
| Aetherial Amethyst Choker | Necklace | 38 | Aetherial | 1 |
| Aetherial Goshenite Choker | Necklace | 38 | Aetherial | 1 |
| Aetherial Pearl Choker | Necklace | 38 | Aetherial | 1 |
| Aetherial Peridot Choker | Necklace | 38 | Aetherial | 1 |
| Aetherial Aquamarine Choker | Necklace | 38 | Aetherial | 1 |
| Aetherial Wolf Necklace | Necklace | 37 | Aetherial | 1 |
Treasure Coffer 2 (The Wet Sands,(X:16.7, Y:7.2)
| Name | Type | Item Level | Rarity | Quantity |
|---|---|---|---|---|
| Conquistador Elmo | Head | 40 | Green | 1 |
| Poacher's Hat | Head | 40 | Green | 1 |
| Divining Hat | Head | 40 | Green | 1 |
| Conquistador Vambraces | Hands | 40 | Green | 1 |
| Venerer's Bracers | Hands | 40 | Green | 1 |
| Divining Halfgloves | Hands | 40 | Green | 1 |
Treasure Coffer 3 (The Blue Sands,(X:8.8, Y:6.8)
| Name | Type | Item Level | Rarity | Quantity |
|---|---|---|---|---|
| Kokoroon's Darkshell Mail | Body | 40 | Green | 1 |
| Poacher's Tunic | Body | 40 | Green | 1 |
| Loyalist's Bliaud | Body | 40 | Green | 1 |
| Paladin's Trousers | Legs | 40 | Green | 1 |
| Poacher's Kecks | Legs | 40 | Green | 1 |
| Divining Gaskins | Legs | 40 | Green | 1 |
Treasure Coffer 4 (The Blue Sands,(X:6.5, Y:9.7)
| Name | Type | Item Level | Rarity | Quantity |
|---|---|---|---|---|
| Paladin's Crier Arms (Lv. 38) | Other | 1 | Green | 1 |
| Crier's Bhuj | Marauder's Arm | 40 | Green | 1 |
| Crier's Claymore | Dark Knight's Arm | 40 | Green | 1 |
| Crier's Halberd | Lancer's Arm | 40 | Green | 1 |
| Crier's Baghnakhs | Pugilist's Arm | 40 | Green | 1 |
| Crier's Knives | Rogue's Arm | 40 | Green | 1 |
| Crier's Composite Bow | Archer's Arm | 40 | Green | 1 |
| Crier's Carbine | Machinist's Arm | 40 | Green | 1 |
| Crier's Staff | Two-handed Thaumaturge's Arm | 40 | Green | 1 |
| Crier's Grimoire | Arcanist's Grimoire | 40 | Green | 1 |
| Crier's Radical | Two-handed Conjurer's Arm | 40 | Green | 1 |
| Crier's Star Globe | Astrologian's Arm | 40 | Green | 1 |
Achievements
This duty is associated with the following achievements:
| Name | Points | Task | Reward | Patch |
|---|---|---|---|---|
| Mapping the Realm: Cutter's Cry | 10 | Discover every location within Cutter's Cry. | - | 2.0 |
Gallery
Gear Images


Dungeon Images
-
 Chimera
 -


Music
| Condition | Theme |
|---|---|
| Main | Abomination |
| Battle | A Fell Air Falleth |
| Mid-Bosses | A Fine Death |
| Final Boss | Nemesis |
Lore
The Devourer Of Darklight
Near an old mountain path used by woodcutters as a detour through the more perilous stretches of northern Thanalan lies a cave sought out only by the ignorant or the foolish. Upon first glance, the shade of its maw might appear inviting to one who seeks to escape the punishing rays of the midday sun. However, any good woodcutter knows to keep his distance, for it is said that those who enter never return—the cries of the damned echoing, up from the depths the only testament to their folly.
As the Sixth Astral Era drew to a close, Cutter's Cry claimed for its legend a vaunted name—that of the Darklight Raiders. Hardened warriors all, it was believed that they would make short work of the fiends within, but none would return from that mission save for one man. This survivor, Sibold, spoke of their ill-fated encounter with the dread chimera, who slew all of his comrades, even their inimitable leader, Gerbald the Red. While his memory of the battle was hazy, the creature’s disappearance afterwards led some to believe that the Darklight Raiders may have triumphed after all, albeit at a high price.
Years later, following the Calamity, unsettling reports began to emerge that the chimera's spine-chilling growl could be heard deep within the cave once more...
The Chimera
For its insatiable appetite for manflesh, this abominable specimen was given the name "Craver" by woodcutters. Despite suffering grievous wounds in its encounter with the Darklight Raiders, it survived to make a fall recovery and resumed its reign of terror. While presumed to trace its origins from the chimerical creations of the Allagan Empire, it is not known how it came to inhabit Cutter's Cry.
The Myrmidon Princess
An antling species native to Thanalan, myrmidon society is centered around a queen. When an heir—the princess—is born, the queen goes into exile, taking half the colony with her, while the rest remain to serve her successor.
More
Carved splendidly smooth by erosion, the rock formations are a sight to behold, but one would do well not to admire them overlong —lest she become fodder for fell fiends.
History
- In patch 7.3, the following changes were implemented with the addition of Duty Support to the dungeon:
- The shifting sands that allow players to progress through the second part of the dungeon will now appear after defeating a certain number of enemies (around 2 packs). Previously, these were available from the start, and players may have skipped the enemies, which occasionally created conflicts in matchmade groups.
- The Myrmidon Princess boss battle has been adjusted.
- Myrmidon adds now spawn on a timer instead of being HP based.
- Previously spawned multiple types of adds at once.
- The Haste that the boss previously cast on the adds has been removed.
- The tether graphical effect of the Myrmidon Marshal has been adjusted. It now uses the animation and tether of the
 Paladin action Cover (previously, it was just a thin yellow tether).
 - The Myrmidon Marshal now buffs the boss with Vulnerability Down instead of giving a regen.
- Now uses Stone II, a circle AoE telegraph aimed at a random player.
- The Chimera boss battle has been adjusted:
- Boss now centers itself before using Cacophony.
- The player targeted with Cacophony is now marked with an orange overhead marker (previously orange crosshairs).
- The Ram's Keeper, an attack which left persistent ice puddles, has been replaced with Lightning Storm, which does not leave puddles.
| A Realm Reborn (Lv. 15-50) | |||||
|---|---|---|---|---|---|
| Heavensward (Lv. 51-60) | |||||
| Stormblood (Lv. 61-70) | |||||
| Shadowbringers (Lv. 71-80) | |||||
| Endwalker (Lv. 81-90) | |||||
| Dawntrail (Lv. 91-100) | |||||
| Seasonal |
| ||||