Aloalo Island
Aloalo Island

- Level
- 90 (Sync: 90)
- Item Level
- 605 (Sync: 665)
- Difficulty
- Normal
- Party size
- Flexible
1-4 man • 1-4
- Unsyncing
- Not Allowed
- Time limit
- 90 minutes
- Phoenix Down
- Available
- Duty Finder
- V&C Dungeon Finder
- Tomestones
 25
25 - Req. quest
- Stranger from Paradise
- Entrance
- Thavnair (X:24.7, Y:37.0)
- Region
- ???
- Patch
- 6.51
- Links
- GT TC
In a seldom-traveled corner of the south sea isles lies Aloalo, an island filled with lush vegetation and teeming with vibrant wildlife. Yet the survival of this paradise hinges on a delicate natural balance which has only grown more precarious since the island's stewards departed a century ago. Answering the plea of a messenger most peculiar, you must join Matsya on a journey to restore order to Aloalo, and in the process uncover secrets long forgotten.
— In-game description
Aloalo Island is a level 90 variant dungeon introduced in patch 6.51 with Endwalker.
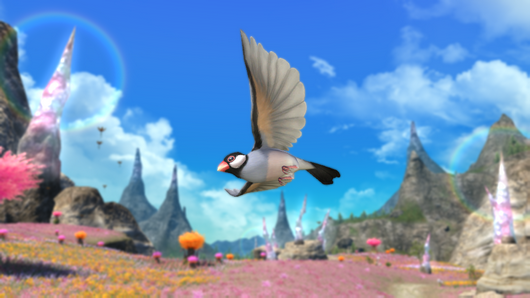
The dungeon's rewards are cosmetic in nature: the Free Spirit's Glamour Set, as well as other glamour items, can be acquired for the currency obtained in the dungeon, while the Spectral Statice mount is obtained for completing all 12 Aloalo Conservation Records (i.e., different endings depending on the dungeon mechanisms activated and paths taken).
Objectives
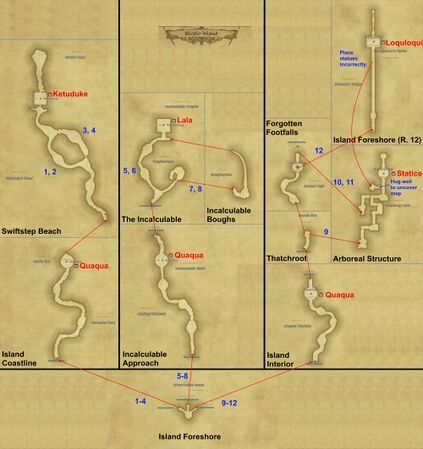
The party may unlock up to one entry in the Aloalo Conservation Record per instance.
Random events or player choices prior to the first boss will influence the first boss's mechanics. Player choices after the first boss will influence the second boss's mechanics and determine the lore entry unlock.
| # | Icon | Name | Path | Solution |
|---|---|---|---|---|
| 1 | A Not-quite Deserted Island | Left | Decline Matsya's request to fish. Do not assist Zozone (the Lalafell NPC). He will flee once his health is 0. | |
| 2 | The First Settlers Of Aloalo Island | Left | Decline Matsya's request to fish. Heal Zozone (can use Variant Cure if not on healer) or prevent them from dying by getting aggro on the enemies. | |
| 3 | God Of Heaven And Sea | Left | Allow Matsya to fish. Later, interact with the patch of sand (right) to receive a Southern Sow Bug. | |
| 4 | A Noxious Gift | Left | Allow Matsya to fish. Later, interact with the mound of rocks (left) to receive a Southern Worm. | |
| 5 | The Roots Of Arcanima | Middle | Go straight through and defeat the enemies, ignore any interactions. | |
| 6 | Under The Boughs Of The Great Tree | Middle | On both the second and third groups of enemies after the first boss, go into the red-flowered bushes and scare off both sets of armadillos at the end of the hidden paths (one set per path). | |
| 7 | A Dear Friend | Middle | After the first boss, kill the treant first, then kill all the caterpillars on the sigil. During the last group of enemies, do not damage J'jhimei behind the left wood golem. After several seconds, the golems will become active and attack the player. | |
| 8 | Fish For The Mind | Middle | After the first boss, kill the treant first, then kill all the caterpillars on the sigil. During the last group of enemies, also hit J'jhimei behind the left wood golem. | |
| 9 | A Familiar History | Right | Accept Statice's offer and interact with the portal she spawns. | |
| 10 | The Remnants Of Faith | Right | This lore entry can be obtained by accepting or denying Statice's offer.
Accept Statice's offer. Interact with the portal and kill the six raptors in the following room. On the right side of the next hallway there is a tunnel hidden by vines. Pass through the vines and continue down the tunnel into the crocodile room, avoiding Statice's whoopee cushion trap. Deny Statice's offer three times. Do not interact with the treasure boxes. Ignore the animal statues and pull the lever. | |
| 11 | A Lalafell Or A Fish? | Right | Deny Statice's offer three times. Interact with a treasure box and defeat the mimics. Ignore the animal statues and pull the lever. | |
| 12 | Wellspring Of Golden Memories | Right | This is the path to Loquloqui. Deny Statice's offer three times. Continue until reaching the three animal statues, and complete the three rituals correctly:
(1) (2) (3) Notes: Saying the initial phrase will cause the corresponding statue to glow, a symbol to appear above the player's head who will be given a buff, and a blue circle to in front of the statue, where they should begin their rotation movements. Performing a step correctly will trigger a sound effect. Players have 1 minute to complete each ritual once they say the activation phrase. If the player takes too long for a ritual, the symbol/buff will disappear and it will fail. Only the player with the buff can complete the ritual. Each ritual can be completed in any order, but once a ritual is started, it must be completed correctly before starting the next. Failed rituals can be re-tried once the buff runs out, so long as the lever isn't pulled. Afterwards, follow Matsya down the secret passage and continue through the foggy area, defeating the enemies and collecting the leather sack from Whasbyrm. In the area before the final boss, place the statues correctly: sparrow furthest from the boss room, whale middle, then turtle closest to the boss room. If done correctly, the mist will clear and the player will proceed to the secret boss. |
Note: If using a guide to complete the routes, it is recommended to attempt route 12 before 10-11, because if the player fails, they can still unlock the others. Completing Route 12 will unlock A Fish a Day, the second and final quest in the Aloalo Island questline.
To uncover the map in the closed-off room to the left, just before Statice's boss room, hug the left hallway at the bottom of the cliff from the room until the map is revealed. The room can normally be accessed by successfully completing the rituals and entering the secret foggy area (route 12) but not placing the statues correctly.
Enemies
Left Path
- Aloalo Paddle Biter
- Aloalo Uragnite
- Aloalo Snipper
- Aloalo Biast
- Aloalo Anala
- Aloalo Khalamari
- Aloalo Sallet
- Aloalo Kiwakin
- Aloalo Zaratan
- Aloalo Ogrebon
- Aloalo Ray
Middle Path
- Aloalo Worm
- Aloalo Gigantoad
- Aloalo Nepenthes
- Aloalo Monstera
- Aloalo Crawler
- Aloalo Treant
- Aloalo Mantis
- Aloalo Islekeeper
- Bird of Aloalo
- Aloalo Ahool
- Aloalo Vanara
- Aloalo Susena
- Aloalo Wood Golem
- Jolly-tailed J'jhimei
Right Path
- Aloalo Hamsa
- Aloalo Ochu
- Aloalo Deadly Coconut
- Aloalo Asvattha
- Aloalo Raptor
- Aloalo Baritine Croc
- Aloalo Sopranine Croc
- Aloalo Goobbue
- Aloalo Boar
- Aloalo Boarlet
- Mimic
- Aloalo Vemosia
- Aloalo Morbol
- Wobbly-kneed Whasbyrm
Bosses
Failing any boss mechanic will result in a ![]() Vulnerability Up debuff.
Vulnerability Up debuff.
First boss of all paths. Shortly after engaging the boss, the arena will be surrounded with an AoE that will inflict damage-over-time to anyone who steps in it.
- Made Magic: Partywide damage and spawns three blue spheres.
- Arcane Armaments: The boss will tether to each sphere, and a green axe icon will slowly move towards each sphere. When it contacts, it will cause a brief point-blank AoE telegraph to appear. Move to the wall away from two spheres.
- Made Magic / Arcane Armaments: Similar to before, but a green chakram icon will move to each sphere, which will telegraph a donut AoE instead, so move on top of a sphere.
- Arcane Armaments: Spawns either two spears or two hammers to the sides of the boss.
- Rout: If it spawns spears, it will dash to one wall, and telegraph four dashes through the arena: three dashes around the edge in a triangle pattern, and one through the middle. The boss will either dash through the middle first, then the edges, or edges first then middle.
- Hammer Landing: If it spawns hammers, it will summon three beacons numbered 1-3. The boss will jump to each in order of the numbers and use a knockback. Position to avoid being knocked into the wall or use knockback immune. If timed correctly, knockback immune actions can prevent all 3 knockbacks.
- Violet Storm: A 120 degree cleave in front of where the boss is facing. Only has a brief AoE indicator.
Left Path: Quaqua's abilities change depending on the random weather event immediately prior to it (either fair skies or thunder).
- If the weather is fair skies, Quaqua will use:
- Howl: Summons two untargetable Anala Familiars, one left and one right. Each will telegraph a line AoE (Scalding Waves) that will cascade outwards in both directions. Dodge into one AoE telegraph after it goes off, wait for two AoEs, then dodge back to the middle.
- If the weather is stormy, Quaqua will use:
- Howl: Summons four untargetable Drake Familiars at the north wall. Two drakes will spawn "exaflare" telegraphs (Cloud to Ground), followed by the other two.
Middle Path: Quaqua's abilities change depending on how many poison flowers the player stepped on. If four flowers are stepped on, the ground prior to the boss will become poisonous.
- If fewer than four flowers were stepped on:
- Arcane Armaments: Spawns two tethers in a straight line, each with a green spear icon, to the water in the background. The summoned spears will use a large, briefly telegraphed, circle AoE originating from the targeting lasers. After hitting the ground, they will telegraph two multi-hit cross-shaped AoEs that will rotate according to the arrows. Start in the area where both AoEs are rotating towards, then slowly move in a straight line to the other previously safe area once the AoEs start going off.
- If four or more flowers were stepped on:
- Arcane Armaments: Spawns three tethers in a Y pattern, each with a green spear icon, to the purple water in the background. The summoned spears will then hit the arena and each spawn a growing circular pool of poison water. Move to the wall between two spears that are far away (two safe spots in total).
Right Path: Quaqua's abilities change depending how many fallen statues were repaired.
- If both statues were repaired:
- Arcane Pursuit: Spawns four purple orbs (Aetheric Charge) near the center of the arena. The statues at the edge of the arena will cast a line AoE that is harmless to players, but will remove the orbs.
- Arcane Pursuit: Now spawns a purple orb that will tether to players and slowly follow them. A statue will telegraph a line AoE as before. The orbs should be baited so they are hit by the AoE and destroyed. Orbs that collide with players or are not destroyed will do high damage. Another statue will telegraph a line AoE, giving the party two chances to destroy all orbs.
- If 0-1 statues were repaired:
- The four statues outside of the arena will begin glowing purple. Two statues at at time will begin telegraphing gaze attacks (Arcane Intervention) that will resolve once the purple circle converges on the statue, so look away from the statues before their gaze resolves. Being hit will inflict
 Hysteria.
- The four statues outside of the arena will begin glowing purple. Two statues at at time will begin telegraphing gaze attacks (Arcane Intervention) that will resolve once the purple circle converges on the statue, so look away from the statues before their gaze resolves. Being hit will inflict
The following are used regardless of path:
Made Magic / Arcane Armaments: Similar to before, but now spawns five spheres: three will have chakram icons, and two will have axe icons. Dodge by going to a sphere containing a chakram that is not directly next to an axe.
 Soul of the South Seas: Ketuduke
Second boss of the left path. Shortly after engaging the boss, the arena will be surrounded with an AoE that will inflict damage-over-time to anyone who steps in it.
- Tidal Roar: Party-wide damage.
- Spring Crystals: Spawns four polyhedron Spring Crystals on some tiles. These will each do a telegraphed point-blank AoE (Saturate), so do not be near them.
- Spring Crystals: Spawns two flat Spring Crystals on some tiles. These will each do a telegraphed line AoE (Saturate) in the directions of the long faces of the crystal, each hitting a column of tiles.
- Spring Crystals: Spawns two flat Spring Crystals on two adjacent tiles on the east wall.
- Bubble Net: Party-wide damage. One of the crystals will be lifted up into a bubble.
- Fluke Typhoon: A gust of wind in one direction that will move the bubbled crystal two tiles. After this resolves, the crystal line AoEs will immediately resolve with a very brief telegraph.
- Strewn Bubbles: Four blue portals will travel two tiles from the center in alternating directions, leaving behind a blue line. This telegraphs an AoE that covers each tile the line passes through.
- Encroaching Twintides: A telegraphed donut AoE, immediately followed by a point-blank AoE (Near Tide) with a very brief telegraph.
The boss will use a mechanic that depended on the route:
(Route 1) No fishing; do not assist Zozone:
- Zozone (untargetable) will spawn and want revenge.
- Spring Crystals: Spawns two flat crystals on two adjacent middle tiles near Zozone.
- Bubble Net: Partywide damage and traps one crystal in a bubble. The boss then begins casting Fluke Typhoon.
- Zozone will spawn an untargetable Summoned Apa add. It will tether to players with a proximity tether and cast Water III, requiring them to be far away to avoid excess damage while resolving the crystal line AoEs after Fluke Typhoon.
- After the mechanic, Zozone will flee.
(Route 2) No fishing; Save Zozone:
- Tidal Wave: Telegraphed knockback from one side. Cannot be prevented with knockback immune actions. Players will be inflicted with
 Bind for a few seconds during the knockback.
 - Hydrosurge: Spawns a persistent line AoE through the middle of the arena.
- Zozone (untargetable) will spawn to assist the party.
- Spring Crystals: Spawns two flat crystals whose AoEs will cover the two columns on the side of the arena that the party is on.
- Zozone will spawn a Summoned Apa and Summoned Anila. The Apa will cast Wavefoam, spawning multiple bubbles on the arena.
- Each player should step in a bubble, which will Bind and inflict
 Bubble Net.
 - The Anila will use Fluke Typhoon, knocking all bubbled players to the other side without crystals, safely across the persistent line AoE.
- Zozone and the adds will then flee.
(Route 3) Fishing; right sand pile:
- Roar: Summons two untargetable Aloalo Zaratan, each of which will face opposite directions (indicated by the orange arrow). They will both telegraph a 180 degree frontal cleave, together covering the entire arena.
- Bubble Net: Partywide damage and traps one of the adds in a bubble.
- Updraft: The bubbled add will be knocked up into the air, and both adds will resolve their AoE. Go in front of the bubbled add as its attack will miss.
(Route 4) Fishing; left stone pile:
- Roar: Summons an untargetable Aloalo Ogrebon in the middle of the arena.
- Bubble Net: Partywide damage and spawns several bubbles on the arena.
- The Ogrebon will begin casting Shock, a massive AoE that covers the entire arena.
- If the Ogrebon gets trapped in a bubble, players should remain on the ground (i.e., not in a bubble).
- If the Ogrebon does not get trapped in a bubble, players should enter bubbles.
- Updraft: Any bubbled entities will be knocked up into the air and the AoE will resolve.
The following are common regardless of route.
- Spring Crystals: Spawns four polyhedron crystals on one middle row and two flat crystals on adjacent wall tiles.
- Bubble Net: Traps two polyhedron crystals and one flat crystal, followed by Fluke Typhoon. To dodge these AoEs, go to the middle of the tile that initially contained a polyhedron crystal trapped in a bubble.
- Hydrobomb: Three sets of sequential baited circle AoEs on players.
- Blowing Bubbles: Eight portals (four on opposite walls) will appear and each spawn a bubble that will move across the arena. Being hit will Bind the player for several seconds and make them vulnerable to other avoidable AoEs.
- Meanwhile, the boss will cast Receding Twintides, a telegraphed point-blank AoE, that is immediately followed by Far Tide, a briefly telegraphed donut AoE.
- Strewn Bubbles is used again but will be combined with Receding Twintides (out then in) instead.
- Hydroblast: Telegraphed AoE tankbuster.
Timeless Guardian: The Lala
Second boss of the middle path. Shortly after engaging the boss, the arena will be surrounded with an AoE that will inflict damage-over-time to anyone who steps in it.
- Inferno Theorem: Party-wide damage.
- Arcane Blight: Telegraphed 270 degree conal AoE.
- Arcane Plot: Spawns several blue tiles with arrows, on the walls. These telegraph persistent AoEs that will move in the direction of the arrow across the arena, covering all tiles in the path. Go to a tile that an arrow does not travel through.
- Arcane Blight: Similar as before, but also telegraphs a 90 degree rotation of the AoE telegraph (either clockwise or counterclockwise), with a timer indicating when the rotation will resolve. The safe spot is after the AoE rotates.
- Analysis: Gives each player a


 Front/Right/Back/Left Unseen debuff.
 - Targeted Light: Tethers all players, who will be targeted with an unavoidable attack. Each player must face their gap towards the boss to avoid taking high damage.
The boss will use a mechanic that depended on the route:
(Route 5) Go straight through:
- Faunal Figure: Spawns two untargetable Rodiaki (armadillo) adds, who will telegraph two proximity AoEs (Flail Smash) near the middle of the arena.
(Route 6) Scare off armadillos:
- Floral Figure: Spawns two untargetable Kapokapo (seedling) adds, who will telegraph two donut AoEs (Rolling Spout) near the middle of the arena.
(Route 7) Do not hit J'jhimei:
- Constructive Figure: Spawns three untargetable Aloalo Golem adds, who will telegraph three line AoEs (Aero II) hitting adjacent rows.
(Route 8) Damage J'jhimei:
- Volcanic Coordinates: Two sets of baited circle AoEs on players.
The following are common regardless of route.
- Strategic Strike: Three-hit tankbuster
- Analysis and Targeted Light are used again, but this time, the safe direction will rotate 90 degrees based on the telegraph, requiring players to face the gap towards the boss that takes into account the rotation. An easy way to resolve it is to look at the debuff icon and rotate it instead of trying to rotate the yellow marker around the character.
- Arcane Plot: Similar as before, but only spawns two blue tiles with arrows. In addition, there will be two tiles with arrows only, indicating that the moving AoE will change direction upon reaching those tiles. This leaves one row or column of tiles at the wall safe.
- Calculated Trajectory: Gives each player a Face debuff (e.g.,
 Forward March,
  About Face,
  Left Face,
  Right Face.) that will turn into a
  Forced March. In addition, the direction of the march will rotate 90 degrees based on the overhead telegraph. Players must face so they do not force march into the wall or the AoEs. Similar to Analysis, it may be easier to look at the debuff icon instead of the arrow marker below the character.
 - Arcane Plot is used again and will spawn AoE telegraphs and arrows similar to the first use. However, this attack will be combined with the previous route-dependent mechanic. For routes 5-7, the variable mechanic will resolve after the tile AoEs propagate.
- (Route 5) Faunal Figure: The adds telegraph two proximity AoEs (Flail Smash) on two wall tiles.
- (Route 6) Floral Figure: The four adds each telegraph a donut AoE (Rolling Spout) centered on it, leaving only one tile safe.
- (Route 7) Constructive Figure: The two adds each telegraph a line AoE (Rolling Spout) centered on it, leaving two tiles safe.
- (Route 8) Volcanic Coordinates: Two sets of baited AoEs that appear with the arrow telegraphs. The baited AoEs will resolve before the tile AoEs propagate.
Long-lost Faerie: Statice
Second boss of the right path.
Immediately after engaging the boss, she will not move, and a landmine will appear in the middle of the arena. Players should be careful to avoid it, which will safely disappear after a few seconds.
- Surprise Balloon: Inflates a balloon in the middle that will telegraph a knockback. A needle will use a telegraphed line AoE that will pop the balloon and cause the knockback.
- 4-tonze Weight: In addition, multiple circle AoE telegraphs at the edge of the arena will appear, leaving several gaps. Players should be knocked back to a safe area or use knockback immune.
- Trick Reload: Statice will sequentially load 6 bullets into her gun. Four of them will be successfully loaded, while two will miss. The boss will count the bullets she attempts to load. The party should take note of which bullets miss.
- Trigger Happy: Cover the arena with 6 conal AoE telegraphs, numbered 1-6. Numbered regions corresponding to the missed bullets are safe. For example, if Trick Reload had an OOXOXO pattern (O = loaded; X = missed), then the slices numbered 3 and 5 are safe.
- Pinwheel: The boss will summon three untargetable Balls of Fire at the walls. Each will telegraph a line AoE with a gap and a clockwise or counterclockwise rotation (Fire Spread). All three will rotate the same direction. Players can use the gaps to dodge the AoEs.
- Aero IV: Party-wide damage.
The boss will use a mechanic that depended on the route:
(Route 9) Accept Statice's offer and fall for the whoopee cushion prank:
- Whoopee Cushion: Spawns several whoopee cushion shadows around the arena. Stepping on one will reveal a cushion.
- Fair Flight: Knocks up all players, who will take damage once they fall. Players must be knocked up on a cushion, which will prevent them from taking damage when they safely land on it. Anyone who lands on the floor will take damage and be immobilized for a few seconds.
(Route 10) Deny Statice's offer and avoid the trapped treasure coffers:
- Present Box: Spawns four staves near the middle of the arena, several Surprising Missiles at the walls, and a Surprising Weapon, who will tether to a player. Two staves will telegraph donut AoEs, while the other two will aim line AoE telegraphs at random players. The party must avoid the AoEs and the missiles. If the Surprising Weapon gets too close to its target, it will knock the player back but not damage them.
(Route 11) Deny Statice's offer and open a trapped treasure coffer:
- Jack-in-the-box: Spawns four large, untargetable treasure coffers. Three of them will slightly move, while the fourth will remain still. The three that moved will then use a large point-blank AoE (Burst) with a brief indicator, so move to the stationary box.
The following are common regardless of route:
- Dartboard: Divides the arena into several slices of different colors (red, blue, yellow, and a narrower green section). Each color has a symbol on it (red = meteor, blue = hexagon, yellow = hammer, green = butterfly).
- The boss will spawn two sets of circle AoE telegraphs in random locations.
- A targetable Homing Pattern will spawn. When hit, it will be pushed in the direction of the attack. If it is too close to the boss, she will also push it in a random direction. If it touches the wall, it will be repelled.
- After several seconds, one of the following mechanics will resolve depending on which color section the Homing Pattern is currently in.
- Red: Unavoidable party-wide damage (Meteor)
- Blue: Deals 10 damage to each player (Hunks of Junk)
- Yellow: Proximity AoE telegraph (Sledgemagic)
- Green: Temporary
 Movement Speed Up to all players.
- Pinwheel is used again, but now combined with Trick Reload and Trigger Happy. Players must move to a safe sector while avoiding the rotating line AoEs.
- Surprise Balloon is used again, but now combined with Trick Reload and Trigger Happy. In addition, the balloon will inflate at a wall. The party should position to be knocked back into a safe sector, or use knockback immune.
- Shocking Abandon: Tankbuster
Forgotten Figure: Loquloqui
Secret second boss of the right path, path 12. Shortly after engaging the boss, the arena will be surrounded with an AoE that will inflict damage-over-time to anyone who steps in it.
- Long-lost Light: Party-wide damage.
- Summoning Rite: Spawns four untargetable Uolosapa (bird) adds at the north wall, each of which will telegraph a narrow line AoE.
- O Life, Flourish: Tethers two adds, causing their line AoEs to widen.
- Summoning Rite: Spawns six untargetable Repulu (newt) adds on the arena, each of which will telegraph a small point-blank AoE.
- O Life, Flourish: Tethers three adds, causing their circle AoEs to enlarge.
- Protective Will: Tankbuster.
- O Petals, Unfurl: Spawns two glowing flower buds on the wall, each of which will tether a glowing area on the arena. The flower buds will then travel to the glowing area and emit a large point-blank AoE with a brief indicator.
- Land Wave: 180 degree frontal cleave from the boss. Only has a brief ground indicator.
- O Isle, Bloom: Twelve flower bed tiles will sequentially spawn in a zigzag pattern, covering the entire arena. These telegraph square AoEs, so move into one after it resolves.
- O Sky, Be Mine: The boss grows in size.
- Sanctuary: Proximity AoE telegraph in the middle.
- Stirring of Spirits: The boss will jump in place three times, each doing party-wide damage and a knockback (Shockwave), while spawning three sets several circle AoE telegraphs. Position to avoid being knocked back into the wall or the AoEs, or time knockback immune to cover all three knockbacks.
- The boss will then return to its normal size.
- Summoning Rite: Spawns four birds and six newts, which function as before.
- O Life, Flourish: Tethers two birds and two newts, causing their AoEs to enlarge. Move to a corner of the arena without any tethered adds nearby.
- O Petals, Unfurl: Functions similarly as before, but now summons four flower buds. Two of them will have short tethers, so they will reach their destination and emit their AoEs first, while the other two have long tethers. Starting from the long tether side, wait until the short tethers resolve, then move into that side of the arena.
Loot
Aloalo Island uses personal loot, so players have to be sure to click and loot each chest themselves. If the party chooses the same portal that the NPC suggests at the start of the dungeon, an additional treasure coffer will spawn later on the path, immediately prior to the second boss.
| Name | Type | Item Level | Rarity | Quantity |
|---|---|---|---|---|
| Aloalo Potsherd | Other | 1 | Basic | 1 |
| Name | Type | Item Level | Rarity | Quantity |
|---|---|---|---|---|
| Aloalo Potsherd | Other | 1 | Basic | 2 |
| Ketuduke Card | Triple Triad Card | N/A | 1 |
| Name | Type | Item Level | Rarity | Quantity |
|---|---|---|---|---|
| Aloalo Potsherd | Other | 1 | Basic | 2 |
| Lala Card | Triple Triad Card | N/A | 1 |
| Name | Type | Item Level | Rarity | Quantity |
|---|---|---|---|---|
| Aloalo Potsherd | Other | 1 | Basic | 2 |
| Statice Card | Triple Triad Card | N/A | 1 |
| Name | Type | Item Level | Rarity | Quantity |
|---|---|---|---|---|
| Aloalo Potsherd | Other | 1 | Basic | 2 |
| Loquloqui Card | Triple Triad Card | N/A | 1 |
Treasure Coffers
 Treasure Coffer
| Name | Type | Item Level | Rarity | Quantity |
|---|---|---|---|---|
| Magicked Prism (Uolosapa) | Other | 1 | Basic | 1 |
| Aloalo Faerie Cushion | Other | 1 | Basic | 1 |
| Aloalo Island Palm | Other | 1 | Basic | 1 |
| Aloalo Pendant Wall Lamp | Other | 1 | Basic | 1 |
| Aloalo Roselle Hedge | Other | 1 | Basic | 1 |
| Sagely Sparrow Statue | Other | 1 | Basic | 1 |
| South Seas Coelacanth Display | Other | 1 | Basic | 1 |
| Giant Leaf Parasol | Other | 1 | Basic | 1 |
| Repulu | Minion | N/A | Basic | 1 |
| Uolosapa | Minion | N/A | Basic | 1 |
Achievements
This duty is associated with the following achievements:
| Name | Points | Task | Reward | Patch |
|---|---|---|---|---|
| Lord of the Skies | 5 | Defeat Ketuduke in the Aloalo Island variant dungeon. | - | 6.51 |
| Number Cruncher | 5 | Defeat the lala in the Aloalo Island variant dungeon. | - | 6.51 |
| A Prank Too Far | 5 | Defeat Statice in the Aloalo Island variant dungeon. | - | 6.51 |
| The Frailty of Words | 5 | Defeat the Loquloqui in the Aloalo Island variant dungeon. | - | 6.51 |
| Good-willed Hunting | 10 | Unlock all conservation records on Aloalo Island. | Spectral Statice Whistle | 6.51 |
| Mapping the Realm: Aloalo Island | 10 | Discover every location within the Aloalo Island variant dungeon. | - | 6.51 |
Music
| Section | Theme |
|---|---|
| Main | O Speaker, Slumber |
| Mid-Boss | On Blade's Edge |
| Final Bosses | Finality |
| Secret Final Boss | Heroes Forge Ahead |
Gallery
Reward Images
-
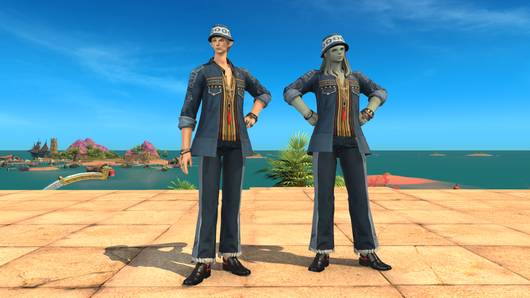
-
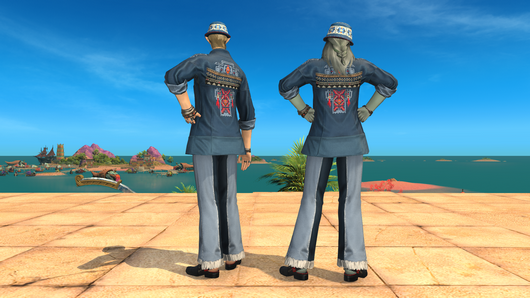 Free Spirit's Glamour Set Back
 -
-
-


Dungeon Images


Other Images
-
 Map (Click to enlarge)

| Endwalker (Lv. 90) | |||||
|---|---|---|---|---|---|
| Dawntrail (Lv. 90-100) | |||||