
The Forked Tower: Magic (Extreme)

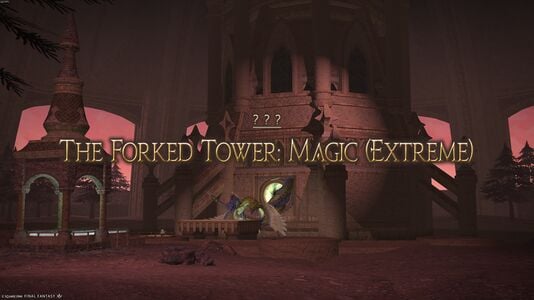
The Forked Tower: Magic (Extreme)

- Level
- 100 (Sync: 100)
- Item Level
- 690 (Sync: 700)
- Know. Level
- 40
- Difficulty
- Extreme
- Party size
- Flexible • 12-48

- Unsyncing
- Not Allowed
- Time limit
- 30 minutes + extensions
- Phoenix Down
- Not Available
- Req. quest
- In the Shadow of the Tower
- Entrance
- The Occult Crescent: North Horn (X:15.0, Y:29.9)
- Location
- Tower of Magic
- Region
- ???
- Patch
- 7.55

A shimmering spire presides over the warped landscape of the North Horn. Has the time come for your long-awaited encounter with the isle's architect?
— In-game description
The Forked Tower: Magic (Extreme) is a level 100 field operation introduced in patch 7.55 with Dawntrail. Instead of being a separate instance, it exists within The Occult Crescent: North Horn when entered by a premade alliance meeting certain conditions. It is an optional, more difficult version of The Forked Tower: Magic.

Participation
The required degree of coordination and large raid size makes this raid impractical to recruit for solely through Party Finder or other in-game methods. Thus, in North American and European data centers, the most popular way of completing this content is through premade groups organized through various player-run Discord servers. Each server has its own specific rules and organizational methods.
Requirements & Entrance
To enter:
- Players must form a premade alliance of at least 12 total players in at least 3 parties outside of the Occult Crescent. All players must be knowledge level 40.[1]
- The leader of a preformed alliance meeting these conditions can choose to enter an "extreme-mode" North Horn instance by speaking with Jeffroy in Phantom Village (X:4.5, Y:6.6). All alliance members must be in the Phantom Village (the specific instance does not matter) to enter the Forked Tower: Magic (Extreme).
- Upon entering an extreme-mode instance, the weather will change to
 Auroral Mirages after five minutes, and players can stand atop the aetherial node at (X:15, Y:29) to enter. Once an additional five minutes pass, players standing on the node will be primed for entry, teleporting to the tower after 30 more seconds. The weather's spawning is still affected by FATEs and Critical Engagements like in normal-mode instances.
 - The North Horn instance is permanently closed to public entry. The initial duty time limit is 15 minutes, and will be set to 35 minutes on raid entry. Both the duty and raid timers are extended by 20 minutes on each boss killed; clearing the raid sets the raid timer to 10 minutes and duty timer to 15 minutes.
- Assuming no FATEs were cleared, players on the aetherial node will be primed to enter the tower when the duty timer is at 5 minutes, giving a 10-minute grace period after entering the North Horn instance to sort out phantom jobs or do other activities.
Unlike standard content, players cannot be resurrected by normal means will have 3 stacks of the debuff  Resurrection Restricted. Defeated players may only be resurrected by Revive from
  Phantom Chemist, Occult Raise from
  Phantom White Mage, or level 3 healer limit breaks. Each time they are revived, they will lose one stack. When a player has no more stacks remaining, they will receive the
  Resurrection Denied status, preventing resurrection by any means and must therefore leave the raid if they die again. Completing the secret puzzle of the raid by defeating the Hermetic Recluse outside the tower will replenish 1 stack to each living player within the raid, if they do not already have 3 stacks.


Players may only swap their job or phantom job in the starting room of the raid. Once they leave the room, they will be given the  Duties as Assigned status and be unable to swap their job or phantom job. Level 24
  Phantom Freelancers may swap their phantom job once after the starting room.
Party Functions
Most raid groups will typically form up to six parties of up to eight players each outside the raid. The specific role composition per party is flexible, but each party should contain at least one tank and one shield healer. The Party Finder recruitment for this raid is listed as the 48-player option for the Occult Crescent: North Horn - The Forked Tower: Magic (Extreme).
Players are usually separated into six lettered parties (A-F), corresponding to the Party Finder UI. (Some groups use 1-3 in place of D-F.) This separation is used for multiple points in the raid that require players to form two or three separate groups. Players may freely leave, (re)join, disband, and reform parties while inside the raid.
Waymarks, Ready Checks, and Countdowns
Waymarks and ready checks are only visible in the player's individual party and are not shared by the entire raid. Each party may designate a party leader who is responsible for placing waymarks and conducting ready checks, but anyone in the party is usually free to contribute.
Waymarks can be saved and loaded in the in-game waymark preset feature. A common set of waymarks should be shared for the entire raid group to ensure everyone is on the same page. For the final boss, it is common for there to be three sets of waymarks based on which "home platform" the party is in.
After ready checks are conducted, they are often communicated to the rest of the raid via the /yell chat to show that the party is ready.
Unlike The Forked Tower: Blood, countdowns are alliance wide and are therefore can be visible to all raid members. Sometimes, in place of countdowns, the raid leader will designate boss pull times based on the Forked Tower duty timer, which is shared by all raid members. For example, a pull time of "30:00" means that the boss will be pulled at 30:00 left on the timer.
Phantom Job Requirements
Specific phantom jobs are mandatory to clear the raid. As there is no effective in-game functionality for coordinating phantom job compositions, this is often done through external spreadsheets such as this. All players should be maximum level on the phantom job they wish to use for the raid.
As this duty can be cleared with only 12 players, there are fewer specific phantom jobs with unique responsibilities compared to The Forked Tower: Blood. However, raid-wide damage is significantly higher, so phantom jobs with defensive actions are highly recommended, along with shield healers with high Phantom Mastery and gear.
Mandatory Jobs
| Phantom Job | Number Required | Responsibilities |
|---|---|---|
 Phantom Time Mage or Phantom Time Mage or
|
2 (1 per side) |
|
 Phantom Ranger Phantom Ranger
|
1 (ideally 1 per side)* 2 (1 per side) if no Thief |
|
 Phantom Bard Phantom Bard
|
1 (ideally 1 per party) |
|
 Phantom Dancer Phantom Dancer
|
2 (ideally more for safety) |


* Experienced rangers can "blind pop" traps without a thief to reveal them, because all traps spawn in predictable locations. Thieves can also reveal traps without a ranger, but certain trap patterns might require a sacrifice if not disarmed.
Recommended Jobs
| Phantom Job | Number Recommended | Responsibilities |
|---|---|---|
 Phantom Thief Phantom Thief
|
2 (1 per side) |
|
| Phantom White Mage
|
3+ |
|
 Phantom Mystic Knight Phantom Mystic Knight
|
1 | +5% boss damage with Blazing Spellblade |
 Phantom Black Mage Phantom Black Mage
|
2 (1 per side) | Crowd control on trash mobs with Occult Toad |
 Phantom Samurai Phantom Samurai
|
As many as possible | Extremely high and simplest DPS with Zeninage and Iainuki |
 Phantom Summoner or Phantom Summoner or  Phantom Blue Mage Phantom Blue Mage
|
1 per party | Party shielding with Earthen Wall and Occult Mighty Guard |
| Phantom Freelancer
|
1 (Lv 15+) | One freelancer can travel between each party and apply buffs with Inquiring Mind at a knowledge crystal, eliminating the need for  Phantom Knights. If the freelancer is Lv. 24, they can swap to another job at the final boss. Phantom Knights. If the freelancer is Lv. 24, they can swap to another job at the final boss.
|


Hidden Explosive Traps

Similar to The Forked Tower: Blood, there are hidden explosive traps that may spawn in certain locations (see maps). Traps are only located in the sections of the raid between the boss encounters, specifically areas that are demarcated by thick red lines on the floor. Glyphs will emanate from one side of the line, denoting the area with traps.
Traps can be revealed with Trap Detection from Phantom Thief and disarmed at a distance using Occult Falcon from Phantom Ranger. In the areas with traps, the rest of the party should remain behind the thief/ranger in their group at all times.
For safety, traps should be disarmed when possible. There are two types of traps, the second type is significantly more dangerous and will cause wipes if carelessly detonated.
Traps bypass invulnerability cooldowns and thus can only be safely disarmed by Phantom Rangers. Experienced groups will often have rangers "blind pop" traps, i.e. disarming them without being revealed by a thief, because traps spawn in predictable locations.
| Trap | Image | Effect | Disarming Method |
|---|---|---|---|
| Normal Trap |  |
Releases a small AoE when detonated (slightly larger than the trap itself), killing anyone in range. |
Ignore or disarm at a distance using Occult Falcon from |
| Unstable (Mega) Trap |  |
Releases a massive AoE when detonated, killing anyone in range. |
Ignore or disarm at a distance with ranger. If being disarmed, all raid members should be aware that this trap will be disarmed and should move far away. |
Objectives
- Clear the Herpetology Forum
- Clear the tower base
- Clear the Choreology Room
- Clear the Agnoiology Room
- Clear the Thanatology Room
- Clear the Horology Room
- Clear the Epistemology Theater
Enemies and Bosses
Boss HP will scale based on the number of players inside the raid, starting from 12.
Being hit with any avoidable AoEs during boss encounters will inflict a stack of  Thrice-come Ruin that lasts indefinitely until the end of the boss or until the player dies. If a player receives three stacks, they will be inflicted with
  Doom and die.
After defeating a boss, players have a random chance of receiving the  Battle High status for 15 minutes, increasing their Critical Hit and Direct Hit Rate and providing healing-over-time.
Buff capping is an notable issue in this raid. Players should click off any undesired Phantom Freelancer buffs (typically Romeo's Ballad and Fleetfooted) to help prevent losing important mitigation or shielding buffs. They can also consider world visiting a different world than their home world to remove Free Company action buffs.
Tower Base
Central Mezzanine


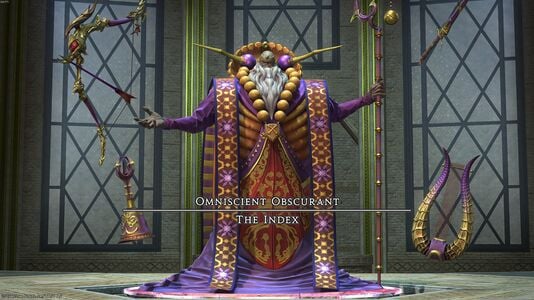
 Omniscient Obscurant: The Index
Phantom Chemist/White Mage Resurrection Strategy
A phantom chemist or phantom white mage is named a "resurrecter" in this section.
In the event of a full raid wipe, all players must normally leave the raid regardless of how many stacks of Resurrection Restricted they still have, because the return prompt will take them back to the North Horn base camp. To allow for more boss attempts, players have devised a chemist/white mage "cheese" strategy:
- If a boss pull is deemed unsalvageable (e.g. there are too many deaths or if a DPS check will not be met), a designated resurrecter will sacrifice themselves by running into the death wall or incapacitating themselves via mechanics.
- Another resurrecter will revive the sacrifice resurrecter, but that player will not accept the resurrection prompt. The Raise buff will need to be refreshed periodically to prevent it from expiring. Ideally, the reviving resurrecter should revive the sacrifice resurrecter outside of aggro range of the boss.
- Once the call to wipe has been made by the raid leader, all players will attempt to die at the south of the arena or outside of aggro range of the boss.
- After the party wipes and the boss resets, the sacrifice resurrecter will accept the raise.
- The sacrifice resurrecter will then revive the other players, ideally starting with resurrecters first so they can also help revive. All resurrecters will commonly be marked for visual identification.
- Once everyone's Weakness debuff has fallen off, the party can pull the boss again.
An alternative resurrecter "cheese" strategy requires a resurrecter to resurrect outside the arena and not participate in the fight:
- The resurrecter pulls the boss alone and dies near the entrance
- A second resurrecter waits outside the arena
- The remainder of the alliance enters the arena and begins their countdown
- With 5s to pull, the second resurrecter resurrects the dead resurrecter outside the arena
- With 5s left on the raise timer, the dead resurrecter accepts the raise.
This results in the resurrecter resurrecting outside the arena, which has already completed its 'automatic pull in' at 45s after pull.
Loot
- 0
 Enlightenment Silver Obols
 - 0
 Phantom EXP
  0 Allagan Tomestones of Mathematics
 0 Allagan Tomestones of Mnemonics
(The above values, all zeroes, are correct. They are listed to avoid the implication that the values are the same as the normal difficulty.)
This duty uses personal loot, so players will need to interact with and loot treasure coffers themselves. A full clear with all chests yields 24 Arcane Amulets; after the duty is completed, returning to the start of the duty and taking the opposite path after the Herpetology Room allows the collection of one additional Arcane Amulet, for a total of 25.


| Name | Type | Item Level | Rarity | Quantity |
|---|---|---|---|---|
Notes on the Two-headed Aevis 
|
Other | 1 | Basic | 1 |
| Arcane Amulet
|
Currency | 1 | Basic | 1 |
| Final Final Fixative | Other | 1 | Basic | 1 |


 Tower Base
On each side of the raid, a coffer is hidden on a randomly selected circular platform connected to the main path. A Phantom Thief has to use Trap Detection to reveal it. Reaching the coffer on the other side requires returning to the start of the duty.
| Name | Type | Item Level | Rarity | Quantity |
|---|---|---|---|---|
| Arcane Amulet
|
Currency | 1 | Basic | 1 |
| Final Final Fixative | Other | 1 | Basic | 1 |
| Name | Type | Item Level | Rarity | Quantity |
|---|---|---|---|---|
| Notes on the Sword Dancer
|
Other | 1 | Basic | 1 |
| Arcane Amulet
|
Currency | 1 | Basic | 2 |
| Final Final Fixative | Other | 1 | Basic | 1 |

Central Mezzanine
Located on the west side of the area on one of the three circular platforms, a Phantom Thief has to use Trap Detection to reveal it.
| Name | Type | Item Level | Rarity | Quantity |
|---|---|---|---|---|
| Arcane Amulet
|
Currency | 1 | Basic | 1 |
| Final Final Fixative | Other | 1 | Basic | 1 |
| Name | Type | Item Level | Rarity | Quantity |
|---|---|---|---|---|
| Arcane Amulet
|
Currency | 1 | Basic | 1 |
| Final Final Fixative | Other | 1 | Basic | 1 |
| Name | Type | Item Level | Rarity | Quantity |
|---|---|---|---|---|
| Notes on Necrophobia
|
Other | 1 | Basic | 1 |
| Arcane Amulet
|
Currency | 1 | Basic | 2 |
| Final Final Fixative | Other | 1 | Basic | 1 |
| Duck-billed Porter Whistle | Other | 1 | Basic | 1 |


An additional coffer spawns in the room after the boss, next to a knowledge crystal, if the puzzle to spawn Hermetic Recluse was solved.
| Name | Type | Item Level | Rarity | Quantity |
|---|---|---|---|---|
| Arcane Amulet
|
Currency | 1 | Basic | 3 |
| Final Final Fixative | Other | 1 | Basic | 1 |
| Name | Type | Item Level | Rarity | Quantity |
|---|---|---|---|---|
| Arcane Amulet
|
Currency | 1 | Basic | 1 |
| Final Final Fixative | Other | 1 | Basic | 1 |
Pinnacle of Knowledge
Two coffers are located in each of the locked rooms connected to the path leading to the final boss, requiring a Phantom Thief to open.
| Name | Type | Item Level | Rarity | Quantity |
|---|---|---|---|---|
| Arcane Amulet
|
Currency | 1 | Basic | 2 |
| Final Final Fixative | Other | 1 | Basic | 1 |
| Name | Type | Item Level | Rarity | Quantity |
|---|---|---|---|---|
| Arcane Amulet
|
Currency | 1 | Basic | 2 |
| Final Final Fixative | Other | 1 | Basic | 1 |
 The Index
| Name | Type | Item Level | Rarity | Quantity |
|---|---|---|---|---|
| Notes on the Index
|
Other | 1 | Basic | 1 |
| Arcane Amulet
|
Currency | 1 | Basic | 5 |
| Final Final Fixative | Other | 1 | Basic | 1 |
| Duck-billed Porter Whistle | Other | 1 | Basic | 1 |

An additional coffer drops if the Hermetic Recluse was spawned and killed before the Index died.
| Name | Type | Item Level | Rarity | Quantity |
|---|---|---|---|---|
| Arcane Amulet
|
Currency | 1 | Basic | 3 |
| Final Final Fixative | Other | 1 | Basic | 1 |
| Duck-billed Porter Whistle | Other | 1 | Basic | 1 |
Achievements
This duty is associated with the following achievements:
| Name | Points | Task | Reward | Patch |
|---|---|---|---|---|
| Tour de Fork I | 10 | Complete the Forked Tower: Magic (Extreme) for the first time. |  Of the Two Towers Of the Two Towers
|
7.55 |
| Tour de Fork II | 10 | Complete the Forked Tower: Magic (Extreme) 5 times. | - | 7.55 |
| Tour de Fork III | 10 | Complete the Forked Tower: Magic (Extreme) 20 times. | - | 7.55 |
| Tour de Fork IV | 20 | Complete the Forked Tower: Magic (Extreme) 50 times. | The Omnipotent
|
7.55 |


Lore
Dialogue
Two-headed Aevis
Tower Base
Central Mezzanine
Storm Generators
Attempting physical onslaught.
Prepare for total annihilation.
Tower Curseclocks
Preparing magical countermeasures.
When the encounter was resolved correctly
Magical countermeasures disabled...
Intruders may advance to the next sector.
The Index

Music
| Section | Theme |
|---|---|
| Main | Exdeath's Castle (Dawntrail) |
| Boss 1-3 | FINAL FANTASY V: Battle 1 (Dawntrail) |
| Final Boss | Omega Squared |


Gallery
Screenshots
-
-
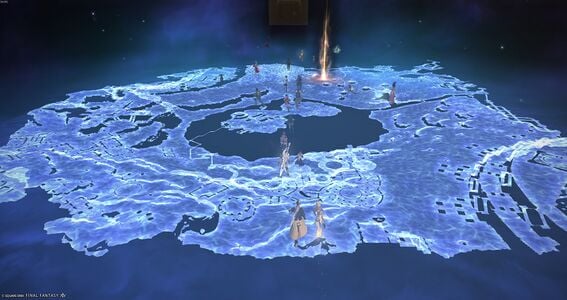 Map room
 -
-
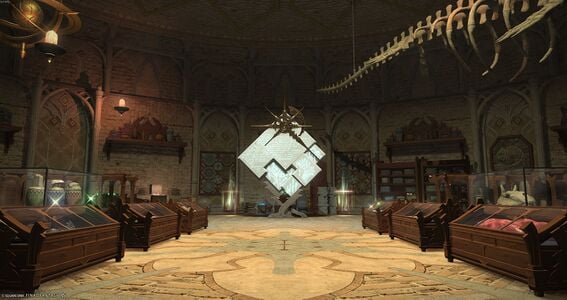 Final room


Maps
-
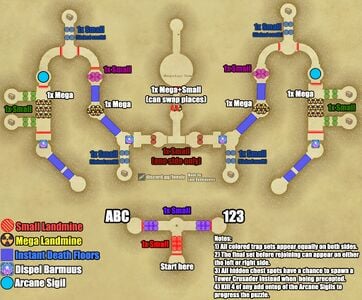 Tower Base annotated map
 -
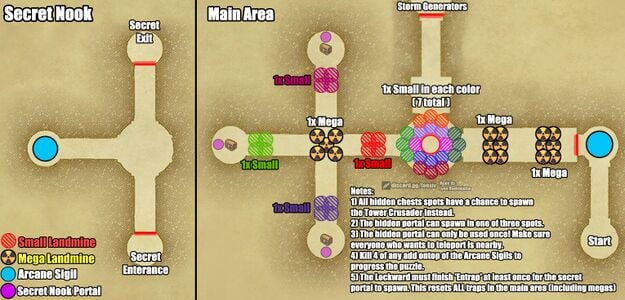 Central Mezzanine and Secret Nook annotated map
 -
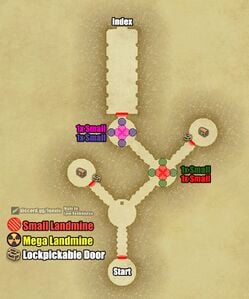 Pinnacle of Knowledge annotated map


Trivia
- The dungeon is inspired by the Fork Tower dungeon from FFV.
- Each room containing a major encounter is named for a field of study related to the boss or enemies present:
- Herpetology: Study of amphibians and reptiles
- Choreology: Study of dance
- Agnoiology: Study of ignorance
- Thanatology: Study of death
- Horology: Study of timekeeping
- Epistemology: Philosophical study of knowledge
External Links
- Raidplans and guides
- Mitigation Cooldown Suggestions
- Encounter Timelines
References
- ↑ The alliance leader does not need to be knowledge level 40 to enter an extreme-mode instance. However, all players must be knowledge level 40 to enter the tower.


| Stormblood: The Forbidden Land, Eureka (Lv. 70) | |||||
|---|---|---|---|---|---|
| Shadowbringers: Save the Queen: Blades of Gunnhildr (Lv. 71-80) | |||||
| Dawntrail: Occult Crescent (Lv. 100) | |||||


