Healer Guide
This is a beginner's guide to some of the basics of healing. Remember: Keeping your team alive is only the first of your responsibilities. There's much more you can do!
Offense
Healers in Final Fantasy 14 are expected to use their offensive spells and deal damage. You should not follow in Sylphie's steps in only wanting to heal.
But I don't want to do more! I want to heal! I'm good at healing! You can't make me do those other things!
— Sylphie
Good healers are able to keep party members alive while dealing damage. Compared to equally-skilled players, healers are able to do about 50% of the damage of a DPS role. By contributing to damage, you are helping the party and yourself in making engagements shorter, creating a possible feedback loop:
- 1

 Tanks will only need to tank for shorter amounts of time, which in turn saves some of their mitigation abilities and resources for the next encounter; defeated enemies cannot deal damage.
- 0
 By prolonging an engagement, more of their abilities will be on cooldown, which may result in them having less tools to aid in their survival, which will make your attempts at healing them harder and more strained.
- 0
- 1 Similarly, you, the
 healer, will need to spend less of your MP and cooldowns for the engagement. Your next engagement will be easier if you have more tools available at your disposal.
- 0 By prolonging an engagement, you and the tank may not even have enough resources to get through the trash pull, which may result in the tank being KO'd.
- 0
- 0 While
 DPS have multiple cooldowns that deal great amounts of damage, will eventually run out and resort to doing much less damage. This may also misalign their cooldowns and resources which will disrupt their rotations and pace, slowing down future encounters.
1 Remember to Always Be Casting; do not stand around doing nothing.
- Keep casting offensive spells until you need to heal someone. As all healers have a very simple rotation consisting of one to two offensive spells, there is no excuse to not be attacking if you are able to.
- Every healer has a damage-over-time (DoT) and a basic attack spell. Keep your DoT active on the boss at all times, and spam your basic attack spell.
- Every healer has an area-of-effect (AoE) spell unlocked at level 45 or 46 – spam it on mob pulls.
- Some offensive actions are abilities, meaning you may instantly use them in between casted spells. These should be used as much as possible.
- Likewise, to maximize the amount of time you are able to spend damaging enemies, prioritize using healing abilities over spell-based healing.
 Scholar,
  astrologian, and
  sage depend more on these abilities compared to
  white mage.
- Likewise, to maximize the amount of time you are able to spend damaging enemies, prioritize using healing abilities over spell-based healing.
Healing
0 It is not required to have all everyone at max HP, at all times. Outside of high-end content, damage will never instantly KO anyone in one single hit.
- ⚠️ The only exceptions to this rule are if the player, including yourself, have failed several avoidable overlapping mechanics at the same time, and/or if they have existing stacks of
 Vulnerability Up from failing avoidable mechanics.
1 Heal without waste: if you heal someone at 90% of their max HP for 30% of their max HP, you will have wasted two-thirds of your heal. You should instead keep damaging the boss and only heal them when they are lower, unless they would die otherwise (e.g. tankbuster/special mechanic).
1 Heal efficiently: it is better to heal someone once than healing them several times to get the same effect.
- An infamous example is using Cure instead of Cure II (or similar analogous healing spells on other healers). In the two spells you could use casting Cure twice, you could instead cast Cure II once, and cast Stone II once.
- 1 The MP cost of casting Cure II over Cure is irrelevant. This is an example of you using your tools. Your MP will regenerate quickly out-of-battle, and proper uses of Lucid Dreaming will keep your MP high. Using Lucid Dreaming to recoup your MP usage in-battle is another example of using your tools!
- 1
- ⚠️ Using Cure may be viable if you are totally out of MP and tools (less than 1000 MP, with no healing abilities, with Lucid Dreaming on cooldown), which may be more frequent in lower level encounters. This however, is a sign of your party playing improperly, and not yourself. Consider taking the time to teach them – this is a sign that you have grown as a player!
- 0 By never evolving to use stronger healing tools when available, you will never become a good healer, or learn to recover or prevent emergencies.
- 0


1 Good healers are those who can balance dealing damage while still healing allies when needed.
- 0 While dealing damage is required as a healer, it is important to still keep allies alive. Do not neglect healing yourself, or other party members, when healing is required.
- 1 Make use of healing abilities. Abilities are actions that have a cooldown, but can be used in between casted spells.
- 0 Do not save these powerful abilities for "emergency situations! To be proactive in healing means you will be preventing any emergencies happening in the first place.
- 0
- ⚠️ Healing GCDs (e.g. Cure II) are spells that put you on the global cooldown, thus costing your party one cooldown's worth of your damage. While it may not seem like much, lost damage will accumulate quickly.
- This is not a big deal at lower levels, as healers typically do not have many healing abilities.
- ⚠️ Regeneration spells (i.e. Regen, Medica II) heal for more potency over healing spells, but make sure that you or allies are not KO'd while waiting for the regen to do its work.
- 1 If you have other abilities available, prioritize using them over regen spells. This is even better if they have a regen attached to them (i.e. Celestial Opposition)!
- Healing oGCDs (e.g. Tetragrammaton) are abilities that do not delay your spells (besides their animation, known as "clipping") and do not cost MP; so you should use them as much and as efficiently as possible.
- 1


⚠️ Remain wary of the range of your healing. While single-target healing actions have a long 30 yalm range, AoE healing actions have a shorter range which may not heal everyone. Consider standing near the middle of boss arenas, or tell a DPS who is far away to move closer.
- 1 Being closer to the boss is typically better for resolving mechanics, especially if they produce conal AoEs that are easier to dodge closer to the origin of the AoE.
1 Using Swiftcast on a healing spell to save someone in a pinch is not ideal (unless at lower levels, where numerous healing abilities are not accessible), but it would certainly better than having to resurrect them.
1 Know your tank's ultimate cooldowns, known as "invulns":

| Job | Action | Effects | Tips[1] |
|---|---|---|---|
 Paladin Paladin
|
Hallowed Ground | Simply makes the paladin invincible for 10 seconds. | |
 Warrior Warrior
|
Holmgang | Prevents the warrior's HP from going below 1; they may still be damaged during the duration. | Unless below level 58, warriors can entirely heal themselves with Raw Intuition / Bloodwhetting. Heal them, otherwise. |
 Dark Knight Dark Knight
|
Living Dead | Upon the dark knight reaching 1 HP, they will grant themselves a powerful self-heal based them dealing damage. They are unable to be KO'd, but can still take damage. Upon healing an amount equal to their HP, they lose the self-heal. |
Do not heal the dark knight if they are stuck at 1 HP for a while. They should eventually heal themselves instantly to max in dungeons. If against bosses, they may need an extra heal. |

|
Superbolide | Reduces the gunbreaker's HP to 50%, and makes them invincible. If already under 50% HP, their HP is not affected. | Functionally identical to Hallowed Ground apart from the HP adjustment. |


- ↑ If playing as a white mage, do not cast Holy / Holy III when a tank as any of these status effects active. This is because
 stunning enemies while the tank is invincible has the counter-intuitive effect of wasting the utility of the invuln. Make use of both the invuln and stun by only casting Holy after their invuln has ended, and if they are at an appropriate HP level.


Helping your party

1 Always use Swiftcast to Raise fallen party members.
- ⚠️ If Swiftcast is not available, you will need to consider any mechanics that may be directed towards you while fully casting Raise.
There is a priority system on what to do if multiple party members are KO'd in 8-player content. The priorities are as follows:
| Priority | What to Do | Notes | |
|---|---|---|---|
| 1 | Heal yourself.
|
You cannot heal or raise anyone if you are KO'd. Your co-healer, the other healer in your party, should heal themselves.
| |
| 2 | Heal the tank(s).
|
This will prevent additional DPS from being targeted by the boss if the tank is KO'd, as well as any mechanics such as tankbusters. | |
| 3 | Heal the DPS.
|
This will prevent you and your co-healer from spending more time and MP raising; it is much less expensive, stressing, and quicker to heal allies who are already alive. | |
| 4 | Raise the Tank or Healer.
|
If both tanks are KO'd, raise a tank first. If both tanks are alive, raise your co-healer. | |
| 5 | Raise the  red mages red mages or  summoners. summoners.
|
Both jobs have access to raising spells – Verraise and Resurrection, respectively. Verraise is not available until level 64. Do not prioritize the red mage until at that level, or higher. | |
| 6 | Raise the rest of the DPS. |


- In dungeons, if the tank dies, Swiftcast a raise onto them. Get to healing the DPS and yourself immediately, after.
- ⚠️ If Swiftcast is on cooldown, keep yourself and the DPS alive; ignore the tank.
- In dungeon bosses, keep yourself alive, first. Make it a priority to save yourself, and the tank, if it means letting the DPS be KO'd.

- Esuna removes any status effect that has a white bar under its icon.
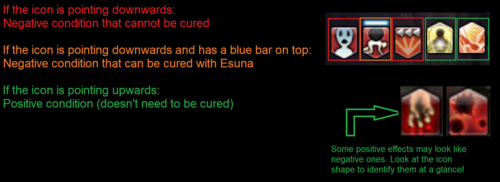
- 1 You should make it a priority to cleanse any disruptive or lethal status effects, if possible.

| Priority | Status Effect | Effect |
|---|---|---|
| High |  Doom[1] Doom[1]
|
Instantly KOs a party member upon the effect expiring. |
| High | Stun,  Petrification Petrification
|
Makes party members completely immobile, leaving them vulnerable to future mechanics. |
| High |  Vulnerability Up Vulnerability Up
|
Any Vulnerability Up status effect may make damage lethal to party members following mechanics, or otherwise makes them generally harder to heal. |
| Medium |  Amnesia, Amnesia,  Pacification, Pacification,  Silence Silence
|
Prevents the usage of abilities, weaponskills, and spells, respectively. Pacification can largely be ignored on  magical ranged DPS and healers, and Silence can be largely ignored on any other role. magical ranged DPS and healers, and Silence can be largely ignored on any other role.If you are silenced, you will not be able to cast any healing spells. |
| Medium |  Paralysis, Paralysis,
|
Will periodically interrupt party members, leaving them immobile for a bit and cancelling any spells. Annoying and reduces DPS. |
| Medium |  Slow, Slow,
|
Increases global cooldown recast time and spell casting time. Very annoying and reduces DPS. |
| Medium |  Heavy, Heavy,  Bind Bind
|
Reduces speed and halts movement, respectively. May leave party members more vulnerable. |
| Lower | Any damage over-time effects, including  poison. poison.
|
The potency of the damage over-time can range, from small to very high. It is still recommended to cleanse these as soon as possible. |
- ↑ * Doom may be applied to party members, and cannot be cleansed with Esuna; Doom must be cleansed through either resolving mechanics (like in The Sunken Temple of Qarn), or being healed to max HP (like in The Wanderer's Palace (Hard)).

Other Tips
- Rescue, while it may be jarring to them, is still a very helpful tool to save party members. It will prevent the need for any healing in the first place.
- Your Level 1 and Level 2
 Limit Breaks heal party members and do no damage, so they should never be used. Your Level 3 Limit Break (available with an 8-player party) heals and resurrects everyone nearby to full without resurrection weakness, and it can be useful to save a run. Put it on your hotbar.
