User:Boblers/sandbox
Userspace navigation
| Boblers/sandbox |
- Boblers/AchievementNote
- Boblers/ArmoireItem
- Boblers/ArmoireList
- Boblers/ArmoireListHeader
- Boblers/Boss trophies
- Boblers/Community Events Archive
- Boblers/Design Contest winners
- Boblers/Discord
- Boblers/MountList
- Boblers/RaidTokens 2
- Boblers/RecurringEvent
- Boblers/RecurringEvent/doc
- Boblers/UnlockableEmoteListEntry
- Boblers/WeatherNavTest
- Boblers/sandbox
| Boblers/sandbox |
Blue Mage notes
Shared cooldowns
- Off-guard, Peculiar Light
- Feather Rain, Eruption
- Mountain Buster, Shock Strike
- Glass Dance, Veil of the Whorl
- Magic Hammer, Candy Cane
- Level 5 Death, Ultravibration
- Quasar, J Kick
- Angel's Snack, Dragon Force, Matra Magic
- Chelonian Gate, The Rose of Destruction, Ruby Dynamics
- Both Ends, Nightbloom
- Apokalypsis, Being Mortal
Non-stackables
- Bristle, Whistle
- Ice Spikes, Veil of the Whorl, Schiltron
- Song of Torment, Aetherial Spark, Nightbloom
Combos
Notes:
| Spell 1 | Spell 2 | Spell 3 | Notes |
|---|---|---|---|
| Winged Reprobation (4 times) | Conviction Marcato | - | - |
| Peat Pelt | Deep Clean | - | Generates regen stacks. |
| Wild Rage (2 casts) | Revenge Blast | - | Wild Rage sets up the correct HP range for Revenge Blast. You will be at 1 HP, so heal afterwards! |
| Tingle | Whistle | Triple Trident | High physical damage |
| Toad Oil | Self-destruct | - | 300 more potency. In practice, also apply some buffs and debuffs before exploding! |
| Peripheral Synthesis | Mustard Bomb | - | Adds a DoT. |
|
- | - | |
|
|
- | Perpetual Ray's stun lasts only 1 second, so it probably cannot be combo'd off of. |
|
- | - | |
|
- | - | |
|
- | - | |
| - | - |
Important tank spells
Important healer spells
Mudra table test
| Action | Description | Mudra Combination | ||
|---|---|---|---|---|
| step 1 | step 2 | step 3 | ||
| Rabbit Medium | Thumpity thump thump, thumpity thump thump... | Wrong mudra combinations. | ||
| Fuma Shuriken | Delivers a ranged ninjutsu attack with a potency of 500. | Any mudra ( Ten, Chi, or Jin) | ||
| Katon (Lv. 35+) | Delivers fire damage with a potency of 350 to target and all enemies nearby it. | Chi | Ten | - |
| Jin | Ten | - | ||
| Raiton (Lv. 35+) | Delivers lightning damage with a potency of 740. Grants a stack of Raiju Ready. | Ten | Chi | - |
| Jin | Chi | - | ||
| Hyoton (Lv. 45+) | Delivers ice damage with a potency of 350. Additional Effect: Bind | Ten | Jin | - |
| Chi | Jin | - | ||
| Huton (Lv. 45+) | Deals wind damage with a potency of 240 to target and all enemies nearby it. Additional Effect: Allows execution of actions which require the effect of Hidden, without being under that effect. | Jin | Chi | Ten |
| Chi | Jin | Ten | ||
| Doton (Lv. 45+) | Creates a patch of corrupted earth, dealing damage with a potency of 80 to any enemies who enter. | Ten | Jin | Chi |
| Jin | Ten | Chi | ||
| Suiton (Lv. 45+) | Delivers water damage with a potency of 580. Additional Effect: Allows execution of actions which require the effect of Hidden, without being under that effect. | Ten | Chi | Jin |
| Chi | Ten | Jin | ||
| Goka Mekkyaku (Lv. 76+) | Deals fire damage with a potency of 850 to target and all enemies nearby it. | Kassatsu | Chi | Ten |
| Kassatsu | Jin | Ten | ||
| Hyosho Ranryu (Lv. 76+) | Deals ice damage with a potency of 1,300. | Kassatsu | Ten | Jin |
| Kassatsu | Chi | Jin | ||
Markers
Circle AoE
Area of Effect, abbreviated as "AoE", is the most common type of attack used against players. These attempt to damage players in an area of varying shapes and sizes— often indicated by bright orange highlights on the ground, but sometimes signified through cast names, enemy motions, or other visual warnings.
In high-end content and higher-level normal-difficulty content, these orange telegraphs will often not appear until right before the attack resolves, requiring players to pay attention to the enemy's animation or cast name to determine where to avoid the attack. This is most often the case with content seen in Shadowbringers and later.
In general, these attacks register ("snapshot") when the telegraph disappears, not when the AoE animation finishes. However, some duties feature red-colored AoEs; these attacks will register substantially later than usual after disappearing, and players should mind their positions.
Types
Static Circle AoE
An unmoving circle AoE of varying size. Will typically be placed directly under an enemy, a player, or preset locations around an arena. Players are generally expected to move out of the highlighted areas in time to avoid taking damage.
-
 The common circle AoE marker used from A Realm Reborn to Stormblood.
 -
 Circle AoEs used in Shadowbringers and after.
.png)
.png)

Static Donut AoE
An unmoving donut AoE of varying size. Will typically be placed directly under an enemy, a player, or preset locations around an arena. Players must to move into the epicenter of the AoE to avoid damage.
Static Line AoE

An unmoving rectangular AoE of varying size. Is often used to indicate an enemy firing a powerful projectile or preparing a running charge.
Players are generally expected to side-step these attacks, as their length often extend the full length of the arena.
Static Cone AoE
An unmoving conal AoE of varying size. Most often originates from the front of an enemy but, in some cases, can come from the rear or sides.
Players are generally expected to circle around the enemy to escape danger. As cones expand outwards from its epicenter, these AoEs are easier to dodge by being closer to the enemy casting it.
-
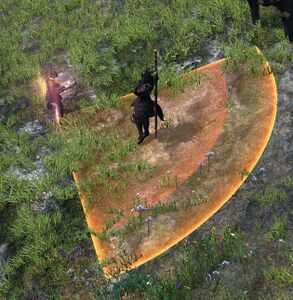 A 90 degree frontal cone AoE.
 -
 The Cone AoE marker used in Shadowbringers and after.

.png)

Cleave
A common term for an unmarked frontal AoE aimed at the highest enmity target. Most often a 90 degree cone, but size and shape may vary.
These are undodgeable high-damage attacks only intended for the tanks to take; as such, it is common for DPS and healers to stay behind the boss at all times, while only the tank stays in front.
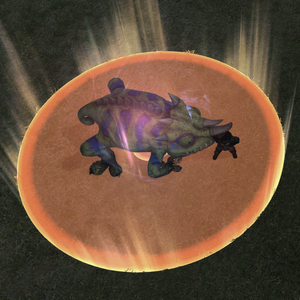
Puddle

A long-lasting AoE that can apply damage, debuffs, or even buffs when stood inside. Generally a stage hazard that limits movement space. Will often be the after-effects of a Static Circle AoE or a Spread Circle. Players will typically want to avoid standing in these, but can often control where Puddles are created.
Landmine

A long-lasting mine that explodes if a player gets too close.
Typically must be avoided, but in some cases must be exploded by a tank to avoid a larger explosion later.
Is often paired with a knockback against players hit by the explosion, which may cause chain reactions with other landmines.
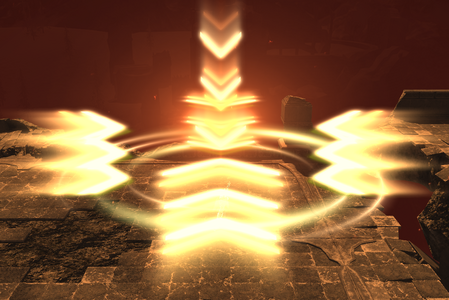
Homing AoE

An attack that will drop multiple AoEs on a player sequentially. The player must continuously move in a certain direction to avoid the attack. Indicated by trailing yellow chevrons and a pulsating circle around the targeted player.
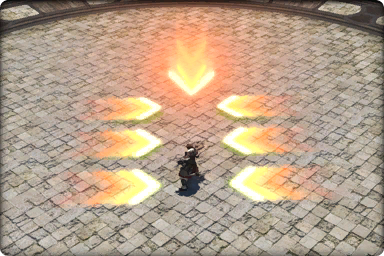
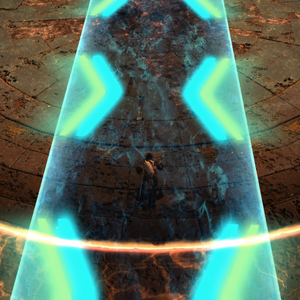
Moving AoE
Circle or line AoEs that will cascade outwards as follow-up AoEs in the direction(s) indicated by the arrows on the AoE telegraph.
Circular moving AoEs are commonly referred to as Exaflares by players.
-
 A moving circle AoE telegraph.
 -
 A bi-directional moving line AoE telegraph.


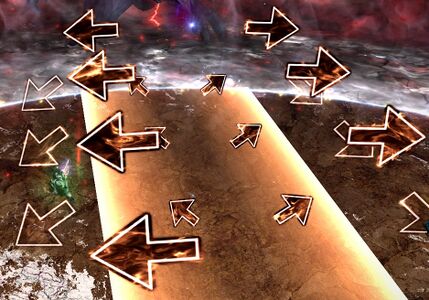
Radial Line AoE

An advanced variant of the Line AoE. This attack fires multiple (usually 4) line AoEs out from an epicenter in indicated directions, creating a starburst-like pattern. Indicated by a ring of chevrons on the ground pointing outwards. The size of this telegraph is usually much shorter than the length of the AoEs.
Line of Sight AoE

A room-wide AoE that hits every player that has a direct, unblocked line of sight to the enemy casting this. Players must stand behind an object, often a large rock, to shield themselves from the incoming blast. Failure to take cover is often fatal.
In later expansions, these attacks are telegraphed by a room-wide radial wave emanating from the center. Older duties will have no visual telegraph, typically only being indicated by a long 10 second cast.
The most common and notable Line of Sight AoE is Ecliptic Meteor, used by Behemoth enemies.
Spread markers
Unlike the standard AoE, which are intended to be avoided, Spread Markers deal unavoidable damage. Players instead need to prioritize minimizing damage to others.
These markers will appear on one or multiple players simultaneously, indicating an attack dealing slight or moderate damage to the targeted players and others nearby. Any player getting hit by two or more of these attacks will take potentially lethal amounts of damage, requiring the marked players to spread their positions across the arena to survive.
In high-end content (and rarely in normal-difficulty content), these attacks also often apply a vulnerability to damage of the same type (often ![]() Magic Vulnerability Up) for a very short amount of time, increasing the lethality of overlapping spread markers.
Magic Vulnerability Up) for a very short amount of time, increasing the lethality of overlapping spread markers.

Spread Circle
A circle AoE targeting and following a varying number of players. Often indicated by a colored arrow and circle on top of players, but in some cases are only indicated by a cast bar or debuff. Players will need to move away from the marked player to minimize damage to themselves and the party.
While having multiple players inside a Spread Circle should be avoided, it is safe to have the circle markers themselves overlap. Creating a Venn diagram shape is the most efficient way to position Spread Circles.
Spread Line or Cone
A line or cone AoE targeting one or more players, colloquially referred to as proteans. Often indicated by a colored arrow or mark on the target, but in some cases may be a moving Static Line AoE that is attached to a player.
Players will need to either spread out in a circle around the boss, or sometimes to opposite sides, to avoid overlapping attacks.
In high-end duties, these types of attacks are often baited by proximity or are untelegraphed.
Proximity AoE
Area of Effect, abbreviated as "AoE", is the most common type of attack used against players. These attempt to damage players in an area of varying shapes and sizes— often indicated by bright orange highlights on the ground, but sometimes signified through cast names, enemy motions, or other visual warnings.
In high-end content and higher-level normal-difficulty content, these orange telegraphs will often not appear until right before the attack resolves, requiring players to pay attention to the enemy's animation or cast name to determine where to avoid the attack. This is most often the case with content seen in Shadowbringers and later.
In general, these attacks register ("snapshot") when the telegraph disappears, not when the AoE animation finishes. However, some duties feature red-colored AoEs; these attacks will register substantially later than usual after disappearing, and players should mind their positions.
Types
Static Circle AoE
An unmoving circle AoE of varying size. Will typically be placed directly under an enemy, a player, or preset locations around an arena. Players are generally expected to move out of the highlighted areas in time to avoid taking damage.
-
The common circle AoE marker used from A Realm Reborn to Stormblood.
-
Circle AoEs used in Shadowbringers and after.
Static Donut AoE
An unmoving donut AoE of varying size. Will typically be placed directly under an enemy, a player, or preset locations around an arena. Players must to move into the epicenter of the AoE to avoid damage.
Static Line AoE
An unmoving rectangular AoE of varying size. Is often used to indicate an enemy firing a powerful projectile or preparing a running charge.
Players are generally expected to side-step these attacks, as their length often extend the full length of the arena.
Static Cone AoE
An unmoving conal AoE of varying size. Most often originates from the front of an enemy but, in some cases, can come from the rear or sides.
Players are generally expected to circle around the enemy to escape danger. As cones expand outwards from its epicenter, these AoEs are easier to dodge by being closer to the enemy casting it.
-
A 90 degree frontal cone AoE.
-
The Cone AoE marker used in Shadowbringers and after.
Cleave
A common term for an unmarked frontal AoE aimed at the highest enmity target. Most often a 90 degree cone, but size and shape may vary.
These are undodgeable high-damage attacks only intended for the tanks to take; as such, it is common for DPS and healers to stay behind the boss at all times, while only the tank stays in front.
Puddle
A long-lasting AoE that can apply damage, debuffs, or even buffs when stood inside. Generally a stage hazard that limits movement space. Will often be the after-effects of a Static Circle AoE or a Spread Circle. Players will typically want to avoid standing in these, but can often control where Puddles are created.
Landmine
A long-lasting mine that explodes if a player gets too close.
Typically must be avoided, but in some cases must be exploded by a tank to avoid a larger explosion later.
Is often paired with a knockback against players hit by the explosion, which may cause chain reactions with other landmines.
Homing AoE
An attack that will drop multiple AoEs on a player sequentially. The player must continuously move in a certain direction to avoid the attack. Indicated by trailing yellow chevrons and a pulsating circle around the targeted player.
Moving AoE
Circle or line AoEs that will cascade outwards as follow-up AoEs in the direction(s) indicated by the arrows on the AoE telegraph.
Circular moving AoEs are commonly referred to as Exaflares by players.
-
A moving circle AoE telegraph.
-
A bi-directional moving line AoE telegraph.
Radial Line AoE
An advanced variant of the Line AoE. This attack fires multiple (usually 4) line AoEs out from an epicenter in indicated directions, creating a starburst-like pattern. Indicated by a ring of chevrons on the ground pointing outwards. The size of this telegraph is usually much shorter than the length of the AoEs.
Line of Sight AoE
A room-wide AoE that hits every player that has a direct, unblocked line of sight to the enemy casting this. Players must stand behind an object, often a large rock, to shield themselves from the incoming blast. Failure to take cover is often fatal.
In later expansions, these attacks are telegraphed by a room-wide radial wave emanating from the center. Older duties will have no visual telegraph, typically only being indicated by a long 10 second cast.
The most common and notable Line of Sight AoE is Ecliptic Meteor, used by Behemoth enemies.
Spread markers
Unlike the standard AoE, which are intended to be avoided, Spread Markers deal unavoidable damage. Players instead need to prioritize minimizing damage to others.
These markers will appear on one or multiple players simultaneously, indicating an attack dealing slight or moderate damage to the targeted players and others nearby. Any player getting hit by two or more of these attacks will take potentially lethal amounts of damage, requiring the marked players to spread their positions across the arena to survive.
In high-end content (and rarely in normal-difficulty content), these attacks also often apply a vulnerability to damage of the same type (often ![]() Magic Vulnerability Up) for a very short amount of time, increasing the lethality of overlapping spread markers.
Magic Vulnerability Up) for a very short amount of time, increasing the lethality of overlapping spread markers.
Spread Circle
A circle AoE targeting and following a varying number of players. Often indicated by a colored arrow and circle on top of players, but in some cases are only indicated by a cast bar or debuff. Players will need to move away from the marked player to minimize damage to themselves and the party.
While having multiple players inside a Spread Circle should be avoided, it is safe to have the circle markers themselves overlap. Creating a Venn diagram shape is the most efficient way to position Spread Circles.
Spread Line or Cone
A line or cone AoE targeting one or more players, colloquially referred to as proteans. Often indicated by a colored arrow or mark on the target, but in some cases may be a moving Static Line AoE that is attached to a player.
Players will need to either spread out in a circle around the boss, or sometimes to opposite sides, to avoid overlapping attacks.
In high-end duties, these types of attacks are often baited by proximity or are untelegraphed.
AoE marker
Area of Effect, abbreviated as "AoE", is the most common type of attack used against players. These attempt to damage players in an area of varying shapes and sizes— often indicated by bright orange highlights on the ground, but sometimes signified through cast names, enemy motions, or other visual warnings.
In high-end content and higher-level normal-difficulty content, these orange telegraphs will often not appear until right before the attack resolves, requiring players to pay attention to the enemy's animation or cast name to determine where to avoid the attack. This is most often the case with content seen in Shadowbringers and later.
In general, these attacks register ("snapshot") when the telegraph disappears, not when the AoE animation finishes. However, some duties feature red-colored AoEs; these attacks will register substantially later than usual after disappearing, and players should mind their positions.
Types
Static Circle AoE
An unmoving circle AoE of varying size. Will typically be placed directly under an enemy, a player, or preset locations around an arena. Players are generally expected to move out of the highlighted areas in time to avoid taking damage.
-
The common circle AoE marker used from A Realm Reborn to Stormblood.
-
Circle AoEs used in Shadowbringers and after.
Static Donut AoE
An unmoving donut AoE of varying size. Will typically be placed directly under an enemy, a player, or preset locations around an arena. Players must to move into the epicenter of the AoE to avoid damage.
Static Line AoE
An unmoving rectangular AoE of varying size. Is often used to indicate an enemy firing a powerful projectile or preparing a running charge.
Players are generally expected to side-step these attacks, as their length often extend the full length of the arena.
Static Cone AoE
An unmoving conal AoE of varying size. Most often originates from the front of an enemy but, in some cases, can come from the rear or sides.
Players are generally expected to circle around the enemy to escape danger. As cones expand outwards from its epicenter, these AoEs are easier to dodge by being closer to the enemy casting it.
-
A 90 degree frontal cone AoE.
-
The Cone AoE marker used in Shadowbringers and after.
Cleave
A common term for an unmarked frontal AoE aimed at the highest enmity target. Most often a 90 degree cone, but size and shape may vary.
These are undodgeable high-damage attacks only intended for the tanks to take; as such, it is common for DPS and healers to stay behind the boss at all times, while only the tank stays in front.
Puddle
A long-lasting AoE that can apply damage, debuffs, or even buffs when stood inside. Generally a stage hazard that limits movement space. Will often be the after-effects of a Static Circle AoE or a Spread Circle. Players will typically want to avoid standing in these, but can often control where Puddles are created.
Landmine
A long-lasting mine that explodes if a player gets too close.
Typically must be avoided, but in some cases must be exploded by a tank to avoid a larger explosion later.
Is often paired with a knockback against players hit by the explosion, which may cause chain reactions with other landmines.
Homing AoE
An attack that will drop multiple AoEs on a player sequentially. The player must continuously move in a certain direction to avoid the attack. Indicated by trailing yellow chevrons and a pulsating circle around the targeted player.
Moving AoE
Circle or line AoEs that will cascade outwards as follow-up AoEs in the direction(s) indicated by the arrows on the AoE telegraph.
Circular moving AoEs are commonly referred to as Exaflares by players.
-
A moving circle AoE telegraph.
-
A bi-directional moving line AoE telegraph.
Radial Line AoE
An advanced variant of the Line AoE. This attack fires multiple (usually 4) line AoEs out from an epicenter in indicated directions, creating a starburst-like pattern. Indicated by a ring of chevrons on the ground pointing outwards. The size of this telegraph is usually much shorter than the length of the AoEs.
Line of Sight AoE
A room-wide AoE that hits every player that has a direct, unblocked line of sight to the enemy casting this. Players must stand behind an object, often a large rock, to shield themselves from the incoming blast. Failure to take cover is often fatal.
In later expansions, these attacks are telegraphed by a room-wide radial wave emanating from the center. Older duties will have no visual telegraph, typically only being indicated by a long 10 second cast.
The most common and notable Line of Sight AoE is Ecliptic Meteor, used by Behemoth enemies.
Spread markers
Unlike the standard AoE, which are intended to be avoided, Spread Markers deal unavoidable damage. Players instead need to prioritize minimizing damage to others.
These markers will appear on one or multiple players simultaneously, indicating an attack dealing slight or moderate damage to the targeted players and others nearby. Any player getting hit by two or more of these attacks will take potentially lethal amounts of damage, requiring the marked players to spread their positions across the arena to survive.
In high-end content (and rarely in normal-difficulty content), these attacks also often apply a vulnerability to damage of the same type (often ![]() Magic Vulnerability Up) for a very short amount of time, increasing the lethality of overlapping spread markers.
Magic Vulnerability Up) for a very short amount of time, increasing the lethality of overlapping spread markers.
Spread Circle
A circle AoE targeting and following a varying number of players. Often indicated by a colored arrow and circle on top of players, but in some cases are only indicated by a cast bar or debuff. Players will need to move away from the marked player to minimize damage to themselves and the party.
While having multiple players inside a Spread Circle should be avoided, it is safe to have the circle markers themselves overlap. Creating a Venn diagram shape is the most efficient way to position Spread Circles.
Spread Line or Cone
A line or cone AoE targeting one or more players, colloquially referred to as proteans. Often indicated by a colored arrow or mark on the target, but in some cases may be a moving Static Line AoE that is attached to a player.
Players will need to either spread out in a circle around the boss, or sometimes to opposite sides, to avoid overlapping attacks.
In high-end duties, these types of attacks are often baited by proximity or are untelegraphed.
Stack marker
![]() A stack marker splits the damage between everyone within the marker. If nobody stacks to share the damage, it will usually kill the target. There are multiple variants of the stack marker.
A stack marker splits the damage between everyone within the marker. If nobody stacks to share the damage, it will usually kill the target. There are multiple variants of the stack marker.
Overlap penalties
Certain duties may spawn multiple stack markers at once. In most instances (except for Syrcus Tower), stack markers should NOT be overlapped! Mechanics with multiple stack markers will generally apply severe vulnerability debuffs to all players inside for a few seconds. These debuffs fall off harmlessly if a player participates in only one stack. However, anyone who participates in multiple stacks will still have the debuff when the second stack hits, making them take severe or fatal damage.
Types
Circle stack

![]() The most common variant traces a circular shape around the target. Everyone needs to stand within this circle to split the damage with the targeted player. Standing directly on top of the targeted player also works, but is more cautious than necessary.
The most common variant traces a circular shape around the target. Everyone needs to stand within this circle to split the damage with the targeted player. Standing directly on top of the targeted player also works, but is more cautious than necessary.
Line stack
![]() A line stack marker divides the damage between everyone that stands in line with the targeted player and the boss. Visually, attacks like this often involve the boss firing a laser through the target.
A line stack marker divides the damage between everyone that stands in line with the targeted player and the boss. Visually, attacks like this often involve the boss firing a laser through the target.
To participate, a player only needs to be within the line, they do not need to be inside the actual marker. In the example image, standing further north but still being within the east-west bounds of the line will still count for splitting the damage.
Line stack markers commonly appear in two forms: targeted and static.
- Targeted line stack markers attach to a player, indicating that the boss will aim their attack at where that player is standing once the cast ends.
- Static line stack markers act like Static line AoEs, but are often pointed towards a stunned player or something important that must be protected.
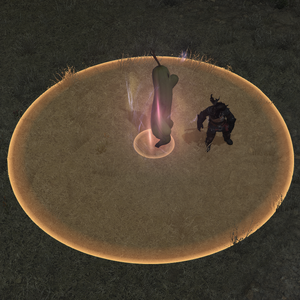
-
 A line stack marker targeted onto a player.
 -
 A static line stack marker.


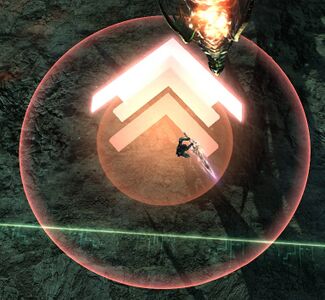
Multi-hit stack
![]() A multi-hit stack is the same as a stack marker, but will hit multiple times. While a regular stack displays 5 arrows (1 above and 4 in a cross), a multi-hit stack will display multiple arrows in each direction (generally 3 arrows each). This is most-commonly used for "Akh Morn", an attack frequently used by dragon enemies.
A multi-hit stack is the same as a stack marker, but will hit multiple times. While a regular stack displays 5 arrows (1 above and 4 in a cross), a multi-hit stack will display multiple arrows in each direction (generally 3 arrows each). This is most-commonly used for "Akh Morn", an attack frequently used by dragon enemies.
Participants need to stay together until all hits of the stack finish. Leaving too early means participation will not be counted for later hits.
-
 A multi-hit stack marker
 -
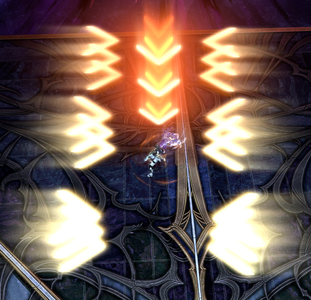 A multi-hit line stack marker


Shared Tankbuster
A circle stack marker with a red coloration and a variable number of orbs above the targeted tank. The requisite number of tanks must position themselves inside the ring to share the damage.
An example of this is Twin Pom Meteor in Thornmarch (Hard).
In high-end duties, a common strategy of dealing with these is to simply have one tank take it solo with an invulnerability cooldown.
-
 A shared tankbuster requiring 3 tanks.
 -
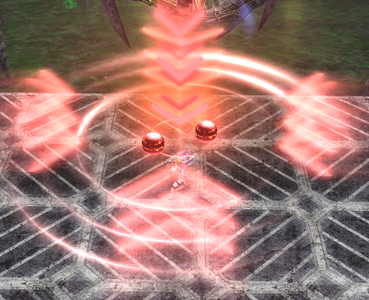 A multi-hit shared tankbuster intended for 2 tanks.


Multi-Player Marker
An attack, commonly referred to as Enumeration, that requires a either a minimum or an exact number of players to group together or else face punishment. Represented by a circle with a varying amount of spheres floating above it. The amount of spheres indicate the amount of players that must be inside the circle.
In Heavensward and Stormblood, but most commonly the Alexander raids, these markers require an exact number of players: if there are 3 spheres, then exactly 3 players must be inside the circle. 4 players does not count, it must be exactly 3.
However, in newer duties, the most common indicator is a blue circle with two spinning pyramids, in which case at least two players must be in it. In high-end duties, usually four of these appear at once, requiring the entire party to divide into pairs.
Rarely in some high-end duties, a normal stack marker may be treated as an Enumeration— requiring a minimum number of players (e.g. 4) to be inside. If there are too few, all inside are defeated instantly[1].
-
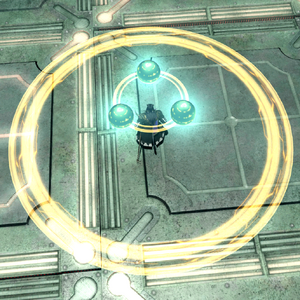 A stack marker requiring exactly 3 players to stand together inside. Only appears in Heavensward.
 -
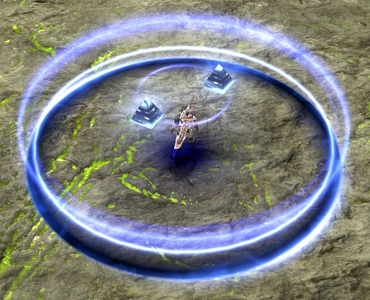 A pair stack that requires at least 2 people. More commonly seen.


Red Triangle Markers

Players will be marked simple red triangle pointing down (with no other AoE telegraphs), requiring the marked players to stack with at least one other person to avoid taking damage.

Light and Dark Rings
Players are marked with black or white rings. A white ring player must stand with one black ring player to cancel out the two opposing effects. If opposite colored players do not stack, or if there are more than two players in a stack, the players in the misformed stack (or the entire party) will take heavy damage.
An advanced variant of the Line Stack Marker. Damage is divided unevenly, dealing the most damage to the first player hit in the line and decreasing damage to each player afterwards. Typically, tanks will be required to stand at the front with non-tanks behind them.
In many scenarios, a stunned player or a vulnerable objective will be targeted, requiring players to line up and protect the target from death or destruction.
"Wild Charge"-style attacks typically do not have a unique marker.
The only example of a Wild Charge marker is Silkie's Slippery Soap attack from Another Sil'dihn Subterrane, which uses a line stack marker with the vertical orange arrow offset to the back.