The Dalriada
The Dalriada
“The Dalriada's engines have failed, forcing it to the ground. The Resistance would seize this opportunity to storm the warship, and at last put an end to the imperials' presence in Bozja.
— In-game description
The Dalriada is a level 80 FATE spawned in Zadnor.
Rewards
- See also: Field Operations and Zadnor
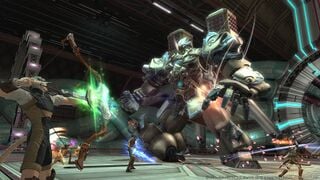
The Dalriada is a special engagement that takes place in a separate zone and serves as the "finale" to Zadnor. Available after reaching Resistance Rank 25 and completing the prerequisite quests, it is an instance that allows up to a maximum of 48 players, and is accessed in the same way as ![]() Castrum Lacus Litore is in the
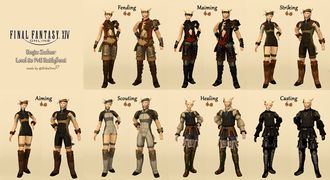
Castrum Lacus Litore is in the ![]() The Bozjan Southern Front. When it pops, click the Register button in the Resistance Recruitment list, and if you are selected, click Commence. Defeating bosses within the Dalriada grants rare loot, Bozjan Mythril Coins, and Bozjan Platinum Coins, which can be exchanged for special armor sets.
The Bozjan Southern Front. When it pops, click the Register button in the Resistance Recruitment list, and if you are selected, click Commence. Defeating bosses within the Dalriada grants rare loot, Bozjan Mythril Coins, and Bozjan Platinum Coins, which can be exchanged for special armor sets.
Requirements
- Disciple of War or Magic level 80 or higher
- Resistance Rank 25
- Quest:
 March of the Bloody Queen
Bosses
The Dalriada is designed for a maximum of 48 players, however if the group is significantly undersized, the Echo will be applied to facilitate completion with the smaller group. The time limit starts at 20 minutes, and is extended by 10 minutes each time a boss encounter is completed.
Breaching the Dalriada
Split 8 people off from the main raid and have them board the hoverbikes to go "up" and face Sartauvoir the Inferno while the rest of the group stays "down" and faces a miniboss gauntlet. Both encounters must be fought simultaneously. Please note that if the raid is significantly undersized you may want fewer than 8 players to go up to ensure that there are enough people on the miniboss gauntlet. The Echo will ensure both encounters remain beatable if the groups are properly balanced.
 Sartauvoir the Inferno (For players going up via hoverbikes)
- Pyrokinesis: Room-wide damage, mitigate and heal.
- Time Eruption: Clocks will spawn on the floor in a grid. Players need to locate the slowest turning clock and stand on that square until the rest of the clocks explode, then move off the clock to avoid that explosion. The boss can also use Reverse Time Eruption, which is the exact opposite mechanic.
The boss will also summon Phoenix Egis that will charge in a straight line across the arena. Step out from in front of them to avoid.
- Thermal Gust: The boss fires a line AoE at random players. These can be avoided by anyone who isn't targeted.
- Grand Crossflame: A wide cross AoE In the middle of the arena. Simply step out of the AoE to avoid.
The boss can also summon meteor markers that require one player to stand in. At 55% the boss will return to the center of the arena and cast multiple Pyrokinesis spells before transforming.
- Burning Blade: A heavy-hitting tankbuster. Mitigate.
- Mannatheihwon Flame: Deals raid-wide damage and drops cross marks in the front of random players hitboxes. To deal with this, all players should stack and face the same direction to bait the crosses to fire in one direction.
- Left/Right Brand: The boss will telegraph what side the attack will fire from and will cleave that entire side of the arena based on where he is facing.
- Doublecast: Four players are marked with AoEs and a player is marked with a stack marker. Players with the AoE should spread out, while everyone else stacks with the player with the marker.
From here the mechanics repeat until the boss is defeated. If the other party hasn't finished their fight, small mobs will spawn that need to be defeated until they are done.
Miniboss Gauntlet (For everyone staying down)
- 4th Legion Blackburn
- Oppressive Magic Rays: Raid-wide damage. Mitigate and heal.
- Anti-personnel Missile: Marks two quadrants on the floor as 'unsafe' zones on the floor, three times in a row. Players will have to remember the order of the unsafe zones and move accordingly.
- Field Support: Lines a wall with soldiers with crosses that will fire across the arena, as well as an adjacent wall with a few safe zones in between soldiers. Players will also be marked with a Weak spot marker. Players need to stand in the safe gaps and turn the open side of the marker towards the wall with no safe zones. After the attacks fire the soldiers will swarm the arena. Grab them and AoE them down. The boss's mechanics will repeat until it is defeated.
- 4th Legion Augur
- Sanctified Quake 3: Room-wide damage. Mitigate and heal.
- Voidcall: The boss will summon several ads: The Flameborne Zinitra will cast a knockback, the Stormborne Zinitra will each use a point-blank AoE and the Waveborne Zinitra will mark donut AoEs under players. Players should stack and either get knocked back under the Waveborne Zinitra to avoid the other AoEs, or stack in the center and pop a knockback resistance. After the attacks resolve, the ads will swarm the arena. Grab them and AoE them down.
- Pyroplexy': Meteor markers spawn around the arena, each requiring one player standing in them before they resolve. If a circle is missed it will explode, dealing damage and inflicting everyone with a
 Vulnerability Up stacking debuff.
- Tamed Alkonost/Tamed Carrion Crow
- Stormcall/Winds: Orbs will be summoned on one side of the arena and tether to the boss while the Crow will mark one side of the arena with a tornado and a massive knockback. The orbs will move towards the side of the arena with one orb moving slower. The orbs will touch the edge of the arena, dropping large AoEs, then the knockback will fire, pushing players and the slow-moving orb to the other side of the arena. Players should follow the slow-moving orb, then after the wind blows, move away from the side the slow-moving orb is on.
Alkonost will summon four shadows and tether to them two at a time, performing attacks that the clones will mimic and fire all at once. Two of the clones will mimic Painful Gust, a large point-blank AoE, and Frigid Pulse, a donut-AoE. Dodge the attacks from the boss, and the Crow will do a knockback attack, and players should get knocked into one of the clones using Frigid Pulse. From here the bosses will just use different AoEs and repeat attacks until they are defeated. If the other party hasn't completed their fight, ads will spawn until both bosses are defeated.
 4th-make Cuchulainn
- Putrified Soul: Raid-wide damage. Mitigate and heal through.
- Might of Malice: A hard-hitting tank buster on the main target. Be sure to mitigate and use cooldowns.
- Burgeoning Dread: Players are debuffed with Forced March and will auto-move in a specific direction, based on the debuff. players should be aware of which way their buff will have them walking and be sure to not walk into the puddles around the arena.
- Fleshy Necromass: The boss will return to the center of the arena and begin to cast this ability. At the end of the cast the boss will bounce around the arena, randomly flattening players, dealing damage and debuffing with
 Down for the Count and
  Vulnerability Up. To mitigate this, players should walk into the puddles to be transformed into slimes. If they get hit by the boss, they will simply receive a small amount of damage and a
  Stun. Once the boss returns to the center of the arena the fight will continue.
 - Necrotic Billow: AoEs will appear under random players. Group up to bait the AoEs then simply step out of them.
- Ambient Pulsation: Summons a row of AoEs on the sides and middle of the arena in a random order. Players should stand in the first AoEs, wait until the second-row spawns, then stand in the remaining safe area where the third row will spawn. After the first row explodes, move there to avoid the rest of the explosions.
- Ghastly Aura: Players are debuffed with Misdirection. A hand appears over the players head and rotates when they aren't moving. When the player begins moving, the hand will stop rotating and the player can only move in the direction the hand is pointing. This will usually be paired with other attacks.
- Fell Flow: A conal AoE from the front of the boss. Turn away from the party.
The boss will repeat its attacks from here until it is defeated.
Hallway Sequence
Teams will need to head down the left and right hallways and take out the ads in both. There are several mechanics that happen in these halls:
- Laser gates that fire at random times will deal damage and debuff with a heavy
 Paralysis if hit by them.
 - Lasers will fire from the end of the hallway with a heavy knockback and deal damage.
- The floor will electrify and deal a heavy
 Electrocution Damage over Time debuff that is percentage-based.
Four people need to stay behind in the first room to help players avoid mechanics. The players staying behind need to stand on the four floor panels to disable the electric floor in the hallways. At the front of the room is also a set of monitors that display what side of the room is firing a laser. Players can communicate this info to completely avoid any damage aside from the laser gates which will turn on and off in a pattern. The team staying behind will also have to do this while fighting ads. Be sure to move off the floor panels as little as possible, as if they don't have four people on them at all times the floor will turn on. At the end of each hallway will be a button that needs to be pressed at the same time as the button in the other hallway. Once both buttons are pressed, players will be able to move forward from the main room without heading down the hallways. At the end is a small fight with a Magitek Colossus. Simply burn down and proceed.
 Saunion and Dawon the Younger
The fight will begin against only Saunion, however Dawon will join later.
- High-Powered Magitek Ray: Heavy-hitting tankbuster. Pop cooldowns to mitigate.
- Magitek Halo: A room-wide donut AoE that can only be avoided by standing in the boss's hitbox.
- Magitek Cross Ray: A large cross AoE will segment the floors. Move out of this to avoid.
Occasionally the boss will place arrows on the floor underneath himself and begin preparing an attack. Just before the attack fires, the boss will move in that direction, moving the attack with him. Players will have to be aware of the attack that comes out as well as what direction the arrows are pointing to avoid the attacks correctly.
- Missile Command: Fires AoEs targeted at specific players followed by a stack marker on another player. Players should move out of the AoEs and stack with the marked player to mitigate damage.
At roughly 40% HP The boss will become untargetable and a large knockback marker will appear in the center of the room. After players are knocked back, Dawon the Younger will appear and the fight will continue. From here on out, the bosses essentially have a shared HP pool. If one gets too low, the other will siphon some of it's remaining HP to it. Players don't need to worry about defeating them at the same time, however. Be sure to separate the bosses as they will tether and buff each other if they are too close to one another.
- Magitek Halo/Wildfire Winds: Saunion will begin using his attack while indicating a direction he will move at the last minute. Players simply need to follow him and stand in his hitbox. Meanwhile, Dawon will summon several fireballs and feather plumes around the arena. The fireballs explode in a point-blank AoE, while the plumes fire a donut AoE. Players need to move from Saunion's attack to the nearest plume to avoid damage.
- Missile Command/Swooping Frenzy: Dodge the AoE's from the missiles, then follow Dawon to where he jumps to and stack in his hitbox to avoid the donut AoE and stack for the second part of Missile Command.
- Obey/Spiral Scourge: Saunion will move away and lay a line on the floor, indicating the path he will move along. Simultaneously, Dawon will drop markers around the room with a segmented arrow, indicating what order he will leap to them, and a circle on top showing what kind of attack he will perform. A red cross is a firey cross that flies across the arena, and a green circle is a donut AoE that hits the entire arena except for his hitbox. Players will need to maneuver around Saunion's attack while trying to make it to the green circle marker and stand there to avoid Dawon's other attacks. One of the donut AoE markers will appear directly on Saunion's path, so be careful about moving directly there.
The bosses will follow up with another combo of Missile Command/Swooping Frenzy.
- Tooth and Talon: Heavy-hitting tankbuster from Dawon. Mitigate with cooldowns.
- Pentagust/AoEs: Dawon will leap to one of the corners and fire 5 conal AoEs into the arena, while Saunion drops random AoEs around the arena. Players will need to stand in the safe zones created between the conal AoE blasts and avoid Saunion's blast.
- Spiral Scourge/Wildfire Winds: Players will dodge to the first plumes as normal, then Saunion will begin moving along his path. Be careful to avoid him while also standing in the plume, as they overlap.
The bosses will repeat their attacks here until both are defeated. After this is a fairly long cutscene.
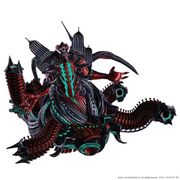
 Allagan Harrier: The Diablo Armament
- Advanced Death Ray: A line buster on the main target. Move away from the party to avoid cleaving anyone else.
- Aetheric Explosion: A raid-wide AoE. Mitigate and heal through.
- Aetherochemical Lasers: Fires two sets of lasers, either one up the middle of the arena and two on the sides, or vice versa. Players can anticipate what laser is firing by looking to see what tentacle the boss has lifted. Simply move out of the way of the first laser, then stand on where it fired to avoid the second. The lasers will leave a path on the ground that will explode shortly after both lasers have fired, so stand on the hitbox of the second laser until the first one explodes, then move to the now safe zone to avoid the second explosion.
- Diabolic Gate: The boss will deal raid-wide damage, shrink the arena with a death-zone, summon several gates with images on them around the arena, and move to another spot around the arena. The boss will then fire a Ruinous Pseudomen straigt forward into one of the gates. The corresponding gate will then fire the laser into another gate, continuing until all gates have fired. The arena will return to normal size and the boss will cast Ultimate Pseudoterror, a donut AoE deep in the boss's hitbox.
- Magitek Bits: Bits will spawn in a line across the stage, half facing one side and half facing the other. Players need to stand behind the bits to avoid taking damage. These will fire periodically during the boss's other attacks.
- Advanced Death IV: Several expanding AoEs will spawn on the arena. Getting hit by these will kill players instantly. After the initial AoEs disappear, a few will spawn under random players. These can be avoided the same way as the initial attack.
Aetheric Boom: Orbs will spawn around the arena and tether to each other, then slowly begin to move towards one another. If tethered orbs collide, they explode and wipe the raid. Players need to run around the arena and touch these to destroy them first. If an orb whose partner has exploded is left unattended, it will eventually explode and debuff the raid with ![]() Vulnerability Up.
These attacks will repeat from here. The boss will occasionally teleport and fire a third set of Aetherochemical Lasers, overlapping with part of the arena and shrinking the safe zone.
At 15% HP the boss will return to the north of the arena and constantly fire Void Systems Overload, firing conal AoEs in sets, deal raid-wide damage and drop Acceleration Bombs on players, which will explode if players are performing any action (including Auto-Attacking) or moving. Players need to determine how long their bomb has, and either stand still in an AoE cone and let the bomb resolve, then move out to a safe area, or let the conal AoEs resolve and move into those before standing still. The boss will also fire line AoEs at four randomly marked players, while the rest of the party will need to stack with a player in a line who has a line stack marker. This mini-phase will repeat until the boss is defeated.
Vulnerability Up.
These attacks will repeat from here. The boss will occasionally teleport and fire a third set of Aetherochemical Lasers, overlapping with part of the arena and shrinking the safe zone.
At 15% HP the boss will return to the north of the arena and constantly fire Void Systems Overload, firing conal AoEs in sets, deal raid-wide damage and drop Acceleration Bombs on players, which will explode if players are performing any action (including Auto-Attacking) or moving. Players need to determine how long their bomb has, and either stand still in an AoE cone and let the bomb resolve, then move out to a safe area, or let the conal AoEs resolve and move into those before standing still. The boss will also fire line AoEs at four randomly marked players, while the rest of the party will need to stack with a player in a line who has a line stack marker. This mini-phase will repeat until the boss is defeated.
Rewards
Loot
 Sartauvoir the Inferno / Miniboss Gauntlet
| Name | Type | Item Level | Rarity | Quantity |
|---|---|---|---|---|
| Bozjan Mythril Coin |
Other | N/A | Basic | 40 |
| Forgotten Fragment of Revelation | Other | N/A | Basic | 1 |
| Forgotten Fragment of Heroism | Other | N/A | Basic | 1 |
| Forgotten Fragment of Cunning | Other | N/A | Basic | 1 |
| Bozjan Mythril Coin | Other | N/A | Basic | 20 |
 4th-make Cuchulainn
| Name | Type | Item Level | Rarity | Quantity |
|---|---|---|---|---|
| Bozjan Platinum Coin |
Other | N/A | Basic | 1 |
| Forgotten Fragment of Sagacity | Other | N/A | Basic | 1 |
| Forgotten Fragment of Becoming | Other | N/A | Basic | 1 |
| Field Notes on Meryall | Other | N/A | Basic | 1 |
 Saunion and Dawon the Younger
| Name | Type | Item Level | Rarity | Quantity |
|---|---|---|---|---|
| Bozjan Platinum Coin |
Other | N/A | Basic | 1 |
| Field Notes on Lyon, Part II | Other | N/A | Basic | 1 |
| Field Notes on Menenius, Part II | Other | N/A | Basic | 1 |
| Forgotten Fragment of Artistry | Other | N/A | Basic | 1 |
 The Diablo Armament
| Name | Type | Item Level | Rarity | Quantity |
|---|---|---|---|---|
| Bozjan Platinum Coin |
Other | N/A | Basic | 3 |
| Raw Emotion |
Other | N/A | Basic | 3 |
| Field Notes on the Diablo Armament | Other | N/A | Basic | 1 |
| Deinonychus Horn | Other | N/A | Basic | 1 |
| Wrath of the Harrier Orchestrion Roll | Orchestrion Roll | N/A | Basic | 1 |


